To install Octopus using autoconf, you will need to dnf install the autoconf, automaker, autogen packages
dnf install autoconf automake autogen
Preparing the Configure file using Autoreconf tools
After downloading from https://octopus-code.org/documentation/15/releases/ and unzip and untar, you must prepare the environment to generate the configure file. Do take a look at INSTALL and README files.
autoreconf --install
Prepare the PATH and LD_LIBRARY_PATH Environment
If you are using Module Environment, it will be much easier, if not, you have to configure $PATH and $LD_LIBRARY_PATH
If you wish to disable ipv6 on Rocky Linux 8, there is a wonderful writeup on the script found at https://github.com/juju4/ansible-ipv6/blob/main/tasks/ipv6-disable.yml which you may find useful. If you just need to disable it temporarily without disruption (assuming you have not been using ipv6 at all)
If you are using a MacOS and you are planning to do a X-forwarding, you may notice an error like this. In the Pix, below, after SSH, I wanted to X-forward Firefox Browser from Rocky Linux 8
ssh -X user1@192.168.0.1
There are a few settings we need to do. Let’s fix the “Locale not supported by C library. Using the fallback ‘C’ locale”
Issue 1 – Locale not support by C library. Using the fallback ‘C’ locale
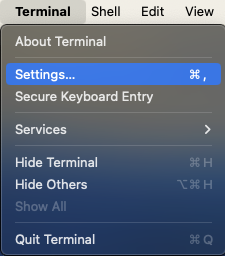
To fix it, go to Top-Left-Hand Corner of your Mac-Desktop to look for the Terminal App,
Click “Settings” (Pix 1)
Click the Profiles Icons (Pix 2)
Uncheck the “Set locale environment variable on startup” (Pix 2)
Close and Quit Terminal App and come in again. You should fix the first problem.
Issue 2 – Install XQuartz
X11 used to be included with macOS. Apple no longer includes X11 with macOS. That is why you see an error like this “Error: no DISPLAY environment variable specified.”
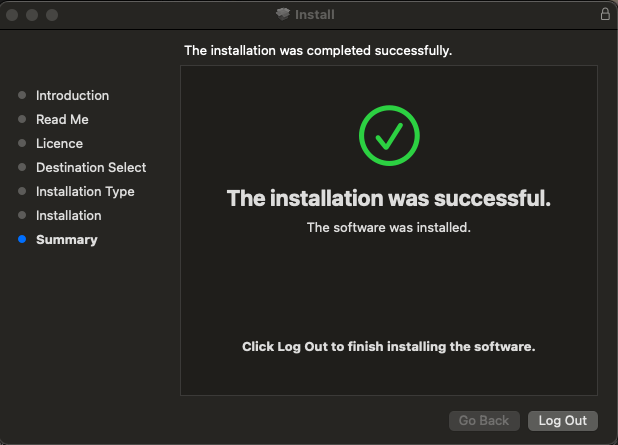
You have to download the XQuartz App which is an open-source effort to develop a version of the X.Org X Window System that runs on macOS. Downloading and Installing is very straight-forward and easy. I’ve captured selected screen-shots….
After installing, you may want to let is run in the background
Log-Off from Your Mac Completely to allow the settings to reinitate
If you are using NetworkManager, it can override your /etc/resolv.conf customised settings. To prevent Network Manager from doing that, you can do the following
I was installing Rocky Linux 8.7 on a Supermicro Server with Intel VirtualRAID. I could not boot to Rocky Linux 8.7, the Install Screen could not be presented. Instead, there are repeated errors like the one below on the screen.
“DMAR: [INTR-REMAP] Request device [bc:00.5] fault index 0x8000 [fault reason 0x25] Blocked a compatibility format interrupt request”
Resolution A problem with the inbox Intel®️ VMD driver included in RHEL 8.7 and 9.0 was identified, and it is necessary to add the boot parameter intremap=off to the kernel command line while installing the operating system. This will prevent the operating system from encountering any problems.
This particular issue has been fixed via a kernel update and has been implemented in RHEL 9.1.
it is necessary to add the boot parameter intremap=off to the kernel command line while installing the operating system
If you have migrated to a new ABAQUS License Server and is planning to point your ABAQUS Linux Client to the new License Server. Here are the simple steps you will need to do
Step 1: Find the custom_v6.env files to edit.
Depending on how you install, for me I like to put everything in /usr/local so my abaqus will be placed there.
# cd /usr/local/abaqus-2023/SIMULIA/EstProducts/2023/linux_a64/SMA/site/
# vim custom_v6.env
Step 2: Edit the custom_v6.env file
Add the abaquslm_license_file = “27398@XXX.XXX.XXX.XXX”
# Installation of Established Products 2023
# Wed Oct 11 13:30:54 2023
plugin_central_dir="/usr/local/abaqus-2023/DassaultSystemes/SIMULIA/CAE/plugins/2023"
# retrieve licensing configuration from EstablishedProductsConfig.ini
importEnv('licensing.env')
abaquslm_license_file = "27398@XXX.XXX.XXX.XXX"
If you are having SSH issues and if you turned on high verbosity and the following output is generated
# ssh -vvv XXX.XXX.XXX.XXX
.....
.....
debug1: Offering public key: debug3: send packet: type 50
debug2: we sent a publickey packet, wait for reply
debug3: receive packet: type 51
.....
.....
debug2: we did not send a packet, disable method
debug1: No more authentication methods to try.
user1@192.168.0.1: Permission denied (publickey,gssapi-with-mic,password)
According to SSH protocol (RFC 4252), these are the general authentication message codes
Type 2: Incorrect Configuration Settings on the /etc/ssh/sshd_config (Assuming you are using Password Authentication) Inside /etc/ssh/sshd_config, you should have something like
PermitRootLogin no
.....
PasswordAuthentication yes
.....
ChallengeResponseAuthentication no
.....
GSSAPIAuthentication yes
GSSAPICleanupCredentials no
.....
UsePAM yes
Type 2: Incorrect Configuration Settings on the /etc/ssh/ssh_config In Rocky Linux 8, everything should be commented except the last line “Include /etc/ssh/ssh_config.d/*.conf”