Joining RHEVM-Manage-Domain tool to join AD Domain

Do note that for Red Hat Enterprise Virtualization you must attach a directory server to the Manager using the Domain Management Tool, engine-manage-domains. This configuration sis for RHEV 3.5
Active Directory
Identity Management (IdM)
Red Hat Directory Server 9 (RHDS 9)
OpenLDAP

# rhevm-manage-domains add --domain=your_active_directory_domain --user=spmstest --provider=ad

Restart the ovirt-engine

# service ovirt-engine restart

Install Windows 7 with VirtIO Drivers on RHEV 3.4

One of the best ways to improve the performance of Microsoft Windows guest is to use paravirtualised devices and drivers for KVM in the guests. This provides close to bare performance (up to 95%). These drivers are provided by the virtio-win RPM packages in the RHEL.

1. The virtio-win packages can be found on RHEL server /usr/share/virtio-win/

# ls -l /usr/share/virtio-win/
drwxr-xr-x. 4 root root      4096 Oct 13 10:24 drivers
drwxr-xr-x. 2 root root      4096 Oct 13 10:24 guest-agent
-rw-r--r--. 1 root root   2949120 May 29  2014 virtio-win-1.7.1_amd64.vfd
-rw-r--r--. 1 root root 149004288 May 29  2014 virtio-win-1.7.1.iso
-rw-r--r--. 1 root root   2949120 May 29  2014 virtio-win-1.7.1_x86.vfd
lrwxrwxrwx. 1 root root        26 Oct 13 10:24 virtio-win_amd64.vfd -> virtio-win-1.7.1_amd64.vfd
lrwxrwxrwx. 1 root root        20 Oct 13 10:24 virtio-win.iso -> virtio-win-1.7.1.iso
lrwxrwxrwx. 1 root root        24 Oct 13 10:24 virtio-win_x86.vfd -> virtio-win-1.7.1_x86.vfd

You may want to add these images to the ISO Library, you can attach the virtio-drivers-*.vfd image to the virtual floppy drier beofre manually installing Windows

2. The rhev-tools-setup.iso image found in the usr/share/rhev-guest-tools-iso

# ls -l /usr/share/rhev-guest-tools-iso
-rw-r--r--. 1 root root    177272 Jul 29 16:30 LICENSES
-rw-r--r--. 1 root root 350181376 Jul 29 16:30 RHEV-toolsSetup_3.4_9.iso
lrwxrwxrwx. 1 root root        57 Oct 13 10:23 rhev-tools-setup.iso -> /usr/share/rhev-guest-tools-iso/RHEV-toolsSetup_3.4_9.iso
-rw-r--r--. 1 root root       924 Jul 29 16:30 SOURCES

3. Upload drivers and tools to the ISO Storage Domain

# rhevm-iso-uploader -u admin@internal list 
Please provide the REST API password for the admin@internal oVirt Engine user (CTRL+D to abort):
ISO Storage Domain Name   | Datacenter                | ISO Domain Status
dmn_ixora_iso_vol         | RH_Resource               | active
# rhevm-iso-uploader -u admin@internal --iso-domain=dmn_ixora_iso_vol upload  /usr/share/virtio-win/virtio-win-1.7.1_x86.vfd /usr/share/rhev-guest-tools-iso/rhev-tools-setup.iso
Please provide the REST API password for the admin@internal oVirt Engine user (CTRL+D to abort):

4. Create the new VM using the RHEV Manager

Remember to click the “Run Once”
Under the “Boot Option”,
– Attached the virtio-win-1.7.1_amd.vfd to the floppy
– Attached the MS Windows 7 ISO to the CD
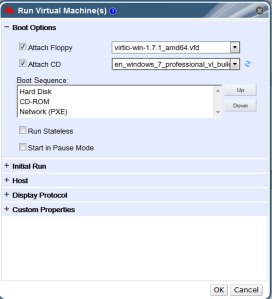
RHEV_Windows7_OS

5. Update Ethernet Drivers, PCI Simple Communication Controller by attaching the RH
RHEV_Windows7_OS_Drivers

6. Once you have booted to Windows 7, go to Device Manager and run an update for the missing Ethernet, storage controller

Windows7_DeviceManager

You should see
– Red Hat VirtIO SCSI controller,
– Red Hat VirtIO SCSI pass-through controller
– Red Hat VirtIO Ethernet Adapter

Checking for Constant Time Stamp Counter

A Constant Time Stamp Counter is included in more recent Intel Processors (TSC) to reads at the processor’s maximum rate regardless of the actual CPU running rate. While this makes time keeping more consistent, but it can skew benchmarks, where a certain amount of spin-up time is spent at a lower clock rate before the OS switches the processor to the higher rate. For more information on Time Stamp Counter, do look at Time Stamp Counter (wikipedia)

To check whether your CPU support TSC, you can issue the command

# grep -q constant_tsc /proc/cpuinfo && echo "Constant TSC detected" || echo "No Constant TSC Detected"

Creation of Logical Networks on RHEV

Logical Networks allow segregation of different types of traffic. According to Red Hat Training Manual, it is recommended to have 3 types of network

  1. Management Network – Network to connect hypervisor (RHEV-H) nodes to the RHEV Manager
  2. Storage Network – Network to connect RHEV-H  to NFS and iSCSI. If you are using FC, there is no need to create a separate network since it is using SAN
  3. Public Network –  Connect the Gateway Router, the RHEV-M systems and RHEV-H Nodes


Configure Logical Networks

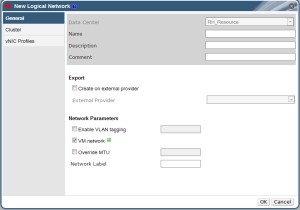
Data Centre > Networks > New Loginal Networks

NewLogicalNetwork


Configure Network Mac Address Pool

1. View Current Settings

# rhevm-config -g MacPoolRanges
MacPoolRanges: 00:1a:4a:9f:7e:00-00:1a:4a:9f:7e:ff version: general

2. Set the Mac range to 52:54:00:56:00:01 – 52:54:00:56:00:FF

# rhevm-config -s MacPoolRanges=52:54:00:56:00:01-52:54:00:56:00:FF

3. Restart ovirt-engine engine

# service ovirt-engine restart

Displaying SPICE on the VM network for RHEV 3.4

By default, SPICE graphic server somehow by default uses the management network to display the console. Usually the management network is not visible to the users.

For RHEV 3.4, this can be easily resolve on the RHEV Manager console

  1. Portal > Networks
  2. Click on the Network you wish SPICE graphic Server to display on
  3. Click “Manage Network”
  4. Click “Display Network”


Once configured. Remember to REBOOT all the VMs to activate the changes

RHEV_SPICE


Installing and Configuring Red Hat Enterprise Virtualisation

Step 1: Ensure that you have subscribed to Red Hat Virtualisation Channels. For more information, see Subscribing to Red Hat Virtualisation Manager Channels

Step 2: Install RHEVM packages.

This will take a while…… 1.6GB of downloads…….

# yum install rhevm rhevm-reports

Step 3: Link the Directory Server to the Red Hat Enterprise Virtualisation Manager.

See Joining RHEVM-Manage-Domain tool to join AD Domain

Step 4: Install RHEV manager

# rhevm-setup

Step 5: Go to the website – Administration Portal

RHEV_portal

Step 6: Logon to the Portal with admin

RHEV_Portal2

Step 7: Create Data Centre

Step 8: Create and Populate a New ISO NFS Storage Domain

Step 9: Creation of Logical Network

Step 10: Creation of Windows 7 with Virtio

Using log collector in RHEV 3.3 and above to collect full log

The Log Collector Utility for RHEV 3 is located in /usr/bin/rhevm-log-collector and is provided by the rhevm-log-collector package installed on the RHEV manager system.

1. To collect all the information, use command

# engine-log-collector
INFO: Gathering oVirt Engine information...
INFO: Gathering PostgreSQL the oVirt Engine database and log files from localhost...
Please provide the REST API password for the admin@internal oVirt Engine user (CTRL+D to skip):
About to collect information from 1 hypervisors. Continue? (Y/n): y
INFO: Gathering information from selected hypervisors...
INFO: collecting information from 192.168.50.56
INFO: finished collecting information from 192.168.50.56
Creating compressed archive...

2. To collect information from selected hosts ending with ending in .11 and .15

# engine-log-collector --hosts=*.11,*.15

3. To collect information from the RHEV-M only

# engine-log-collector --no-hypervisors

References

  1. https://access.redhat.com/solutions/61546

RHEV 3.4 – Explanation of Settings in the New Data Center and Edit Data Center Windows

The table below describes the settings of a data center as displayed in the New Data Center and Edit Data Center windows. Invalid entries are outlined in orange when you click OK, prohibiting the changes being accepted. In addition, field prompts indicate the expected values or range of values.

Figure 1: RHEVM Portal –

RHEV_Data-Centres

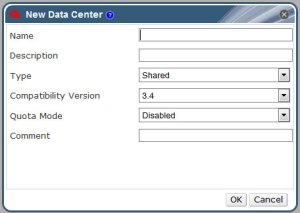
Figure 2: RHEVM – Adding New Data Centre

RHEV_Data-Centres-AddNew

Details on each items

Field
Description/Action
Name
The name of the data center. This text field has a 40-character limit and must be a unique name with any combination of uppercase and lowercase letters, numbers, hyphens, and underscores.
Description
The description of the data center. This field is recommended but not mandatory.
Type
The storage type. Choose one of the following:
  • Shared
  • Local
The type of data domain dictates the type of the data center and cannot be changed after creation without significant disruption. Multiple types of storage domains (iSCSI, NFS, FC, POSIX, and Gluster) can be added to the same data center, though local and shared domains cannot be mixed.
Compatibility Version
The version of Red Hat Enterprise Virtualization. Choose one of the following:
  • 3.0
  • 3.1
  • 3.2
  • 3.3
  • 3.4

After upgrading the Red Hat Enterprise Virtualization Manager, the hosts, clusters and data centers may still be in the earlier version. Ensure that you have upgraded all the hosts, then the clusters, before you upgrade the Compatibility Level of the data center.

Quota Mode
Quota is a resource limitation tool provided with Red Hat Enterprise Virtualization. Choose one of:

  • Disabled: Select if you do not want to implement Quota
  • Audit: Select if you want to edit the Quota settings
  • Enforced: Select to implement Quota