Harnessing the Advantages of Edge AI

Article taken from HPCWire “Harnessing the Advantages of Edge AI”

You can enjoy a number of advantages when you deploy edge AI applications. It’s about empowering your users in the field to convert data to value in real-time.

  • Real-Time Insights – Equip your users with real-time information, from business intelligence to military strategy to updated patient health data.
  • Faster Decision Making – Your users can react much more quickly to real-time information and make quicker, more informed decisions.
  • Increased Automation – Train your machines or devices to perform autonomous tasks and maximize efficiency.
  • Enhanced Privacy – Keeping more data closer to the edge means having to send less of it to the cloud, thereby increasing opportunities for data breaches.

Do go to the article for full read. Harnessing the Advantages of Edge AI

Advertisement

Basic Introduction to GitHub (Part 1)

GitHub is the largest code-hosting platform in the world. It uses Git as version control and the repository is based on GitHub. Features such as Pull Requests, Project Boards and GitHub are central and found in one place.

Sign up for a Free Account

To start using GitHub, please go to https://github.com/join and follow the instruction

Creating a PAT of SSH Key

A PAT is a string of characters that can be used in place of a password against the GitHub API and on command lone.

You may need to understand the various scopes on GitHub such as repo, admin: repo_hook, users etc. For more information, do take a look at https://docs.github.com/en/developers/apps/building-oauth-apps/scopes-for-oauth-apps#available-scopes

For starters, you may want to go to https://github.com/settings/tokens and click on Generate new token

On Linux, you can generate your SSH key using the email that you have created in your GitHub User Account

[user1@node1 ~]$ ssh-keygen -t rsa -C "myemail_used_in_Github@hotmail.com"
Generating public/private rsa key pair.
Enter file in which to save the key (/home/user1/.ssh/id_rsa):
/home/user1/.ssh/id_rsa already exists.
Overwrite (y/n)? y
Enter passphrase (empty for no passphrase):
Enter same passphrase again:
Your identification has been saved in /home/user1/.ssh/id_rsa.
Your public key has been saved in /home/user1/.ssh/id_rsa.pub.
The key fingerprint is:
........
........

Adding the SSH Key to the ssh-agent

Although this is not mandatory, adding the SSH Key to the SSH Agent is a good practice that will keep the SSH Key safe. The SSH-agent is an SSH Key Manager that helps to keep the SSH key safe because it protects your SSH keys from being exported. The SSH Agent also saves you from having to type the passphrase you create. every time your SSH key is used.

Before you check, you want to check your ~/.ssh/config first

$ vim ~/.ssh/config
Host * 
AddKeysToAgent yes

At the Terminal,

$ ssh-add ~/.ssh/id_rsa

Copy your SSH Public Key to the field. In your ~/.ssh/config, it should have a .pub extension like id_rsa.pub

Configuring Git

To intialise the Git. Do the following. You may want to take a look at

[user1@node1 ~]$ git config --global user.name "Melvin Soh"
[user1@node1 ~]$ git config --global user.email "kittycool@hotmail.sg"
[user1@node1 ~]$ git config --global init.defaultBranch main
[user1@node1 ~]$ git config --list
credential.helper=netrc -f ~/.netrc.gpg -v
user.name=user1
user.email=myemail_used_in_Github@hotmail.com
init.defaultbranch=main

To continue, See Basic Introduction to GitHub (Part 2)

References:

  1. 1.5 Getting Started – Installing Git
  2. 1.6 Getting Started – First-Time Git Setup

Compiling GCC-10.4.0 on CentOS-7

Step 1: Download the TarBall version of GCC version. If you want to take look at all the available versions, you can take a look at http://ftp.mirrorservice.org/sites/sourceware.org/pub/gcc/releases/

For this blog entry, we will install GCC-10.4.0. First thing first, let’s get the Tarball

% wget http://ftp.mirrorservice.org/sites/sourceware.org/pub/gcc/releases/gcc-10.4.0/gcc-10.4.0.tar.gz

Step 2: Make sure the bzip2 is available in the System

% yum install bzip2 bzip2-devel

Step 3: Untar the TarBall

% tar -zxvf gcc-10.4.0.tar.gz
% cd gcc-10.4.0 

Step 4: Download the prerequisites and start configuring the GCC

% ./contrib/download_prerequisites
% ./configure --prefix=/usr/local/gcc-10.4.0 --disable-multilib --enable-languages=all
% make -j 8
% make install

Step 5: Verify the Installation

% gcc --version

ModuleNotFoundError: No module named ‘torch’ for OneAPI AI Toolkit

If you are using OneAPI Environment, and if you are having this issue

ModuleNotFoundError: No module named 'torch'

Here are some steps, you may wish to use to troubleshoot.

Make sure you activated the oneAPI environment using below command

% source /usr/local/intel/oneapi/2021.3/setvars.sh

:: initializing oneAPI environment ...
   -bash: BASH_VERSION = 4.2.46(2)-release
:: clck -- latest
:: compiler -- latest
:: dal -- latest
:: debugger -- latest
:: dev-utilities -- latest
:: inspector -- latest
:: intelpython -- latest
:: ipp -- latest
:: itac -- latest
:: LPOT -- latest
:: mkl -- latest
:: modelzoo -- latest
:: mpi -- latest
:: pytorch -- latest
:: tbb -- latest
:: tensorflow -- latest
:: oneAPI environment initialized ::

You might want to check the conda environment

% conda info --envs

# conda environments:
#
myenv                    /myhome/melvin/.conda/envs/myenv
myfsl                    /myhome/melvin/.conda/envs/myfsl
base                  *  /usr/local/intel/oneapi/2021.3/intelpython/latest
2021.3.0                 /usr/local/intel/oneapi/2021.3/intelpython/latest/envs/2021.3.0
myoneapi                 /usr/local/intel/oneapi/2021.3/intelpython/latest/envs/myoneapi
pytorch                  /usr/local/intel/oneapi/2021.3/intelpython/latest/envs/pytorch
pytorch-1.8.0            /usr/local/intel/oneapi/2021.3/intelpython/latest/envs/pytorch-1.8.0
tensorflow               /usr/local/intel/oneapi/2021.3/intelpython/latest/envs/tensorflow
tensorflow-2.5.0         /usr/local/intel/oneapi/2021.3/intelpython/latest/envs/tensorflow-2.5.0
                         /usr/local/intel/oneapi/2021.3/pytorch/1.8.0
                         /usr/local/intel/oneapi/2021.3/tensorflow/2.5.0

Activate Pytorch

% conda activate pytorch
% python
% (pytorch-1.8.0) [user1@node1 ~]$ python
Python 3.7.10 (default, Jun  4 2021, 06:52:02)
[GCC 9.3.0] :: Intel Corporation on linux
Type "help", "copyright", "credits" or "license" for more information.
Intel(R) Distribution for Python is brought to you by Intel Corporation.
Please check out: https://software.intel.com/en-us/python-distribution
>>> import torch

If you are still having the error “ModuleNotFoundError: No module named ‘torch’ “

You may want to install directly if you have root access

% conda install pytorch torchvision cpuonly -c pytorch

If not, you may want to create a private environment similar to Creating Virtual Environment with Python using venv

References:

320 mini computers make mega mainframe

The Full Article can be found at Supercomputer at SSCC: 320 mini computers make mega mainframe

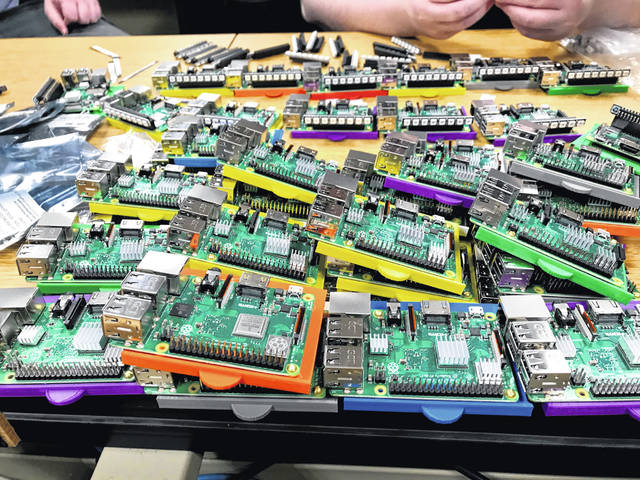
A supercomputer capable of searching the outer limits of space for alien life and helping stop the spread of COVID-19 is located close to home at Southern State Community College, where computer science students learned valuable knowledge and skills in their field by building it themselves. “This is an amazing example of student-selected, project-based learning,” said Computer Science Professor Josh Montgomery. “This project took a wide range of skills to complete.”

According to Montgomery, the supercomputer is composed of 320 Raspberry Pi 3 mini computers with access to 1,280 processing cores and 320 gigabytes of Random Access Memory storage, making it a powerful device with many capabilities. Montgomery said the computer has crunched data for programs like the Search for Extraterrestrial Intelligence, which is an effort to detect evidence of technological civilizations that may exist elsewhere in the universe, particularly in our galaxy, according to its website.

References:

Supercomputer at SSCC: 320 mini computers make mega mainframe

Updating fonts size GUI xfce4-settings-manager

If you feel that your font size is too small, you can change the font size by issuing the command

% ssh -X userid@remoteserver

If you are using xfce4, you can xfc4-settings-manager to change the font size settings by typing on the command line

% xfce4-settings-manager

You will see something like this. Click “Settings Others” under Others Category

Look for xsettings > “Sans 12”

Altair acquires Univa and Ellexus

Altair, (Nasdaq: ALTR) a global technology company providing solutions in data analytics, product development, and high-performance computing (HPC), today announced the acquisition of Univa, a leading innovator in enterprise-grade workload management, scheduling, and optimization solutions for HPC and artificial intelligence (AI) on-premises and in the cloud.

For more information, see Altair Acquires Univa

HPC + AI Wall Street

HPC + AI Wall Street is formulated to advance the understanding of market-ready innovations, enabling growth, new revenue streams, and competitive advantages. This leading conference highlights successful use cases, showcasing thought leaders and driving next-generation advancements in Capital Markets.
HPC + AI Wall Street 2020 is an information-packed day of world-class Financial Services thought leaders in two tracks — Leadership and DevOps. Our virtual trade show of online exhibits and immersive collaborations provides interactive customer engagement opportunities.

To Register https://www.hpcaiwallstreet.com/attend/

xRDP Connection Errors on CentOS 6

After yum install xrdp and starting the service, I encountered the error during remote desktop to the Linux Box.

connecting to sesman ip 127.0.0.1 port 3350
sesman connect ok
sending login info to session manager, please wait...
xrdp_mm_process_login_reponse: login successful for display
started connecting
connecting to 127.0.0.1 5910
error - problem connecting

At the /var/log/xrdp-sesman.log

......
[20141118-23:53:40] [ERROR] X server for display 10 startup timeout
[20141118-23:53:40] [INFO ] starting xrdp-sessvc - xpid=2998 - wmpid=2997
[20141118-23:53:40] [ERROR] X server for display 10 startup timeout
[20141118-23:53:40] [ERROR] another Xserver is already active on display 10
[20141118-23:53:40] [DEBUG] aborting connection...
[20141118-23:53:40] [INFO ] ++ terminated session:  username root, display :10.0
.....

I have installed the necessary GNOME Desktop packages. Installing GNOME Desktop on CentOS 6 on a console before installing xrdp.

But the solution is quite simple. You need to install the tigervnc-server package and just the tigervnc only.

# yum install tigervnc-server

Restart the xrdp again.

# service xrdp restart