showmount fails with clnt_create: RPC: Program not registered from a NFS client communicating with a NetApp filer

1. Assuming this is your mount command

mount -t nfs -o vers=3 XXX.XXX.XXX.XXX:/myserver/nfs /myclient/nfs


2. And if you are using showmount command from an NFS client and the following are observed

clnt_create: RPC: Program not registered


3. You have to access the NetApp Storage to check the NFS Protocol is enabled. I’m using the Netapp OnCommand System Manager

4. Check that the NFS Client can mount.

showmount --no-headers -e nfs_server
/ (everyone)

References:

  1. showmount fails with clnt_create: RPC: Program not registered when executed from a RHEL6 NFS client communicating with a NetApp filer

Remove Mapping of Null User to Windows User or Group in NetAPP

If you need to remove the mapping of null users to windows user or group in NetApp, it can be done with the following steps

Step 1: Set the privilege level to advanced:

# set -privilege advanced

Step 2: Configure the restrict anonymous setting:

# vserver cifs options modify -vserver vserver_name -restrict-anonymous {no-restriction|no-enumeration|no-access}

Step 3: Verify that the option is set to the desired value:

vserver cifs options show -vserver vserver_name

Step 4: Return to the admin privilege level:

set -privilege admin

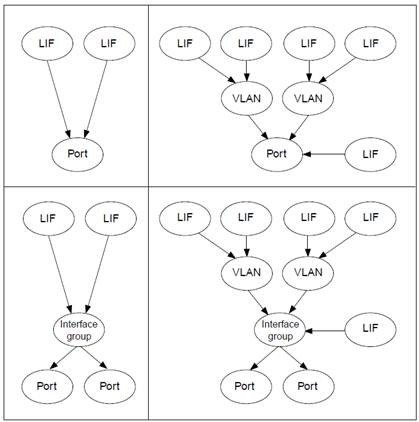
Resolving downed Interface Group on NetApp Cluster-Mode

netapp-cluster1::*>netapp-cluster1::> network int show
            Logical    Status     Network            Current       Current Is
Vserver     Interface  Admin/Oper Address/Mask       Node          Port    Home
----------- ---------- ---------- ------------------ ------------- ------- ----
acai-cluster1
            cluster_mgmt up/up    192.168.2.77/24    acai-cluster1-02
                                                                   a0a     true
acai-cluster1-01
            SM_lif       up/up    192.168.2.141/19   acai-cluster1-01
                                                                   a0a     true
            clus1        up/up    169.254.10.11/16   acai-cluster1-01
                                                                   e1a     true
            clus2        up/up    169.254.10.12/16   acai-cluster1-01
                                                                   e1b     true
netapp-cluster1::*> network port show
Auto-Negot  Duplex     Speed (Mbps)
Node   Port   Role         Link   MTU Admin/Oper  Admin/Oper Admin/Oper
------ ------ ------------ ---- ----- ----------- ---------- ------------
netapp-cluster1-01
a0a    data         down  1500  true/-     auto/-      auto/-
e0a    data         up    1500  true/true  full/full   auto/1000
e0b    data         up    1500  true/true  full/full   auto/1000
e0c    data         up    1500  true/true  full/full   auto/100
e0d    data         up    1500  true/true  full/full   auto/1000

2. If you have a LIF that should be on that node; do the following:
The purpose is to let another node within the cluster to be the home-node for the data and mgmt while you up and down the interface group

netapp-cluster1::*> net int modify -vserver vs_StorageVNode11  -lif vs_StorageVNode11_data1 -home-node netapp-cluster1-02 -home-port a0a
netapp-cluster1::*> net int modify -vserver vs_StorageVNode11  -lif vs_StorageVNode11_mgmt1 -home-node netapp-cluster1-02 -home-port a0a
net int revert *

3. Remove the Interface Group from the -port e0c and down and up the e0c port

netapp-cluster1::*> ifgrp remove-port -node netapp-cluster1-01 -ifgrp a0a -port e0c
netapp-cluster1::*> net port modify -node netapp-cluster1-01 -port e0c -up-admin false
netapp-cluster1::*> net port modify -node netapp-cluster1-01 -port e0c -up-admin true
netapp-cluster1::*> net port show -node netapp-cluster1-01 -port a0a,e0c

Once If e0c shows up and at auto/1000, add the interface and return the interface group back to netap-cluster-01

netapp-cluster1::*> ifgrp add-port -node netapp-cluster1-01 -ifgrp a0a -port e0c
netapp-cluster1::*> net port show -node netapp-cluster1-01 -port a0a
netapp-cluster1::*> net int modify -vserver vs_StorageVNode11 -lif vs_StorageVNode11_data1 -home-node netapp-cluster1-01 -home-port a0a
netapp-cluster1::*> net int modify -vserver vs_StorageVNode11 -lif vs_StorageVNode11_mgmt1 -home-node netapp-cluster1-01 -home-port a0a
netapp-cluster1::*> net int revert *

Node, port and Lif Information for NetApp

Useful References

  1. How to determine the node, port, or lif to which a client should be connected
    https://kb.netapp.com/support/index?page=content&id=1013873&locale=en_US&access=s
  2. How to determine why a lif is on a certain port or node
    https://kb.netapp.com/support/index?page=content&id=1013874&locale=en_US&access=s
  3. Enabling and reverting LIFs to home ports
    https://library.netapp.com/ecmdocs/ECMP1636041/html/GUID-7865FB3E-F57B-4976-803D-A87F2F760342.html

Enabling Predictive Cache Statistics (PCS) for Data OnTap 8.2p

* node1 is the controller currently primary to the aggregate/vol/LUN.

Step 1: Enable PCS

node1::> node run –node node1
node1::> options flexscale.enable on
node1::>options flexscale.enable
flexscale.enable pcs  you should see this
node1::>options flexscale.pcs_size 330GB  based on 3 x 200GB SSD RAID4

Step 2: Allow the representative workload to run and Run your workload

Step 3: Collect data throughout the process

node1::>stats show -p flexscale-access

NetApp recommends issuing this command through an SSH connection and logging the output throughout the observation period because you want to capture and observe the peak performance of the system and the cache. This output can also be easily imported into spreadsheet software, graphed, and so on.

This process initially provides information on the “cold” state of the emulated cache. That is, no data is in the cache at the start of the test, and the cache is filled as the workload runs. The best time to observe the emulated cache is once it is filled, or “warmed”, as this will be the point when it enters a steady state.
Filling the emulated cache can take a considerable amount of time and depends greatly on the workload.

References:

  1. Introduction to Predictive Cache Statistics
  2. Clustered_Data_ONTAP_82_System_Administration

NetApp Visual Storage Console (VSC)5.0 Plugin for VCentre 5.5

VSC 5.0 is a major change that includes a new look and seamless integration with the VMware vSphere Web Client. New features in this release include support for the following:

  • The VMware vSphere Web Client
  • VASA Provider for clustered Data ONTAP®
  • SnapVault integration as a backup job option for clustered Data ONTAP
  • Adding a virtual machine or datastore to an existing backup job
  • Numerous bug fixes

VSC 5.0 discontinues support for the following:

  • vCenter 5.1 and earlier
  • VMware Desktop client
  • 32-bit Windows installations
  • mbralign
  • Single File Restore
  • Datastore Remote Replication
  • Flash Accel

To download, see  http://mysupport.netapp.com/NOW/download/software/vsc_win/5.0/

Documentation, see NetApp Visual Storage Console (VSC) 5.0