Using SMART to predict the likelihood for disk failure

Modern Hard Disk implements a System called SMART (Self-Monitoring, Analysis and Reporting) that uses the electronics on the drive to store diagnostic and perform various tests which will help in the prediction of imminent failure of the Hard Disk.

Enable SMART in BIOS

Check and Enabled in the Computer’s BIOS/firmware menu if it not defaulted

Install smartmontools

# dnf install smartmontools

Check SMART data can be accessed

# smartctl --info /dev/sdb

SMART health check

# smartctl --health /dev/sdb

Depending on the amount of information. You need to either run a short test or a long run

# smartctl --test=short /dev/sdb
# smartctl --test=long /dev/sdb

When the smartctl test has completed, do take a look at

# smartctl --log=selftest /dev/sdb

Understanding the Difference between QSFP, QSFP+, QSFP28

Sometimes I use these terms loosely. Here an article that explain the 3 fiber optic transceivers QSFP, QSFP+ and QSFP28

Taken from the article “Difference between QSFP, QSFP+, QSFP28

Here are some main points

  1. The QSFP specification supports Ethernet, Fibre Channel, InfiniBand and SONET/SDH standards with different data rate options.
  2. QSFP transceivers support the network link over singlemode or multimode fiber patch cable.
  3. Common ones are 4x10G QSFP+, 4x28G QSFP28
  4. QSFP+ are designed to support 40G Ethernet, Serial Attached SCSI, QDR (40G) and FDR (56G) Infiniband, and other communication standards
  5. QSFP+ modules integrate 4 transmit and 4 receive channels plus sideband signals. Then QSFP+ modules can break out into 4x10G lanes. 
  6. QSFP28 is a hot-pluggable transceiver module designed for 100G data rate.
  7. QSFP28 integrates 4 transmit and 4 receiver channels. “28” means each lane carries up to 28G data rate.
  8. QSFP28 can do 4x25G breakout connection, 2x50G breakout, or 1x100G depending on the transceiver used.
  9. Usually QSFP28 modules can’t break out into 10G links. But it’s another case to insert a QSFP28 module into a QSFP+ port if switches support.
  10. QSFP+ and QSFP28 modules can support both short and long-haul transmission.

Disk performance

Storage Benchmarking

There are 4 things that you may want to consider

I/O Latency
I/O latency is defined simply as the time that it takes to complete a single I/O operation. For a conventional spinning disk, there are 3 sources of latency – seek latency, rotational latency and transfer time.

  1. Command Overhead
  2. Seek Latency is how long it takes for the disk head assembly to travel to the track of the disk where the data will be read/written. The fastest high-end server drives today to have a seek time around 4 ms. The average desktop disk is around 9ms (Taken from Wikipedia)
  3. Rotational Latency is the delay taken for the rotation fo the disk to bring the disk sector under the read-write-head. For a 7200 rpm disk, latency is around 4.17 ms (Taken from Wikipedia)
  4. Transfer Time is the time taken for the time it takes to transmit or move data from one place to another. Transfer time equals transfer size divided by data rate.
Typical HDD figures (From Wikipedia)
HDD spindle
speed [rpm]
Average
rotational
latency [ms]
4,200 7.14
5,400 5.56
7,200 4.17
10,000 3.00
15,000 2.00

So the simplistic calculation

overhead + seek + latency + transfer
0.5ms + 4ms  + 4.17ms + 0.8ms = 9.47ms

Acceptable I/O

A question frequently asked is what is the acceptable I/O? According to the Kaminario site, which states that
The Avg. Disk sec/Read performance counter indicates the average time, in seconds, of a read of data from the disk. The average value of the Avg. Disk sec/Read performance counter should be under 10 milliseconds. The maximum value of the Avg. Disk sec/Read performance counter should not exceed 50 milliseconds.


References:

  1. What Is an Acceptable I/O Latency?
  2. Disk Performance
  3. Difference between Seek Time and Rotational Latency in Disk Scheduling


Trying to allocate 1005 pages for VMLINUZ error when booting with RHEL or CentOS 6.5 disks

VMLINUZ2

I was booting the RHEL 6.5 or CentOS 6.5 on a IBM PureFlex System and I have this error. This occurs when When installing Red Hat Enterprise Linux 6 from DVD media the installation will default to native Extensible Firmware Interface (EFI) mode boot. I do not have

According to IBM Website,

The workaround is simply to install the operating system in the traditional legacy mode, since there is generally no reason to install in other than Legacy mode. The workaround is only necessary if the media you are booting defaults to EFI mode (DVD or EFI Preboot eXecution Environment (PXE)) otherwise a legacy installation (e.g. – traditional PXE) is the default and is unaffected by this issue.

To force a legacy installation of the operating system from the EFI bootable DVD media the user should:

Press F12 key when the IBM splash screen is shown during system boot.
Select Legacy Only option and press Enter.
The operating system will boot and install in traditional legacy boot mode.

And the issue was resolved.

References:

  1. Red Hat Enterprise Linux 6 (RHEL6) native Extensible Firmware Interface (EFI) install is not supported with greater than 512 GB memory – IBM System x and BladeCenter
  2. Bug 691860 – UEFI version of ISO fails to boot when >4gig (since f14)

Formatting NVME Partition on CentOS 7

Step 1: Create a partition:

# sudo fdisk /dev/nvme0n1
Choose “n” to create a new partition
Then "p" and "1" for new partition
Using default paratmeter, "w" to write data to disk

Step 2: Create a file system on it:

# sudo mkfs -t ext4 /dev/nvme0n1p1

Step 3: Create a mount point somewhere convenient:

# sudo mkdir /media/nvme

Step 4: Mount the new partition on that mount point:

# sudo mount /dev/nvme0n1p1 /media/nvme

Step 5: Permanently Mount the Device
Step 5a. To find the UUID first

# sudo blkid

Step 5b: To get it to mount every time, add a line to /etc/fstab:

UUID=nvme_UUID /media/nvme ext4 defaults 0 0

(where nvme_UUID is the value taken from “sudo blkid”)

Step 6 (Optional): At this point, the whole thing belongs to ‘root’

To change the ownership to a specific user (with the partition mounted):

# sudo chown -R user:usergroup /media/nvme

Enabling SRIOV in BIOS for IBM Servers and Blade Servers

Step 1: Power on the system, and press F1 to enter the Setup utility.

Step 2: Select System Settings and then Network.

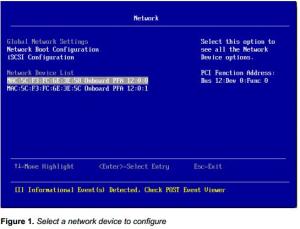
Step 3: Under the Network Device List, select the device to be configured and press Enter to see all the Network Device options (Figure 1).

Bio_Pic1

Step 4: Select the device’s description and press Enter to configure the device (Figure 2)

Bio_Pic2

Step 5: From the selection menu, select Advanced Mode and press Enter to change the value (Figure 3).

Bio_Pic3

Step 6: Choose Enable and press Enter.

Step 7: On the same selection menu, select Controller Configuration and press Enter to enter the configuration menu.

Step 8: Select Configure SRIOV and hit Enter.

Step 9: On the Configure SRIOV page, press Enter to toggle the values

Step 10: Select Enable and press Enter

Step 11: Select Save Current Configurations and press Enter.

Step 12: Press Esc to exit the menu. Then, click Save to save the configuration.

Step 13: Reboot the system.

Installing Voltaire QDR Infiniband Drivers for CentOS 5.4

OS Prerequisites 

  1. RedHat EL4
  2. RedHat EL5
  3. SuSE SLES 10
  4. SuSE SLES 11
  5. Cent OS 5

Software Prerequisites 

  1. bash-3.x.x
  2. glibc-2.3.x.x
  3. libgcc-3.4.x-x
  4. libstdc++-3.4.x-x
  5. perl-5.8.x-x
  6. tcl 8.4
  7. tk 8.4.x-x
  8. rpm 4.1.x-x
  9. libgfortran 4.1.x-x

Step 1: Download the Voltaire Drivers that is fitting to your OS and version.

Do find the link for Voltaire QDR Drivers at Download Voltaire OFED Drivers for CentOS

Step 2: Unzip and Untar the Voltaire OFED Package

# bunzip2 VoltaireOFED-1.5_3-k2.6.18-164.el5-x86_64.tar.bz
# tar -xvf VoltaireOFED-1.5_3-k2.6.18-164.el5-x86_64.tar

Step 3: Install the Voltaire OFED Package

# cd VoltaireOFED-1.5_3-k2.6.18-164.el5-x86_64
# ./install

Step 3a: Reboot the Server

Step 4: Setup ip-over-ib

# vim /etc/sysconfig/network-scripts/ifcfg-ib0
# Voltaire Infiniband IPoIB
DEVICE=ib0
ONBOOT=yes
BOOTPROTO=static
IPADDR=10.10.10.1
NETWORK=10.10.10.0
NETMASK=255.255.255.0
BROADCAST=10.10.255.255
MTU=65520
# service openibd start

Step 5 (Optional): Disable yum repository.

If you plan to use yum to local install the opensmd from the Voltaire package directory, you can opt for disabling the yum.

# vim /etc/yum.conf

Type the following at /etc/yum.conf

enabled=0

Step 6: Install Subnet Manager (opensmd). This can be found under

# cd  $VoltaireRootDirectory/VoltaireOFED-1.5_3-k2.6.18-164.el5-x86_64/x86_64/2.6.18-164.15.1.el5

Yum install the opensmd packages

# yum localinstall opensm* --nogpgcheck

Restart the opensmd service

# service opensmd start

Step 7: Check that the Infiniband is working

# ibstat

 You should get “State: Active”

CA 'mlx4_0'
        CA type: MT26428
        Number of ports: 1
        Firmware version: 2.6.0
        Hardware version: a0
        Node GUID: 0x0008f1476328oaf0
        System image GUID: 0x0008fd6478a5af3
        Port 1:
                State: Active
                Physical state: LinkUp
                Rate: 40
                Base lid: 2
                LMC: 0
                SM lid: 14
                Capability mask: 0x0251086a
                Port GUID: 0x0008f103467a5af1

Step 8: Test Connectivity

At the Server side,

# ibping -S

Do Step 1 to 7 again for the Client. Once done,

# ibping -G 0x0008f103467a5af1 (PORT GUID)

You should see a response like this.

Pong from headnode.cluster.com.(none) (Lid 2): time 0.062 ms
Pong from headnode.cluster.com.(none) (Lid 2): time 0.084 ms
Pong from headnode.cluster.com.(none) (Lid 2): time 0.114 ms
Pong from headnode.cluster.com.(none) (Lid 2): time 0.082 ms
Pong from headnode.cluster.com.(none) (Lid 2): time 0.118 ms

Great! you are done.

Chelsio iWARP Installation and Setup Guide for CentOS 5.4

Most of this material for this blog entry is taken the documentation Guide named Chelsio iWARP installation and setup guide (pdf)  . This Blog Entry  “Chelsio iWARP Installation and Setup Guide for CentOS 5.4” is an modification from a user’s perpective of the original document.

1. Install RPMForge first
You will need some utilities from rpmforge to install iWARP successfully. For more information o install RPMForge, see Installing RPMForge (Linux Toolkits)  

2. Yum Install the following utilities which is required for the iWARP Installation  

# yum install libevent-devel nfs-utils-lib-devel tcl-devel

3.  Download the latest package that matched your Chelsio Network Adapters from Open Fabrics Alliance. Here is the  latest OFED Package Download Site  

4. Unpacked and install the OFED Drivers  

# wget http://69.55.239.13/downloads/OFED/ofed-1.5.1/OFED-1.5.1.tgz
# tar -zxvf OFED-1.5.1.tgz
# cd OFED-1.5.1
# ./install.pl

a. Inside the menu  

1. Choose option 2 to install OFED package.
2. Then choose option 3 to install all OFED libraries.
3. Then choose default options in which come while executing ./install.pl script
to build and install OFED OR 
4. If you are familiar with OFED installation you can choose option 2 then option 4 for
customized installation.

b. If you encounter error like  

file /lib/modules/2.6.18-164.el5/updates/kernel/drivers/net/cxgb3/cxgb3.ko from install of
kernel-ib-1.5.1-2.6.18_164.el5.x86_64 conflicts with file from package
cxgb3toe-1.4.1.2-custom.x86_64

*It is likely that you use the cxgb3toe-1.4.1.2-custom.x86_64.rpm to install the drivers. This immediately conflicts with kernel-ib-1.5.1-2.6.18_164.el5.x86_64.rpm. It is advisisable to install using make && make install. See Installing Chelsio 10GE Driver on CentOS 5.4  

c. Resolution for the error above problem  

# rpm -e  cxgb3toe-1.4.1.2-custom.x86_64.rpm

* Start from Step 4 and do the ./install.pl again.  

5. After installation reboot system for changes to take effect.  

6. Set Chelsio driver option for MPI connection changes.
Give the below command on all systems  

# echo 1 > /sys/module/iw_cxgb3/parameters/peer2peer

OR to make it permanent, add the following line to /etc/modprobe.conf to set the option at module load time:

options iw_cxgb3 peer2peer=1

*The option setting in file /etc/modprobe.conf shall take effect upon system reboot

7. Checking Chelsio iWARP Drivers compatibility with Chrlsio Linux Drivers. There is a whole list as shown in Chelsio iWARP Drivers compatibility with Chelsio Linux drivers. Do take a good look

OFED Package Cxgb3toe-W.X.YY.ZZZ driver Firmware Supported/Not Supported/Not Tested
OFED-1.5.1 Cxgb3toe-1.4.1.2 7.10.0 Not Supported
OFED-1.5.1 Cxgb3toe-1.4.1.2 7.8.0 Supported
OFED-1.5.1 Cxgb3toe-1.4.1.2 7.4.0 Not Supported


8. Installing Chelsio cxgb3toe-W.X.YY.ZZZ driver with OFED-X.Y.Z package. Do follow the blog entry for 

a.  Check Blog Entry on Chelsio iWARP Drivers compatibility with Chelsio Linux drivers. You may not need to do the Performance Tuning.

9. To load the Chelsio iWARP drivers on RHEL 5.4 or CentOS 5.4, add this additional lines to /etc/modprobe.conf

options iw_cxgb3 peer2peer=1
install cxgb3 /sbin/modprobe -i cxgb3; /sbin/modprobe -f iw_cxgb3; /sbin/modprobe rdma_ucm
alias eth1 cxgb3 # assuming eth1 is used by the Chelsio interface

10. Reboot the system to load the new modules

11. After rebooting, you should be have loaded iw_cxgb3 and rdma_ucm module, you should be able to see the ethernet interface(s) for the T3 device. Do configure them with the appropriate ip addresses, netmask etc.

a. Test I: Test Ping
After setting the ipaddress, netmask, gateway etc, you should be able to ping the ethernet interface.

b. Test IIa: Test RDMA (Server Preparation)
To test RDMA, use the rping command that is included in the librdmacm-utils rpm
On the server machine:

# rping -s -a server_ip_address -p 9999

* The server will be “waiting mode” for the client connection

c. Test IIb: Test RDMA (Client Preparation)
You have to setup the clients from Pt 1 to Pt 10 again. If you are using xcat, you may wish to use it to automate the setup of the client.

# rping -c –Vv -C10 -a server_ip_addr -p 9999

* You should see ping data like this on the client

ping data: rdma-ping-0: ABCDEFGHIJKLMNOPQRSTUVWXYZ[\]^_`abcdefghijklmnopqr
ping data: rdma-ping-1: BCDEFGHIJKLMNOPQRSTUVWXYZ[\]^_`abcdefghijklmnopqrs
ping data: rdma-ping-2: CDEFGHIJKLMNOPQRSTUVWXYZ[\]^_`abcdefghijklmnopqrst
ping data: rdma-ping-3: DEFGHIJKLMNOPQRSTUVWXYZ[\]^_`abcdefghijklmnopqrstu
ping data: rdma-ping-4: EFGHIJKLMNOPQRSTUVWXYZ[\]^_`abcdefghijklmnopqrstuv
ping data: rdma-ping-5: FGHIJKLMNOPQRSTUVWXYZ[\]^_`abcdefghijklmnopqrstuvw
ping data: rdma-ping-6: GHIJKLMNOPQRSTUVWXYZ[\]^_`abcdefghijklmnopqrstuvwx
ping data: rdma-ping-7: HIJKLMNOPQRSTUVWXYZ[\]^_`abcdefghijklmnopqrstuvwxy
ping data: rdma-ping-8: IJKLMNOPQRSTUVWXYZ[\]^_`abcdefghijklmnopqrstuvwxyz
ping data: rdma-ping-9: JKLMNOPQRSTUVWXYZ[\]^_`abcdefghijklmnopqrstuvwxyzA
client DISCONNECT EVENT...

12. Great you are done. Read more on how to enable and compile with MPI and iWARP

Chelsio iWARP Drivers compatibility with Chelsio Linux drivers

The material for this Blog Entry is taken from Chelsio iWARP Installation and Setup Guide.

OFED Package Cxgb3toe-W.X.YY.ZZZ driver Firmware Supported/Not Supported/Not Tested
OFED-1.5.1 Cxgb3toe-1.4.1.2 7.10.0 Not Supported
OFED-1.5.1 Cxgb3toe-1.4.1.2 7.8.0 Supported
OFED-1.5.1 Cxgb3toe-1.4.1.2 7.4.0 Not Supported
OFED-1.5.1 Cxgb3toe-1.4.0.8 7.10.0 Not Supported
OFED-1.5.1 Cxgb3toe-1.4.0.8 7.8.0 Supported
OFED-1.5.1 Cxgb3toe-1.4.0.8 7.4.0 Supported
OFED-1.5.1 Cxgb3toe-1.3.1.10 7.10.0 Not Supported
OFED-1.5.1 Cxgb3toe-1.3.1.10 7.8.0 Not Supported
OFED-1.5.1 Cxgb3toe-1.3.1.10 7.7.0 Not Tested
OFED-1.5.1 Cxgb3toe-1.3.1.10 7.4.0 Not Supported
OFED-1.5 Cxgb3toe-1.4.1.2 7.10.0 Not Supported
OFED-1.5 Cxgb3toe-1.4.1.2 7.8.0 Not Tested
OFED-1.5 Cxgb3toe-1.4.1.2 7.4.0 Not Supported
OFED-1.5 Cxgb3toe-1.4.0.8 7.10.0 Not Supported
OFED-1.5 Cxgb3toe-1.4.0.8 7.8.0 Supported
OFED-1.5 Cxgb3toe-1.4.0.8 7.4.0 Not Supported
OFED-1.5 Cxgb3toe-1.3.1.10 7.10.0 Not Tested
OFED-1.5 Cxgb3toe-1.3.1.10 7.8.0 Not Supported
OFED-1.5 Cxgb3toe-1.3.1.10 7.7.0 Supported
OFED-1.5 Cxgb3toe-1.3.1.10 7.4.0 Not Supported
OFED-1.4.2 Not Tested Not Tested Not Tested
OFED-1.4.1 Cxgb3toe-1.4.1.2 7.10.0 Not Supported
OFED-1.4.1 Cxgb3toe-1.4.1.2 7.8.0 Not Tested
OFED-1.4.1 Cxgb3toe-1.4.1.2 7.4.0 Not Supported
OFED-1.4.1 Cxgb3toe-1.4.0.8 7.10.0 Not Supported
OFED-1.4.1 Cxgb3toe-1.4.0.8 7.8.0 Not Tested
OFED-1.4.1 Cxgb3toe-1.4.0.8 7.4.0 Not Supported
OFED-1.4.1 Cxgb3toe-1.3.1.10 7.10.0 Not Supported
OFED-1.4.1 Cxgb3toe-1.3.1.10 7.8.0 Not Supported
OFED-1.4.1 Cxgb3toe-1.3.1.10 7.7.0 Not Tested
OFED-1.4.1 Cxgb3toe-1.3.1.10 7.4.0 Not Tested
OFED-1.4.1 Cxgb3toe-1.3.0 7.4.0 Supported