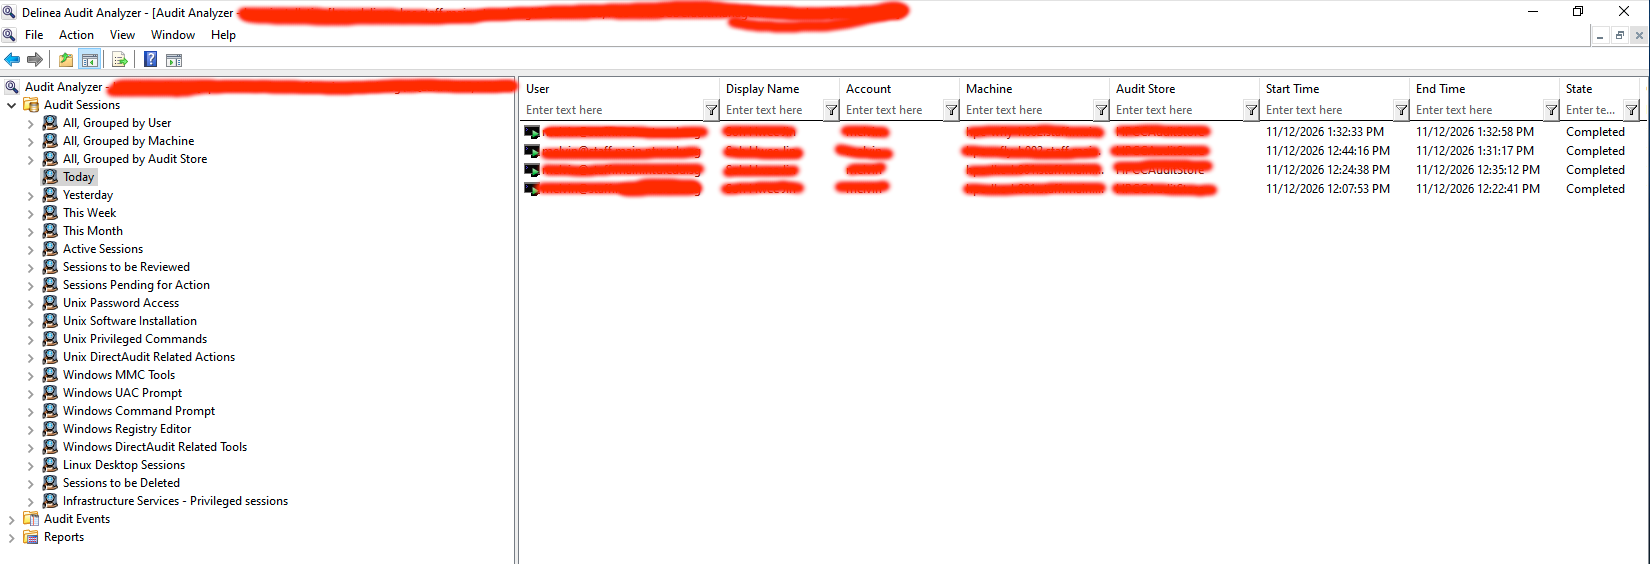
Using Centrifyda commands to enable Audit on dzdo command

Step 1: On the Client, with root access

#dacontrol -e -c /usr/share/centrifydc/libexec/dzdo

Step 2: Use vim and add to the bottom of the file

dash.allinvoked: true

Step 3: Disable NSS, which controls auditing for the entire login session

#dacontrol -d

Step 4: Restart the Centrifyda daemon

systemctl restart centrifyda

Step 5: Log Off and Start a new session

Log in and start a dzdo session. At the Delinea Audit Analyzer, you should see in Progress

SSL connection error For Delinea MFA with DirectControl 

Muco of the Troubleshooting comes from the Knowledgebase Article is derived from KB-8958: MFA with DirectControl fails with SSL connection error and Preparing a Linux Client Server for Centrify and 2FA for CentOS-7

Problem :

When attempting to log in with a user that requires MFA the following error is presented:

$ ssh user@192.168.0.1
SSL Connection Error

Cause:

The error is likely due to a certificate problem. A required certificate may be missing or the permission may not be set correctly

How to check:

# /usr/share/centrifydc/bin/adcdiag
VERSION   : Verify that DirectControl version supports MFA               : Pass
JOINSTATE : Verify that DirectControl is in connected mode               : Pass
ZONECHK   : Verify that MFA is supported in the zone                     : Pass
SSHDCFG   : Verify that SSHD enables ChallengeResponseAuthentication     : Warning
          : Cannot read sshd configuration file. Probably you are not
          : using Delinea openssh. SSH login for MFA users will fail if
          : option ChallengeResponseAuthentication is not set to yes.
          : Please check and ensure ChallengeResponseAuthentication is
          : set to yes in sshd configuration file.
CDCCFG    : Verify that MFA options in centrifydc.conf are correct       : Pass
PROXYCFG  : Verify that HTTP proxy configuration is set properly         : Pass
CLDINST   : Verify that trusted Identity Platform instance is specified  : Pass
          : Successfully connected to Identity Platform and certificate
          : has been verified OK.
CNTRCFG   : Verify that Connectors are configured correctly              : Pass
CURCNTR   : Verify that DirectControl has selected a workable Connector  : Pass
CLOUDROLE : Verify that this machine has permissions to perform Identity
          : Platform authentication                                      : Pass
......
......
......

Check the Logs at /var/centrify/tmp…. You may notice some errors like

.....
.....
ERROR:
Not a trusted connector or no valid connector certificate installed locally.
SUGGESTIONS:
1. Verify that the IWA root CA certificate is installed in the system. Please refer to KB-7393 on how to configure the root CA certificate in the system.
2. Please collect connector log if you need Delinea support.
.....
.....

Resolution:

Check whether the Certificates have been added at

  •  /etc/pki/ca-trust/source/anchors/ 
  • /var/centrify/net/certs

Check the SSH Settings at

# vim /etc/ssh/sshd_config
# To disable tunneled clear text passwords, change to no here!
#PasswordAuthentication yes
#PermitEmptyPasswords no
PasswordAuthentication no


# Change to no to disable s/key passwords
#ChallengeResponseAuthentication yes
ChallengeResponseAuthentication yes

Restart the SSHD Services

# systemctl restart sshd.service

Restart the Centrifydc services

# /usr/share/centrifydc/bin/centrifydc restart

Active Directory Flush and Reload

# adflush -f
# adreload

Automating the Linux Client Server for Centrify and 2FA on Rocky Linux 8

The whole manual setup including those on the Active Directory can be found at Preparing a Linux Client Server for Centrify and 2FA for CentOS-7

If you just want to automate the Linux portion, here is something you may wish to consider.

Update the sshd_config Templates (The most important portion is that the “PasswordAuthentication no” and “ChallengeResponseAuthentication yes” is present. The whole sshd_config template is too large for me to put into the blog.

.....
.....
# To disable tunneled clear text passwords, change to no here!
#PasswordAuthentication yes
#PermitEmptyPasswords no
PasswordAuthentication no

# Change to no to disable s/key passwords
#ChallengeResponseAuthentication yes
ChallengeResponseAuthentication yes
.....
.....
- name: Generate /etc/ssh/sshd_config from /etc/ssh/sshd_config.j2 template
  template:
      src: ../templates/sshd_config.j2
      dest: /etc/ssh/sshd_config
      owner: root
      group: root
      mode: 0600
  when:
    - ansible_os_family == "RedHat"
    - ansible_distribution_major_version == "8"

- name: Restart SSH Service
  systemd:
    name: sshd
    state: restarted
    enabled: yes
  when:
    - ansible_os_family == "RedHat"
    - ansible_distribution_major_version == "8"
  changed_when: false

Here is Centrify_2FA.yml to insert the IWaTrustRoot.pem certificate

- name: Copy IwaTrustRoot.pem to /etc/pki/ca-trust/source/anchors/
  template:
      src: /usr/local/software/certificate/IwaTrustRoot.pem
      dest: /etc/pki/ca-trust/source/anchors/
      owner: root
      group: root
      mode: 0600
  become: true
  when:
    - ansible_os_family == "RedHat"
    - ansible_distribution_major_version == "8"

- name: Copy IwaTrustRoot.pem to /var/centrify/net/certs
  template:
      src: /usr/local/software/certificate/IwaTrustRoot.pem
      dest: /var/centrify/net/certs
      owner: root
      group: root
      mode: 0600
  become: true
  when:
    - ansible_os_family == "RedHat"
    - ansible_distribution_major_version == "8"

Restart the CentrifyDC and do a Flush so that the AD is updated.

- name: CentrifyDC Restart
  ansible.builtin.shell: "/usr/share/centrifydc/bin/centrifydc restart"
  register: centrifydc_status
  changed_when: false

- name: Active Directory Flush
  ansible.builtin.shell: "adflush -f"
  register: flush_status
  changed_when: false

- name: Centrify Service Restarted
  debug:
    msg: "Load Average: {{ centrifydc_status.stdout }}"

Protecting Centrify Zones from accidental deletion on Active Directory

If you have been using Centrify for some time, Centrify store Zones and other objects within the Active Directory (AD) or OU. One question always surface, how to protect the objects from accidental deletion. There are 2 ways. The first way is the easiest way.

Method 1: (via Manual Way to disable ‘accidental deletion’ for specific AD object only):

  1. Ask your System Administrator or OU Administrator to open up the “Active Directory Users and Computers” application.
  2. 2Navigate to your intended AD object (or any AD object like your ‘Zone’).
  3. 3) Right-click on your intended AD object, and select ‘Properties’.
  4. 4) Click on the ‘Object’ tab.
  5. 5) Ensure to check the checkbox of ‘Protect object from accidental deletion’.
  6. 6) Click the ‘Apply’ and then the ‘Ok’ button to confirm the changes.

Method 2: (via Powershell to disable ‘accidental deletion for all objects under specified OU ):

1) Ask your System Administrator to open up the ‘Power Shell’ application.

2) For the command below modify the ‘distingushedName’ (DN name) so that it points to the OU relevant to your domain. The below command will set this for all objects in the specified OU:

    Powershell: Get-ADobject -Filter * -SearchBase “{DN_Name}” | Set-adobject -ProtectedFromAccidentalDeletion $true

   
Example Command (for centrify  ‘Zone’ OU):: Get-ADobject -Filter * -SearchBase “CN=Zones,CN=Centrify,CN=Program Data,DC=win16org22,DC=pmm” | Set-adobject -ProtectedFromAccidentalDeletion $true

(Take Note; In order to attain the DN name, Right-click on your intended AD object, > select ‘Properties > and Click on the ‘Attribute Editor’ tab > Click on the ‘distinguishedName’ column > Copy the DN name and paste it in the PowerShell command specified above)

(Take Note: This creates a “deny” for deletion of all the objects under the specified OU. Now whoever tries to delete this will generate an event. Hence, the user will have to remove this permission before the object can be deleted.)

Preparing a Linux Client Server for Centrify and 2FA for CentOS-7

Preliminary Notes:

You have to setup a Cloud Tenant from Centrify by registering an email with Centrify or Centrify Authorised Reseller.

Once the Tenant has been setup, the login link should have been sent to the email you have provided.

You will need to setup the 2FA Connector VM on premise. The recommended specification of the connectors. Port 443 should be opened for the VM.

  • 4 Core; 8GB RAM; 100 GB HDD; Windows 2016 or later

At the Active Directory

  1. Create UNIX computer group in AD if not already created
  2. Add the UNIX computers that will require 2FA to the UNIX group
  3. Create a UNIX Users group if not already created
  4. Add Users that will require 2FA to the UNIX user group
  5. Add the IWA root CA Certificate to the Centrify GPO. The IWA Certificate can be downloaded from the Centrify cloud but the connector needs to be setup first before we can download the IWA Certificate.

At the CentOS Server

Copying the IwaTRustRoot.pem Certificate to CentOS Linux Server

  1. Change the extension of the IWA certificate that was downloaded from .cer to .pem
  2. For CentOS, please copy the certificate to this location /etc/pki/ca-trust/source/anchors/ in the test server.
  3. Copy the cert to /var/centrify/net/certs as well

Configure the SSH settings

# vim /etc/ssh/sshd_config
# To disable tunneled clear text passwords, change to no here!
#PasswordAuthentication yes
#PermitEmptyPasswords no
PasswordAuthentication no


# Change to no to disable s/key passwords
#ChallengeResponseAuthentication yes
ChallengeResponseAuthentication yes

Restart the SSHD Services

# systemctl restart sshd.service

Restart the Centrifydc services


# /usr/share/centrifydc/bin/centrifydc restart

Active Directory Flush

# adflush -f

Centrify Access Manager

At Centrify Access Manager, do add the MFA Users to require MFS for Login and UNIX Login in the required Computer. See Pix

Further notes:

  1. Automating the Linux Client Server for Centrify and 2FA on Rocky Linux 8

Delinea announces support for AlmaLinux and Rocky Linux

Finally, Delinea (Centrify) has added support for RHCOS, AlmaLinux x86_64, Rocky Linux. Good news indeed

As we continue to bolster our PAM solutions for Linux, the latest release of Server Suite adds support for RHCOS, AlmaLinux x86_64, and Rocky Linux.

Red Hat Enterprise Linux CoreOS (RHCOS) is a container-optimized operating system for running containers at scale. Both Rocky Linux and AlmaLinux are binary-compatible with Red Hat Enterprise Linux (RHEL) and have emerged as a viable alternative to CentOS.

………

Delinea announces support for AlmaLinux and Rocky Linux

How to uninstall Centrify agent on Unix/Linux platforms?

As root or sudo, open a terminal and navigate to the folder where Centrify was first installed (typically /usr/share/centrifydc/bin) . On most Centrify DirectControl-managed systems, you can remove the Centrify DirectControl Agent and related files by running the uninstall.sh script.
as follows:

/bin/sh /usr/share/centrifydc/bin/uninstall.sh

For example:

Do you want to uninstall the CentrifyDC-5.8.1 package from this computer? (Q|Y|N) [N]:N

References

KB-1780: How to uninstall Centrify agent on Unix/Linux platforms?

Centrify Client goes into disconnect mode

The article is taken from Centrify Knowledge Base (KB-1425): adclient goes into “disconnected mode”

Causes

There are several reasons why adclient can goes into disconnect mode. According to the article, it could be due to

  • Replication Delays
  • Expired Computer Password or not renewed or out of sync

Solution:

In Linux, you can restart the Centrify DirectControl Service

# /etc/init.d/centrifydc restart
Stopping Centrify DirectControl:                           [  OK  ]
Starting Centrify DirectControl:                           [  OK  ]
adclient state is: connected

OR you can reset computer object on UNIX/LINUX client:

# adkeytab -r -u administrator@yourdomain.com

Notes:

Machine password renewal can be turned off (for testing purposes only) in /etc/centrifydc/centrifydc.conf by making the following change and running adreload. (Default is 28 days)

adclient.krb5.password.change.interval: 0