If you are using Active Directory, you may only have uid for ownership to locate the directory, the command to use will be
cd /home
find . -maxdepth 1 -user 130456785323
lostuser
If you are using Active Directory, you may only have uid for ownership to locate the directory, the command to use will be
cd /home
find . -maxdepth 1 -user 130456785323
lostuserI assume that you are using the internal and external networks for your login nodes. The Internal network should be interacting with the PBS Schedulers and the External network should as least have SSH port opened for users to Interact with the Login Nodes.
For Internal Network Ports Opening for PBS-Professional Clients, do take at Firewall Ports Opening for PBS-Pro Server and Clients
Make sure you put the correct Ethernet in the right zone with the right ports opening. You can take a look at how you can manipulate Linux firewall with the blog Using firewall-cmd in CentOS 7 which is applicable even for Rocky 8 which used firewalld
After unpacking, run the below client rpm only. There is no need to register the nodes with PBS Scheduler
# rpm -Uvh pbspro-client-19.2.5.20191022141354-0.el8.x86_64.rpm # bashIf you are facing the issue
$ ssh user1@192.168.0.1
kex_exchange_identification: write: Connection reset by peer
It seems that the process on the SSH daemon on the Server side is dead and there is a need to restart the Server
On the Server Side
# systemctl restart sshd.serviceThe Mellanox ConnectX5 VPI adapter supports both Ethernet and InfiniBand port modes, which must be configured.
Check Status
# mst status -v
MST modules:
------------
    MST PCI module is not loaded
    MST PCI configuration module is not loaded
PCI devices:
------------
DEVICE_TYPE             MST                           PCI       RDMA            NET                                     NUMA
ConnectX4(rev:0)        /dev/mst/mt4115_pciconf3      8b:00.0   mlx5_3                                                  1

ConnectX4(rev:0)        /dev/mst/mt4115_pciconf2      84:00.0   mlx5_2                                                  1

ConnectX4(rev:0)        /dev/mst/mt4115_pciconf1      0c:00.0   mlx5_1                                                  0

ConnectX4(rev:0)        /dev/mst/mt4115_pciconf0      05:00.0   mlx5_0                                                  0                                                 1
Start MST
# mst start
Starting MST (Mellanox Software Tools) driver set
Loading MST PCI module - Success
Create devices
Unloading MST PCI module (unused) - Success
Change the port type to Ethernet (LINK_TYPE = 2)
# mlxconfig -d /dev/mst/mt4115_pciconf2 set LINK_TYPE_P1=2Check that the port type was changed to Ethernet
# ibdev2netdev
mlx5_0 port 1 ==> ens1np0 (Down)
mlx5_1 port 1 ==> enp12s0np0 (Down)
mlx5_2 port 1 ==> enp132s0np0 (Up)
mlx5_3 port 1 ==> enp139s0np0 (Down)
References:
If you are using a MacOS and you are planning to do a X-forwarding, you may notice an error like this. In the Pix, below, after SSH, I wanted to X-forward Firefox Browser from Rocky Linux 8
ssh -X user1@192.168.0.1

There are a few settings we need to do. Let’s fix the “Locale not supported by C library. Using the fallback ‘C’ locale”
Issue 1 – Locale not support by C library. Using the fallback ‘C’ locale
To fix it, go to Top-Left-Hand Corner of your Mac-Desktop to look for the Terminal App,
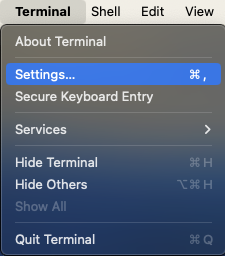

Close and Quit Terminal App and come in again. You should fix the first problem.
Issue 2 – Install XQuartz
X11 used to be included with macOS. Apple no longer includes X11 with macOS. That is why you see an error like this “Error: no DISPLAY environment variable specified.”

You have to download the XQuartz App which is an open-source effort to develop a version of the X.Org X Window System that runs on macOS. Downloading and Installing is very straight-forward and easy. I’ve captured selected screen-shots….


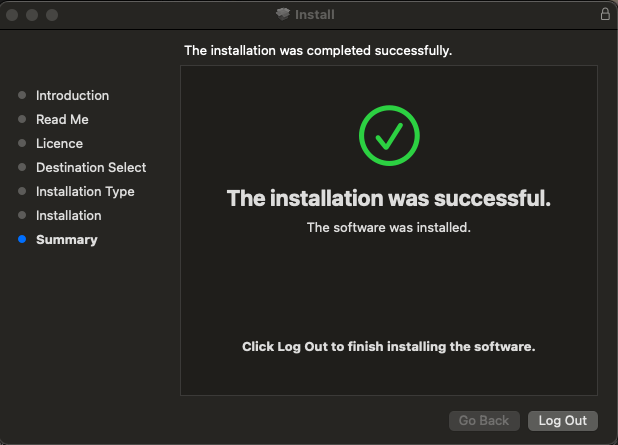
After installing, you may want to let is run in the background


Log-Off from Your Mac Completely to allow the settings to reinitate
Issue 3 – Fixing the libGL error: failed to load driver: swrast on Rocky Linux 8
You may find an issue similar to the one in the earlier blog. That is how you may want to fix it.
Step 1: Download Chrome RPM Package
wget https://dl.google.com/linux/direct/google-chrome-stable_current_x86.64.rpm
Step 2: DNF install Dependency and RPM Packages
# dnf install google-chrome-stable_current_x86_64.rpm 
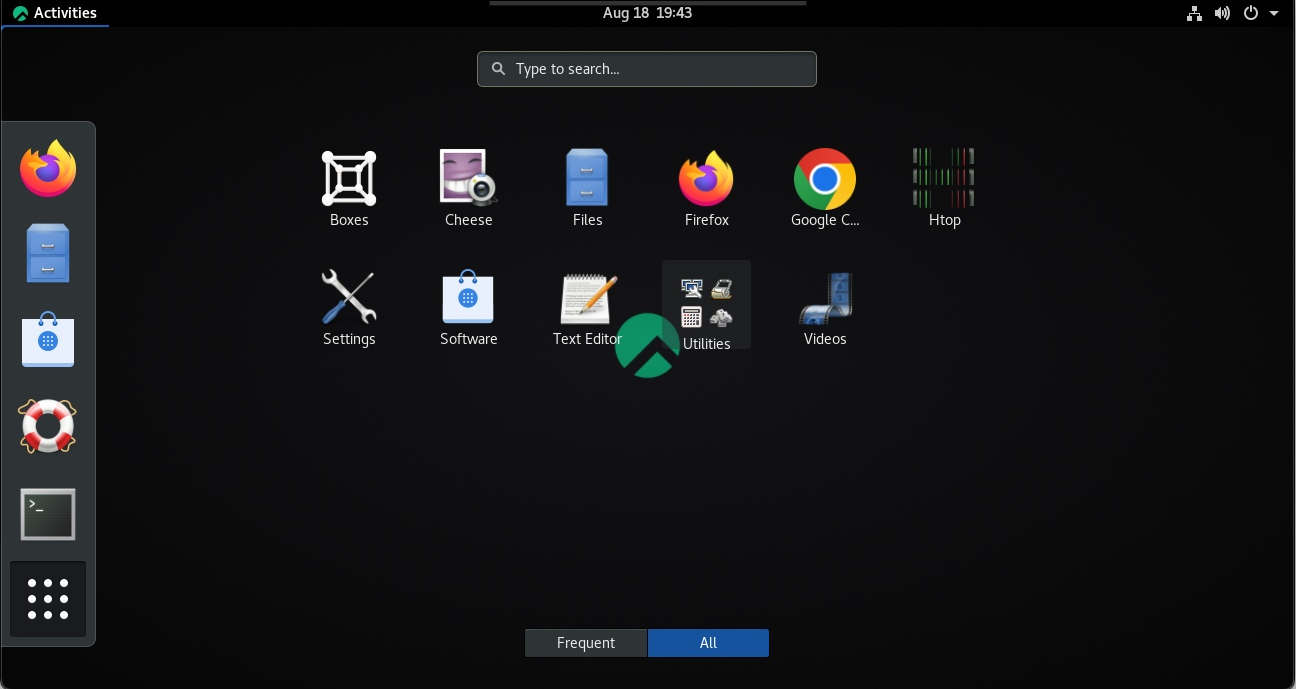
You should be able to find Chrome when you click the “List all Applications”

Great! You can see the Chrome Icon!
If you faced errors the one below like when you X-forward to launch a GUI Application like Firefox
libGL error: No matching fbConfigs or visuals found
libGL error: failed to load driver: swrast
You need to install mesa-libGLU*.x86_64
# dnf install mesa-libGLU*.x86_64You can use Ansible to extract Flexlm information from a remote license server, which is stored in a central place where you can display the information.
I use crontab to extract the information every 15 min and place it in a central place so that users can check the license availability.
- name: Extract Information from ANSYS Lic Server and extract to file
  block:
    - name: Get FlexLM License Info
      ansible.builtin.shell: "/usr/local/ansys_inc/shared_files/licensing/linx64/lmutil lmstat -c ../license_files/ansyslmd.lic -a"
      register: lmstat_output

    - name: Save FlexLM License Output to File on ANSYS Lic Server
      copy:
        content: "{{ lmstat_output.stdout }}"
        dest: "/var/log/ansible_logs/ansys_lmstat.log"

    - name: Get FlexLM Output from Remote Server
      fetch:
        src: "/var/log/ansible_logs/ansys_lmstat.log"
        dest: "/usr/local/lic_lmstat_log/ansys_lmstat.log"
        flat: yes
The fetch command is useful for fetching files from remote machines and storing them locally in a file tree. For more information, do take a look at Fetch files from remote nodes
At crontab, I fetch the file every 15min
*/15 * * * * /root/ansible_cluster/run_lmstat_licsvr.sh
The run_lmstat_licsvr.sh is simply to call the ansible playbook to run the ansible script above.
If you are writing a script that involve cat and if you wish to leave a line after “cat”, do the following
cat /usr/local/lic_lmstat_log/abaqus_lmstat.log ; echo.....
.....
Users of tfluid_int_ccmp: (Total of 128 licenses issued; Total of 0 licenses in use)
Users of tfluid_int_fluent: (Total of 128 licenses issued; Total of 0 licenses in use)
[user1@node1 ~]$
To turn off highlighting until the next search inside VIM application:
:noh To turn off hightlight completely inside VIM application
:set nohlsearch