Title: The biggest “Work from home” experiment in the history of business

Title: The biggest “Work from home” experiment in the history of business

To Register, go to https://www.ddn.com/company/events/isc-user-group/

DDN Past User Group Meetings and Customer Presentations, see https://www.ddn.com/company/events/user-group-sc/
If you need to remove the mapping of null users to windows user or group in NetApp, it can be done with the following steps
Step 1: Set the privilege level to advanced:
# set -privilege advanced
Step 2: Configure the restrict anonymous setting:
# vserver cifs options modify -vserver vserver_name -restrict-anonymous {no-restriction|no-enumeration|no-access}
Step 3: Verify that the option is set to the desired value:
vserver cifs options show -vserver vserver_name
Step 4: Return to the admin privilege level:
set -privilege admin
Interesting Resources on NetApp and Openstack Integration. Do look at Openstack and NetApp – the Pub
This is an pdf document on ONTAP-9 CIFS/SMB Configuration Express Guide
netapp-cluster1::*>netapp-cluster1::> network int show
            Logical    Status     Network            Current       Current Is
Vserver     Interface  Admin/Oper Address/Mask       Node          Port    Home
----------- ---------- ---------- ------------------ ------------- ------- ----
acai-cluster1
            cluster_mgmt up/up    192.168.2.77/24    acai-cluster1-02
                                                                   a0a     true
acai-cluster1-01
            SM_lif       up/up    192.168.2.141/19   acai-cluster1-01
                                                                   a0a     true
            clus1        up/up    169.254.10.11/16   acai-cluster1-01
                                                                   e1a     true
            clus2        up/up    169.254.10.12/16   acai-cluster1-01
                                                                   e1b     true
netapp-cluster1::*> network port show
Auto-Negot  Duplex     Speed (Mbps)
Node   Port   Role         Link   MTU Admin/Oper  Admin/Oper Admin/Oper
------ ------ ------------ ---- ----- ----------- ---------- ------------
netapp-cluster1-01
a0a    data         down  1500  true/-     auto/-      auto/-
e0a    data         up    1500  true/true  full/full   auto/1000
e0b    data         up    1500  true/true  full/full   auto/1000
e0c    data         up    1500  true/true  full/full   auto/100
e0d    data         up    1500  true/true  full/full   auto/1000
2. If you have a LIF that should be on that node; do the following:
The purpose is to let another node within the cluster to be the home-node for the data and mgmt while you up and down the interface group
netapp-cluster1::*> net int modify -vserver vs_StorageVNode11  -lif vs_StorageVNode11_data1 -home-node netapp-cluster1-02 -home-port a0a
netapp-cluster1::*> net int modify -vserver vs_StorageVNode11  -lif vs_StorageVNode11_mgmt1 -home-node netapp-cluster1-02 -home-port a0a
net int revert *
3. Remove the Interface Group from the -port e0c and down and up the e0c port
netapp-cluster1::*> ifgrp remove-port -node netapp-cluster1-01 -ifgrp a0a -port e0c
netapp-cluster1::*> net port modify -node netapp-cluster1-01 -port e0c -up-admin false
netapp-cluster1::*> net port modify -node netapp-cluster1-01 -port e0c -up-admin true
netapp-cluster1::*> net port show -node netapp-cluster1-01 -port a0a,e0c
Once If e0c shows up and at auto/1000, add the interface and return the interface group back to netap-cluster-01
netapp-cluster1::*> ifgrp add-port -node netapp-cluster1-01 -ifgrp a0a -port e0c
netapp-cluster1::*> net port show -node netapp-cluster1-01 -port a0a
netapp-cluster1::*> net int modify -vserver vs_StorageVNode11 -lif vs_StorageVNode11_data1 -home-node netapp-cluster1-01 -home-port a0a
netapp-cluster1::*> net int modify -vserver vs_StorageVNode11 -lif vs_StorageVNode11_mgmt1 -home-node netapp-cluster1-01 -home-port a0a
netapp-cluster1::*> net int revert *
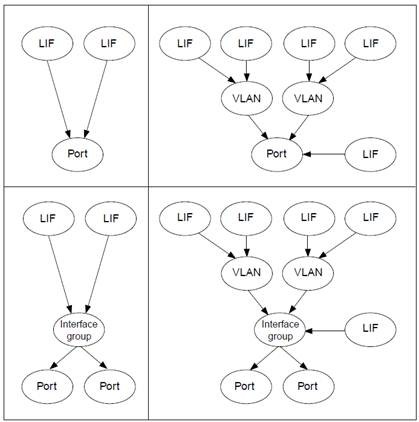
Logical Interface (LIFS) can be hosted on physical ports, interface groups, VLANS and physical ports or interface groups that host VLANS.
To show information on the network ports and LIFs information, do use the following commands
cluster1::> network port show
cluster1::> network port ifgrp show
Useful References
* node1 is the controller currently primary to the aggregate/vol/LUN.
Step 1: Enable PCS
node1::> node run –node node1 node1::> options flexscale.enable on node1::>options flexscale.enable flexscale.enable pcs you should see this node1::>options flexscale.pcs_size 330GB based on 3 x 200GB SSD RAID4
Step 2: Allow the representative workload to run and Run your workload
Step 3: Collect data throughout the process
node1::>stats show -p flexscale-access
NetApp recommends issuing this command through an SSH connection and logging the output throughout the observation period because you want to capture and observe the peak performance of the system and the cache. This output can also be easily imported into spreadsheet software, graphed, and so on.
This process initially provides information on the “cold” state of the emulated cache. That is, no data is in the cache at the start of the test, and the cache is filled as the workload runs. The best time to observe the emulated cache is once it is filled, or “warmed”, as this will be the point when it enters a steady state.
Filling the emulated cache can take a considerable amount of time and depends greatly on the workload.
References:
