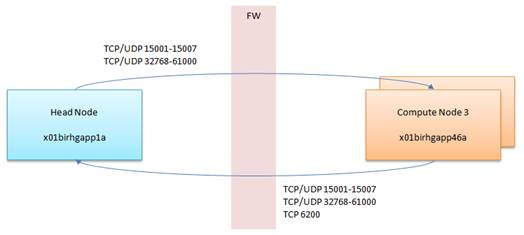
If you are implementing PBS-Pro Display Manager, you have to open ports TCp/UDP 5901-5920

If you are implementing PBS-Pro Display Manager, you have to open ports TCp/UDP 5901-5920
Note: Do note that the default zone is “public”
Section 1: Checking Zones and Prerequisites
Option 1: Check State of Firewalld
# firewall-cmd --state
Running
Option 2: Check Default Zone
# firewall-cmd --get-default-zone
public
Option 3: Check Active Zones
# firewall-cmd --get-active-zones
public: etho eth1
Option 4: Get Zones
# firewall-cmd --get-zones
block dmz drop external home internal public trusted work
Section 2: Selecting Zones for your Interfaces
Option 1: Change Interfaces
# firewall-cmd --permanent --zone=trusted --change-interface=eth0
success
# firewall-cmd --reload
Option 2: Verify the Zone has been changed
firewall-cmd --get-active-zones
trusted
interfaces: eth0
public
interfaces: eth1
Section 3: Editing Firewall-CMD Rules
Option 1: Opening Ports (Single)
# firewall-cmd --permanent --zone=public --add-port=80/tcp
success
# firewall-cmd --reload
Option 2: Opening Ports (Range)
# firewall-cmd --permanent --zone=public --add-port=80-90/tcp
success
# firewall-cmd --reload
Option 3: List Ports
#  firewall-cmd --zone=public --list-all
public (active)
  target: default
  icmp-block-inversion: no
  interfaces: enp6s0f0 eno2 ib1
  sources:
  services: ssh dhcpv6-client
  ports: 22/tcp 5053/tcp 57889/tcp
  protocols:
  masquerade: no
  forward-ports:
  source-ports:
  icmp-blocks:
  rich rules:
Option 4: Remove Port
# firewall-cmd --permanent --zone=public --remove-port=80/tcp
success
# firewall-cmd --reload
Option 5: Adding Service
Checking Services
# firewall-cmd --get-services
Finally, add service – ssh
# firewall-cmd --permanent --zone=public --add-service=ssh
success
# firewall-cmd --reload
Source-Based Filtering with zones and IP Addresses
Add the Source IP Addresses to the Zone (Assume you are limiting IP Addresses on the trusted zone)
firewall-cmd --zone=trusted --add-source=192.168.1.0/24 --permanent
success
firewall-cmd --reloadMake sure the Ethernet is in the trusted zone. To move the ethernet into the trusted zone, see Section2 in the same blog
If you are outside the allowed IP Address, you should see something like (Assume your trusted target server is 192.168.1.1 and your external untrusted client is 192.168.2.0), you might see something like this
ssh user1@192.168.1.1
Password:
Internal errors
References:

Step 1: Check current kernel version
# uname -r
3.10.0-862.14.4.el7.x86_64
Step 2: Check installed kernel version
# yum info kernel
Loaded plugins: fastestmirror, langpacks
Loading mirror speeds from cached hostfile
* base: mirror.0x.sg
* elrepo: elrepo.mirror.angkasa.id
* epel: sg.fedora.ipserverone.com
* extras: mirror.0x.sg
* updates: mirror.0x.sg
Installed Packages
Name : kernel
Arch : x86_64
Version : 3.10.0
Release : 693.el7
Size : 59 M
Repo : installed
From repo : anaconda
Summary : The Linux kernel
URL : http://www.kernel.org/
License : GPLv2
Description : The kernel package contains the Linux kernel (vmlinuz), the core of any
: Linux operating system. The kernel handles the basic functions
: of the operating system: memory allocation, process allocation, device
: input and output, etc.

Name : kernel
Arch : x86_64
Version : 3.10.0
Release : 862.14.4.el7
Size : 62 M
Repo : installed
From repo : updates
Summary : The Linux kernel
URL : http://www.kernel.org/
License : GPLv2
Description : The kernel package contains the Linux kernel (vmlinuz), the core of any
: Linux operating system. The kernel handles the basic functions
: of the operating system: memory allocation, process allocation, device
: input and output, etc.
Step 3: Install Kernel-Devel and Kernel-Headers
# yum install kernel-devel kernel-headers -y
# yum info kernel-devel kernel-headers
Step 4: Check Kernel-Devel. Make sure the version is in-sync
# yum info kernel-devel
Loaded plugins: fastestmirror, langpacks
Loading mirror speeds from cached hostfile
* base: mirror.0x.sg
* elrepo: elrepo.mirror.angkasa.id
* epel: sg.fedora.ipserverone.com
* extras: mirror.0x.sg
* updates: mirror.0x.sg
Installed Packages
Name : kernel-devel
Arch : x86_64
Version : 3.10.0
Release : 862.14.4.el7
Size : 37 M
Repo : installed
From repo : updates
Summary : Development package for building kernel modules to match the kernel
URL : http://www.kernel.org/
License : GPLv2
Description : This package provides kernel headers and makefiles sufficient to build modules
: against the kernel package.
Step 5: Check Kernel-Headers. Make sure the version is in-sync
# yum info kernel-headers
Loaded plugins: fastestmirror, langpacks
Loading mirror speeds from cached hostfile
* base: mirror.0x.sg
* elrepo: elrepo.mirror.angkasa.id
* epel: sg.fedora.ipserverone.com
* extras: mirror.0x.sg
* updates: mirror.0x.sg
Installed Packages
Name : kernel-headers
Arch : x86_64
Version : 3.10.0
Release : 862.14.4.el7
Size : 3.6 M
Repo : installed
From repo : updates
Summary : Header files for the Linux kernel for use by glibc
URL : http://www.kernel.org/
License : GPLv2
Description : Kernel-headers includes the C header files that specify the interface
: between the Linux kernel and userspace libraries and programs. The
: header files define structures and constants that are needed for
: building most standard programs and are also needed for rebuilding the
: glibc package.
Prerequistics:
SERVER ABAQUS_LIC_SVR 000000000 27000
VENDOR ABAQUSLM port=27398
.....
.....
.....
Step 1: Shutting down the License Server
# cd /usr/SIMULIA/License/2017/linux_a64/code/bin/
# lmdown
# lmstat -a
Step 2: Starting the License Server
# lmgrd -c ABAQUS_LIC_SVR.LIC -l 081018.log
What is a TBZ File? There is a good information on this. https://www.reviversoft.com/file-extensions/tbz
To unpack file with TBZ, do use the command
$ tar -xvjf mycompressedfile.tbz -C /tmp
Summit, now the fastest supercomputer in the world, is quickly making its mark in science – five of the six finalists just announced for the prestigious 2018 Gordon Bell Prize used Summit in their work.
For more information, see https://www.hpcwire.com/2018/09/20/summit-supercomputer-is-already-making-its-mark-on-science/
All activities to be triggered from Master Node 1
Step 1:
# ssh nodename
Step 2:
# /etc/sysconfig/network | Add HOSTNAME=newnodename
# /etc/hostname | Add newnodename
exit
Step 3:
Remove Old Provision Environment
# makedns -d nodename /*Remove the nodes from DNS configuration*/
# makedhcp -d nodename /*Remove the nodes from the DHCP configuration*/
Step 4:
Change Definition
# chdef -t node -o oldnodename -n newnodename /*Change the hostname in the xCAT database*/
# chdef -t node -o newnodename bmc=oldbmcname /*Re add the bmc name in the xCAT database*/
Step 5:
Change the hostname and IP address in the /etc/hosts file
# makehosts newnodename
Step 6:
# makedns -n /*Configure the new names in DNS*/
# makedhcp -a /*Configure the new names in DHCP*/
# makeconfluentcfg /*Update Console Server*/
Step 7:
Reboot Updated Server
Step 8:
After you repeat Step – 1 to Step – 7 for all nodes On the primary management node.
Run
# pscp /etc/hosts all:/etc/
to copy the hosts file to all the nodes except the new node, because the new node need password authentication at this point.
The SSH daemon validates SSH client access by Linux system verification via /etc/passwd, or by public/private key cryptography approach.
By using the public/private cryptography approach, we can do a SSH without password.
In my write-up it is for root-to-root connection. You can use it for user connections.
Steps 1: At the Host Machine
# chmod 700 .ssh
# cd .ssh
# ssh-keygen -t rsa
# ssh-copy-id -i ~/.ssh/id_rsa.pub remote-host
(ssh-copy-id appends the keys to the remote-host’s .ssh/authorized_key)
Step 2: At the Remote Machine,
# ssh remote-host
References
Taken from the Manual Page
dmidecode is a tool for dumping a computer’s DMI (some say SMBIOS) table contents in a human-readable format. This table contains a description of the system’s hardware components, as well as other useful pieces of information such as serial numbers and BIOS revision.
Option 1: Getting DMI Type
[root@my-node1 ~]# dmidecode -t
dmidecode: option requires an argument -- 't'
Type number or keyword expected
Valid type keywords are:
bios
system
baseboard
chassis
processor
memory
cache
connector
slot
Option 2: DMI TYPES (From MAN Page)
DMI TYPES
The SMBIOS specification defines the following DMI types:

Type Information
────────────────────────────────────────────
0 BIOS
1 System
2 Baseboard
3 Chassis
4 Processor
5 Memory Controller
6 Memory Module
7 Cache
8 Port Connector
9 System Slots
10 On Board Devices
11 OEM Strings
12 System Configuration Options
13 BIOS Language
14 Group Associations
15 System Event Log
16 Physical Memory Array
17 Memory Device
18 32-bit Memory Error
19 Memory Array Mapped Address
20 Memory Device Mapped Address
21 Built-in Pointing Device
22 Portable Battery
23 System Reset
24 Hardware Security
25 System Power Controls
26 Voltage Probe
27 Cooling Device
28 Temperature Probe
29 Electrical Current Probe
30 Out-of-band Remote Access
31 Boot Integrity Services
32 System Boot
33 64-bit Memory Error
34 Management Device
35 Management Device Component
36 Management Device Threshold Data
37 Memory Channel
38 IPMI Device
39 Power Supply
40 Additional Information
41 Onboard Devices Extended Information
42 Management Controller Host Interface
Option 3 – Using Keyword types
Keywords can be used instead of type numbers with --type. Each keyword is equivalent to a list of type numbers:

Keyword Types
──────────────────────────────
bios 0, 13
system 1, 12, 15, 23, 32
baseboard 2, 10, 41
chassis 3
processor 4
memory 5, 6, 16, 17
cache 7
connector 8
slot 9

Keywords are matched case-insensitively. The following command lines are equivalent:

· dmidecode --type 0 --type 13
· dmidecode --type 0,13
· dmidecode --type bios
· dmidecode --type BIOS
