
This is a nice Video to explain what is Hadoop in Youtube
Joining RHEVM-Manage-Domain tool to join AD Domain
Do note that for Red Hat Enterprise Virtualization you must attach a directory server to the Manager using the Domain Management Tool, engine-manage-domains. This configuration sis for RHEV 3.5
Active Directory
Identity Management (IdM)
Red Hat Directory Server 9 (RHDS 9)
OpenLDAP
# rhevm-manage-domains add --domain=your_active_directory_domain --user=spmstest --provider=ad
Restart the ovirt-engine
# service ovirt-engine restart
Virtual Machine 3D Support Option is Greyed Out for Windows 2008 and 2012 on VMware
The solution is taken from Enable 3D Support option is greyed out in virtual machine video card settings (2092210)
Modify the VMX file of the Virtual Machine
1. Take backup of the virtual machines VMX file
2. Open the VMX file, using text editor and add this line in the end
mks.enable3d = TRUE
*You can use the vi to edit the VMX file
3. Check the VMID of the Guest OS you are reloading
# vim-cmd "vmsvc/getallvms"
Vmid        Name .........
2
4. Reload the virtual machines configuration file by running this command:
# vim-cmd vmsvc/reload VMID
Enabling Predictive Cache Statistics (PCS) for Data OnTap 8.2p
* node1 is the controller currently primary to the aggregate/vol/LUN.
Step 1: Enable PCS
node1::> node run –node node1 node1::> options flexscale.enable on node1::>options flexscale.enable flexscale.enable pcs you should see this node1::>options flexscale.pcs_size 330GB based on 3 x 200GB SSD RAID4
Step 2: Allow the representative workload to run and Run your workload
Step 3: Collect data throughout the process
node1::>stats show -p flexscale-access
NetApp recommends issuing this command through an SSH connection and logging the output throughout the observation period because you want to capture and observe the peak performance of the system and the cache. This output can also be easily imported into spreadsheet software, graphed, and so on.
This process initially provides information on the “cold” state of the emulated cache. That is, no data is in the cache at the start of the test, and the cache is filled as the workload runs. The best time to observe the emulated cache is once it is filled, or “warmed”, as this will be the point when it enters a steady state.
Filling the emulated cache can take a considerable amount of time and depends greatly on the workload.
References:
Relooking at usage of /home directory in Linux
File System in /home can be clustered very quickly nowadays where the amount of data are massive. Residing all the users in one /home directory will cause the administrator to quickly reach the limits of the File System especially if the File System is not a Parallel File System.
One thought is to perhaps using the /home directory to store their user specific files that govern the user environment such as .bashrc .bash_profile .login etc only. All other files such as output, project files etc should not be stored immediately under the /home/user1 files system. Of course no one should be running their computation on the home directory.
If the users is large and you know that the /home directory will be broken further into further hierachy which can be divided into more volume. For example, /home/student/users1 or /home/staff/user2, /home/Department/user3
For more information, do see http://www.tldp.org/LDP/Linux-Filesystem-Hierarchy/html/home.html
NetApp Visual Storage Console (VSC)5.0 Plugin for VCentre 5.5
VSC 5.0 is a major change that includes a new look and seamless integration with the VMware vSphere Web Client. New features in this release include support for the following:
- The VMware vSphere Web Client
- VASA Provider for clustered Data ONTAP®
- SnapVault integration as a backup job option for clustered Data ONTAP
- Adding a virtual machine or datastore to an existing backup job
- Numerous bug fixes
VSC 5.0 discontinues support for the following:
- vCenter 5.1 and earlier
- VMware Desktop client
- 32-bit Windows installations
- mbralign
- Single File Restore
- Datastore Remote Replication
- Flash Accel
To download, see http://mysupport.netapp.com/NOW/download/software/vsc_win/5.0/
Documentation, see NetApp Visual Storage Console (VSC) 5.0
Install Windows 7 with VirtIO Drivers on RHEV 3.4
One of the best ways to improve the performance of Microsoft Windows guest is to use paravirtualised devices and drivers for KVM in the guests. This provides close to bare performance (up to 95%). These drivers are provided by the virtio-win RPM packages in the RHEL.
1. The virtio-win packages can be found on RHEL server /usr/share/virtio-win/
# ls -l /usr/share/virtio-win/
drwxr-xr-x. 4 root root      4096 Oct 13 10:24 drivers
drwxr-xr-x. 2 root root      4096 Oct 13 10:24 guest-agent
-rw-r--r--. 1 root root   2949120 May 29  2014 virtio-win-1.7.1_amd64.vfd
-rw-r--r--. 1 root root 149004288 May 29  2014 virtio-win-1.7.1.iso
-rw-r--r--. 1 root root   2949120 May 29  2014 virtio-win-1.7.1_x86.vfd
lrwxrwxrwx. 1 root root        26 Oct 13 10:24 virtio-win_amd64.vfd -> virtio-win-1.7.1_amd64.vfd
lrwxrwxrwx. 1 root root        20 Oct 13 10:24 virtio-win.iso -> virtio-win-1.7.1.iso
lrwxrwxrwx. 1 root root        24 Oct 13 10:24 virtio-win_x86.vfd -> virtio-win-1.7.1_x86.vfd
You may want to add these images to the ISO Library, you can attach the virtio-drivers-*.vfd image to the virtual floppy drier beofre manually installing Windows
2. The rhev-tools-setup.iso image found in the usr/share/rhev-guest-tools-iso
# ls -l /usr/share/rhev-guest-tools-iso
-rw-r--r--. 1 root root    177272 Jul 29 16:30 LICENSES
-rw-r--r--. 1 root root 350181376 Jul 29 16:30 RHEV-toolsSetup_3.4_9.iso
lrwxrwxrwx. 1 root root        57 Oct 13 10:23 rhev-tools-setup.iso -> /usr/share/rhev-guest-tools-iso/RHEV-toolsSetup_3.4_9.iso
-rw-r--r--. 1 root root       924 Jul 29 16:30 SOURCES
3. Upload drivers and tools to the ISO Storage Domain
# rhevm-iso-uploader -u admin@internal list
Please provide the REST API password for the admin@internal oVirt Engine user (CTRL+D to abort):
ISO Storage Domain Name   | Datacenter                | ISO Domain Status
dmn_ixora_iso_vol         | RH_Resource               | active
# rhevm-iso-uploader -u admin@internal --iso-domain=dmn_ixora_iso_vol upload  /usr/share/virtio-win/virtio-win-1.7.1_x86.vfd /usr/share/rhev-guest-tools-iso/rhev-tools-setup.iso
Please provide the REST API password for the admin@internal oVirt Engine user (CTRL+D to abort):
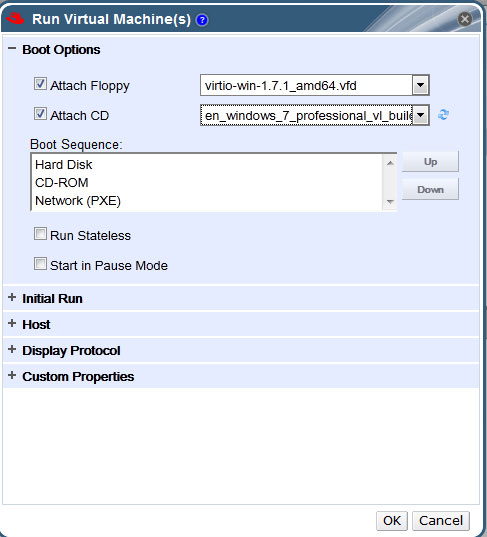
4. Create the new VM using the RHEV Manager
Remember to click the “Run Once”
Under the “Boot Option”,
– Attached the virtio-win-1.7.1_amd.vfd to the floppy
– Attached the MS Windows 7 ISO to the CD
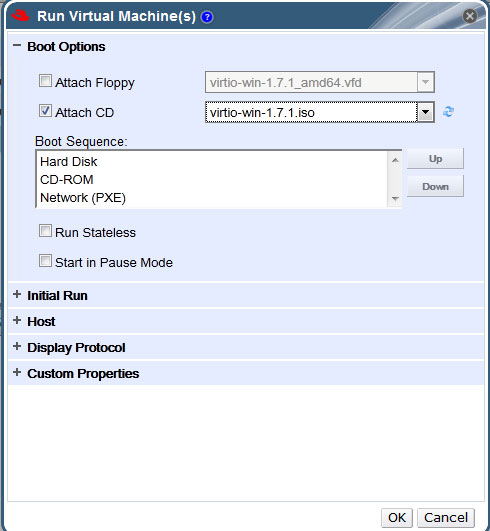
5. Update Ethernet Drivers, PCI Simple Communication Controller by attaching the RH
6. Once you have booted to Windows 7, go to Device Manager and run an update for the missing Ethernet, storage controller
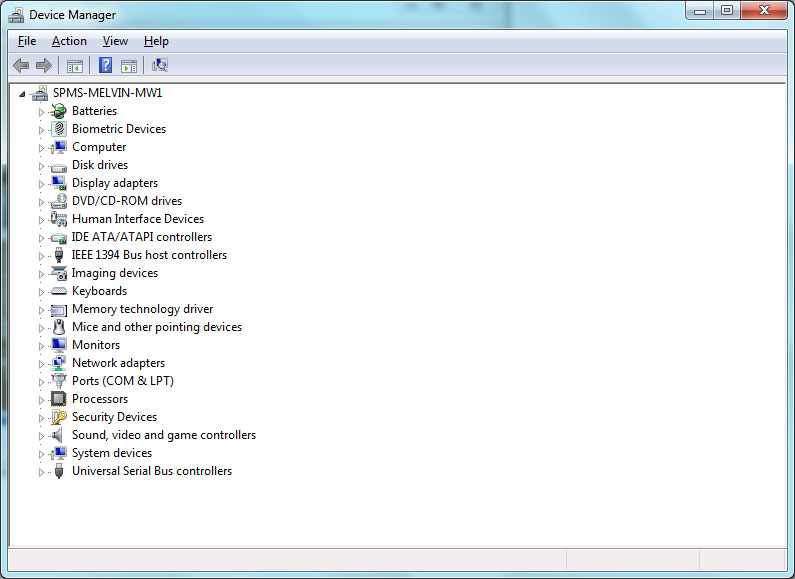
You should see
– Red Hat VirtIO SCSI controller,
– Red Hat VirtIO SCSI pass-through controller
– Red Hat VirtIO Ethernet Adapter
Cannot set user id: Resource temporarily unavailable while trying to login or su as a local user in CentOS
If you encounter this error while trying to login or su –login
# su --login user1
"cannot set user id: Resource temporarily unavailable" while trying to login or su as a local user in CentOS.
To resolve the issue, extend the nproc value in /etc/security/limits.conf for the user.
.....
.....
user1       soft    nproc   10240
# End of file
Alternatively, you can edit /etc/security/limits.d/90-nproc.conf which is
# Default limit for number of user's processes to prevent
# accidental fork bombs.
# See rhbz #432903 for reasoning.

*          soft    nproc     1024
user1       soft    nproc    10240
In CentOS 6, this error occurs even if it has not set the limit explicitly because default configuration to all users is set to /etc/security/limits.d/90-nproc.conf. the reason for this error is that the the user’s the number of executing threads has reached the nproc resource limit.
Compiling and Configuring Python 3.4.1 on CentOS
Step 1: Remember to turn on RPMForge and EPEL Repository.
For more information on repository, see Repository of CentOS 6 and Scientific Linux 6
Step 2: Download Python-3.4.1 from the Python Download Page
Step 3: Install Prerequisite Software
# yum install openssl-devel bzip2-devel expat-devel gdbm-devel readline-devel sqlite-devel
Step 4: Configure and Build
# cd /installation_home/Python-3.4.1
# ./configure --prefix=/usr/local/python-3.4.1
# make
# make install
Step 5: Check that scripts query the correct interpreter:
#/usr/local/python-3.4.1/bin/python3
Step 6: Run setup.py from the Installation Directory of Python
# python setup.py install
Step 7: Install Python Modules (whatever you need. Here is an example)
You can use pip install to install packages using pip3. See Using pip to install python packages
# /usr/local/python-3.4.1/bin/pip3 install networkx
Checking for Constant Time Stamp Counter
A Constant Time Stamp Counter is included in more recent Intel Processors (TSC) to reads at the processor’s maximum rate regardless of the actual CPU running rate. While this makes time keeping more consistent, but it can skew benchmarks, where a certain amount of spin-up time is spent at a lower clock rate before the OS switches the processor to the higher rate. For more information on Time Stamp Counter, do look at Time Stamp Counter (wikipedia)
To check whether your CPU support TSC, you can issue the command
# grep -q constant_tsc /proc/cpuinfo && echo "Constant TSC detected" || echo "No Constant TSC Detected"
