Abaqus/CAE has a built in function to help user to upgrade their Abaqus scripts from older version like 6.14 to the latest. Do follow the below screen shot to upgrade your script.

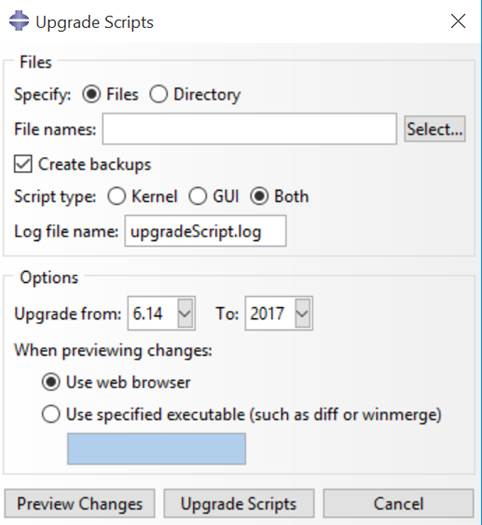

Abaqus/CAE has a built in function to help user to upgrade their Abaqus scripts from older version like 6.14 to the latest. Do follow the below screen shot to upgrade your script.
The Guide was taken from https://media.3ds.com/support/simulia/public/flexlm108/EndUser/chap5.htm
If you wish to restrict user1 to only 64 license
In short,
Step 1: Create a mlm.opt file where the license file are
# touch mlm.opt
MAX 64 abaqus USER user1
Step 2: Edit ABAQUS License File
SERVER this_host 000xxxxyyyyb 27000
VENDOR ABAQUSLM port=27398 options="/usr/SIMULIA/License/2017/linux_a64/code/bin/mlm.opt"
….
….
Step 3: Stop and Start the ABAQUS License File
# ./lmdown
# ./lmgrd -c ABAQUS_LICENSE_FILE.lic -l 241208.log
Option Available OPTION FILE SYNTAX
| Keyword | Description |
|---|---|
| BORROW_LOWWATER | Set the number of BORROW licenses that cannot be borrowed. |
| DEBUGLOG | Writes debug log information for this vendor daemon to the specified file (v8.0+ vendor daemon). |
| EXCLUDE | Deny a user access to a feature. |
| EXCLUDE_BORROW |
Deny a user the ability to borrow BORROW licenses.
|
| EXCLUDEALL | Deny a user access to all features served by this vendor daemon. |
| FQDN_MATCHING | Sets the level of host name matching. |
| GROUP | Define a group of users for use with any options. |
| GROUPCASEINSENSITIVE | Sets case sensitivity for user and host lists specified in GROUP and HOST_GROUP keywords. |
| HOST_GROUP |
Define a group of hosts for use with any options (v4.0+).
|
| INCLUDE | Allow a user to use a feature. |
| INCLUDE_BORROW | Allow a user to borrow BORROW licenses. |
| INCLUDEALL | Allow a user to use all features served by this vendor daemon. |
| LINGER |
Allow a user to extend the linger time for a feature beyond its checkin.
|
| MAX | Limit usage for a particular feature/group-prioritizes usage among users. |
| MAX_BORROW_HOURS | Changes the maximum borrow period for the specified feature. |
| MAX_OVERDRAFT | Limit overdraft usage to less than the amount specified in the license. |
| NOLOG | Turn off logging of certain items in the debug log file. |
| REPORTLOG | Specify that a report log file suitable for use by the FLEXnet Manager license usage reporting tool be written. |
| RESERVE | Reserve licenses for a user or group of users/hosts. |
| TIMEOUT | Specify idle timeout for a feature, returning it to the free pool for use by another user. |
| TIMEOUTALL | Set timeout on all features. |
References:
Here is a write-up of my computing platform and applications:
Step 1: First thing first, source the intel components setting from
# source /usr/local/intel/2018u3/bin/compilervars.sh intel64
# source /usr/local/intel/2018u3/impi/2018.3.222/bin64/mpivars.sh intel64
# source /usr/local/intel/2018u3/mkl/bin/mklvars.sh intel64
# source /usr/local/intel/2018u3/parallel_studio_xe_2018/bin/psxevars.sh intel64
export NWCHEM_TOP=/usr/local/software/nwchem-6.8/nwchem-6.8
export NWCHEM_MODULES=pnnl
export NWCHEM_TARGET=LINUX64
export NWCHEM_LONG_PATHS=y
export PYTHONHOME=/usr
export PYTHONVERSION=2.7
export PYTHONLIBTYPE=so
export USE_PYTHON64=y
export USE_NOFSCHECK=y
export TCGRSH=/usr/bin/ssh
export LARGE_FILES=y
export USE_MPI=y
export USE_MPIF=y
export USE_MPIF4=y
export MPI_LOC="/usr/local/intel/2018u3/impi/2018.3.222/intel64"
export MPI_INCLUDE="/usr/local/intel/2018u3/impi/2018.3.222/intel64/include/gfortran/5.1.0 -I/usr/local/intel/2018u3/impi/2018.3.222/intel64/include"
export MPI_LIB="/usr/local/intel/2018u3/impi/2018.3.222/intel64/lib/release_mt -L/usr/local/intel/2018u3/impi/2018.3.222/intel64/lib"
export LIBMPI="-lmpifort -lmpi -lmpigi -ldl -lrt -lpthread"
export USE_OPENMP=y
export MKLROOT=/usr/local/intel/2018u3/mkl
export MKLLIB="${MKLROOT}/lib/intel64"
export MKLINC="${MKLROOT}/include"
export HAS_BLAS=y
export BLAS_SIZE=8
export BLASOPT="-L${MKLROOT}/lib/intel64 -lmkl_intel_ilp64 -lmkl_intel_thread -lmkl_core -liomp5 -lpthread -lm -ldl"
export LAPACK_SIZE=8
export LAPACK_LIB="$BLASOPT"
export LAPACK_LIBS="$BLASOPT"
export LAPACKOPT="$BLASOPT"
export USE_SCALAPACK=y
export SCALAPACK_SIZE=8
export SCALAPACK="-L${MKLROOT}/lib/intel64 -lmkl_scalapack_ilp64 -lmkl_intel_ilp64 -lmkl_intel_thread -lmkl_core -lmkl_blacs_intelmpi_ilp64 -liomp5 -lpthread -lm -ldl"
export SCALAPACK_LIB="$SCALAPACK"
export SCALAPACK_LIBS="$SCALAPACK"
export CC=icc
export FC=ifort
export USE_64TO32=y
cd $NWCHEM_TOP/src
#make realclean
make nwchem_config
make 64_to_32
make CC=icc FC=ifort FOPTIMIZE=-O3
cd $NWCHEM_TOP/src/tools
make CC=icc FC=ifort FOPTIMIZE=-O3 version
make CC=icc FC=ifort FOPTIMIZE=-O3
cd $NWCHEM_TOP/src
make CC=icc FC=ifort FOPTIMIZE=-O3 link
General Site Installation
Determine the local storage path for the install files. (e.g., /usr/local/NWChem).
Make directories
Determine the local storage path for the install files. (e.g., /usr/local/NWChem).
Make directories
# mkdir /usr/local/nwchem-6.8
# mkdir /usr/local/nwchem-6.8/bin
# mkdir /usr/local/nwchem-6.8/data
Copy binary
# cp $NWCHEM_TOP/bin/ /usr/local/nwchem-6.8/bin
# cd /usr/local/nwchem-6.8/bin
# chmod 755 nwchem
Copy libraries
# cd $NWCHEM_TOP/src/basis
# cp -r libraries /usr/local/nwchem-6.8/data

# cd $NWCHEM_TOP/src/
# cp -r data /usr/local/nwchem-6.8

# cd $NWCHEM_TOP/src/nwpw
# cp -r libraryps /usr/local/nwchem-6.8/data
The Final Lap (From Compiling NWChem)
Each user will need a .nwchemrc file to point to these default data files. A global one could be put in /usr/local/nwchem-6.8/data and a symbolic link made in each users $HOME directory is probably the best plan for new installs. Users would have to issue the following command prior to using NWChem: ln -s /usr/local/nwchem-6.8/data/default.nwchemrc $HOME/.nwchemrc
Contents of the default.nwchemrc file based on the above information should be:
nwchem_basis_library /usr/local/nwchem-6.8/data/libraries/
nwchem_nwpw_library /usr/local/nwchem-6.8/data/libraryps/
ffield amber
amber_1 /usr/local/nwchem-6.8/data/amber_s/
amber_2 /usr/local/nwchem-6.8/data/amber_q/
amber_3 /usr/local/nwchem-6.8/data/amber_x/
amber_4 /usr/local/nwchem-6.8/data/amber_u/
spce    /usr/local/nwchem-6.8/data/solvents/spce.rst
charmm_s /usr/local/nwchem-6.8/data/charmm_s/
charmm_x /usr/local/nwchem-6.8/data/charmm_x/
References:
Prerequistics:
SERVER ABAQUS_LIC_SVR 000000000 27000
VENDOR ABAQUSLM port=27398
.....
.....
.....
Step 1: Shutting down the License Server
# cd /usr/SIMULIA/License/2017/linux_a64/code/bin/
# lmdown
# lmstat -a
Step 2: Starting the License Server
# lmgrd -c ABAQUS_LIC_SVR.LIC -l 081018.log
Minimum Requirements version
I’m using Intel-16.0.4 and Intel-MPI-5.1.3.258
Step 1a: Download and Unpacking Sources
# wget -O - http://dl.openfoam.org/source/5-0 | tar xvz
# wget -O - http://dl.openfoam.org/third-party/5-0 | tar xvz
Step 1b: Rename the Directory
# mv OpenFOAM-5.x-version-5.0 OpenFOAM-5.0
# mv ThirdParty-5.x-version-5.0 ThirdParty-5.0
Step 2: Initiate Intel and Intel-MPI Environment and source OpenFOAM-5.0 bashrc
source /usr/local/intel/bin/compilervars.sh intel64
source /usr/local/intel/parallel_studio_xe_2016.4.072/bin/psxevars.sh intel64
source /usr/local/intel/impi/5.1.3.258/bin64/mpivars.sh intel64
source /usr/local/intel/mkl/bin/mklvars.sh intel64
source /usr/local/OpenFOAM/OpenFOAM-5.0/etc/bashrc
export MPI_ROOT=/usr/local/intel/impi/5.1.3.258/intel64
Step 3: Make sure your CentOS-7 Environment have the following base packages
# yum install gcc-c++ gcc-gfortran gmp flex flex-devel boost zlib zlib-devel qt4 qt4-devel
Step 4: Edit the OpenFOAM internal bashrc
# vim /usr/local/OpenFOAM/OpenFOAM-5.0/etc/bashrc
Line 35,36
export WM_PROJECT=OpenFOAM
export WM_PROJECT_VERSION=5.0
Line 45
FOAM_INST_DIR=/usr/local/$WM_PROJECT
Line 60
export WM_COMPILER_TYPE=system
Line 65
export WM_COMPILER=Icc
Line 88
export WM_MPLIB=INTELMPI
Step 5: Compile OpenFOAM
# ./Allwmake -update -j
If the Gold Accounting System hanged by an unforeseen situation, there are 2 simple ways to start the services again
Step 1: Logon as postgres account
# su --login postgresStep 2: Start the Gold Database
/usr/bin/postmaster -i -D /var/lib/pgsql/data > /var/log/pgsql 2>&1 &Step 3: Start the gold Services
/opt/gold/sbin/golddIf you have an error message when you launched FastX2 client, you will see this error “The command gnome-session existed with signal 15” on CentOS 7 for FastX2.
Step 1: This error is caused by selinux on CentOS 7. Do the following /etc/selinux
SELINUX=disabledTrying to use the command “setenforce 0” does not seems to be able to fix the issue.
Step 2: Remember to install GNOME Desktop
# yum groupinstall "GNOME Desktop" "Graphical Administration Tools"Step 3: Uninstall the StarNetFastX2 and reinstall
# rpm -e StarNetFastX2
# rpm -Uvh --force StarNetFastX2-2.4.7.rhel6.x86_64.rpmSupported Platform
Details Information can be taken from Installing VASP from VASPwiki. This for CPU Compilation
Activate the Intel Compilers/ Intel MPI Environment. In your .bashrc
source /usr/local/intel_2015/parallel_studio_xe_2015/bin/psxevars.sh intel64
source /usr/local/intel_2015/impi/5.0.3.049/bin64/mpivars.sh intel64
source /usr/local/intel_2015/composerxe/bin/compilervars.sh intel64
source /usr/local/intel_2015/mkl/bin/mklvars.sh intel64
MKLROOT=/usr/local/intel_2015/mkl
At the installation base of vasp.5.4.4 base
# cp arch/makefile.include.linux_intel ./makefile.include
For Linking against Intel-MPI Libraries. Edit makefile.include.linux_intel
# vim makefile.include.linux_intel
MKL_PATH = $(MKLROOT)/lib/intel64
BLACS = -lmkl_blacs_intelmpi_lp64
SCALAPACK = $(MKL_PATH)/libmkl_scalapack_lp64.a $(BLACS)
LLIBS = $(SCALAPACK) $(LAPACK) $(BLAS)
For Linking Intel MKL Wrapper of fftw at makefile.include.linux_intel
OBJECTS= fftmpiw.o fftmpi_map.o fftw3d.o fft3dlib.o \
         $(MKLROOT)/interfaces/fftw3xf/libfftw3xf_intel.a
INCS=-I$(MKLROOT)/include/fftw
Make the files
# make all
If you wish to build the standard, gamma, non-collinear individually, you should make as below
# make std
# make gam
# make ncl
The vasp binary of standard, gamma-only, and non-collinear version of VASP can be found in the bin folder of vasp
vasp_gam vasp_ncl vasp_std
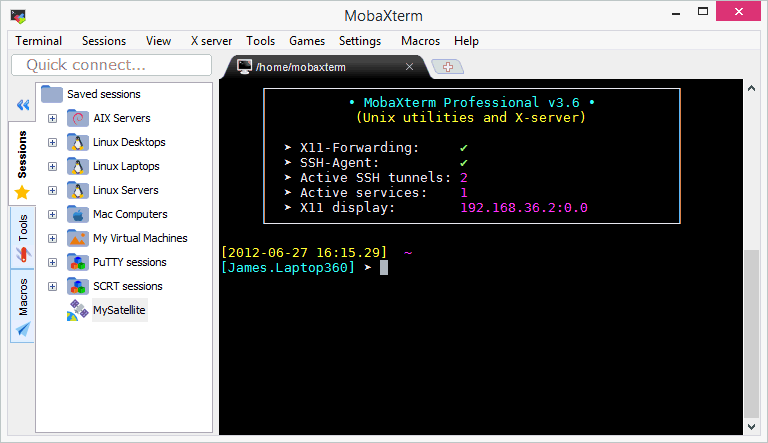
If you are looking for a a Swiss Army Knife for Remote Computing, you may want to take a look at MobaXterm which boasts a number of features including