
A good white paper from Nvidia
Author: kittycool only
Mellanox SN2100 Ethernet Bundle Configurator
Mellanox has a Ethernet Configurator which you can even use for other model.
Here’s how it works:
Choose the following:
1. Choose the setup
- 1 switch
- 2 switches connected with mLAG
- 5 switches: testing both mLAG as well as leaf spine (BGP/ECMP) – simple L3/VTEP/VXLAN Routing (VXLAN on Cumulus only for now)
2. Choose the speed of the host/NIC
- 10/25/100GbE
3. Choose the operating system
- ONYX
- Cumulus Linux
What you get is:
1. Topology: how to connect, which specific ports should be used
2. Solution brief for the selected scenario
3. One Click Configuration files:
- For the CLI guys: running config
- For the Ansible guys: Ansible playbooks (ONYX Ansible for mLAG and L3 will be added soon)
RDMA over Converged Ethernet (RoCE) with Windows Server Storage Spaces Direct Solution
HPC and Medical Advances from HPE
Nvidia DGX Data Centre Reference Design
This is a white Paper from Nvidia which is an interesting information for easy deployment of DGX Servers for Deep Learning
Checking and Modifying Timestamp of whole Directory recursively
Step 1: Show the complete date, time and year for a specific file
$ ls -l --full-time-rwxrwxr-x 1 root root 1109 2018-07-20 12:52:52.587945000 +0800 Allwmake
drwxrwxr-x 5 root root 4096 2018-07-20 12:52:52.602945000 +0800 applications
drwxrwxr-x 3 root root 8192 2018-07-20 12:53:19.536973000 +0800 bin
-rw-rw-r-- 1 root root 35646 2018-07-20 12:52:52.592945000 +0800 COPYING
drwxrwxr-x 5 root root 4096 2018-07-20 12:53:19.936974000 +0800 doc
drwxrwxr-x 8 root root 4096 2018-07-20 12:53:20.039974000 +0800 etc
drwxr-xr-x 4 root root 4096 2018-07-20 12:55:17.230101000 +0800 platforms
-rw-rw-r-- 1 root root 1620 2018-07-20 12:52:52.597945000 +0800 README.org
drwxrwxr-x 38 root root 4096 2018-07-20 12:53:22.032976000 +0800 src
drwxrwxr-x 17 root root 4096 2018-07-20 12:54:45.114064000 +0800 tutorials
drwxrwxr-x 7 root root 4096 2018-07-20 12:55:15.939099000 +0800 wmakeStep 2: If you wish to modify the time-stamp for the entire directory, you can use the command,
% for file in `find .`; do touch $file; doneReferences:
- touch – change file timestamps(Unix Tutorial)
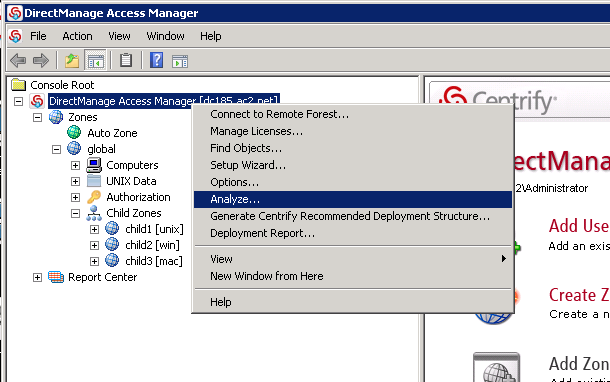
Resolving Orphaned Objects in Centrify Access Manager
On the Centrify Access Manager, when we search for the userid, the Centrify Access Manager is not found.
But when we add the userid in the system, it mentioned that the userid is duplicated. It seems that the userid has been cached and orphaned somewhere in Centrify.
Step 1: To find out duplicated users / objects, you may use Analyze feature in Access Manager. See Pix 1
Step 2: Analyse Results
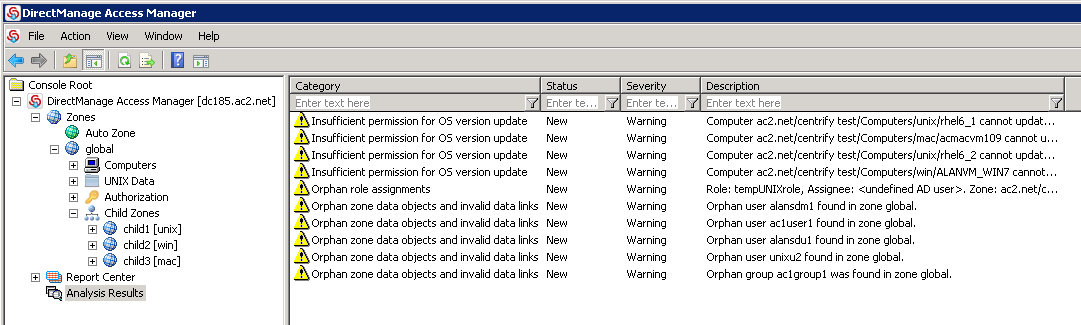
You will notice
– Duplicate users in zones
– Orphan zone data objects and invalid data links
Step 3: Right-Clicked to fix the isses
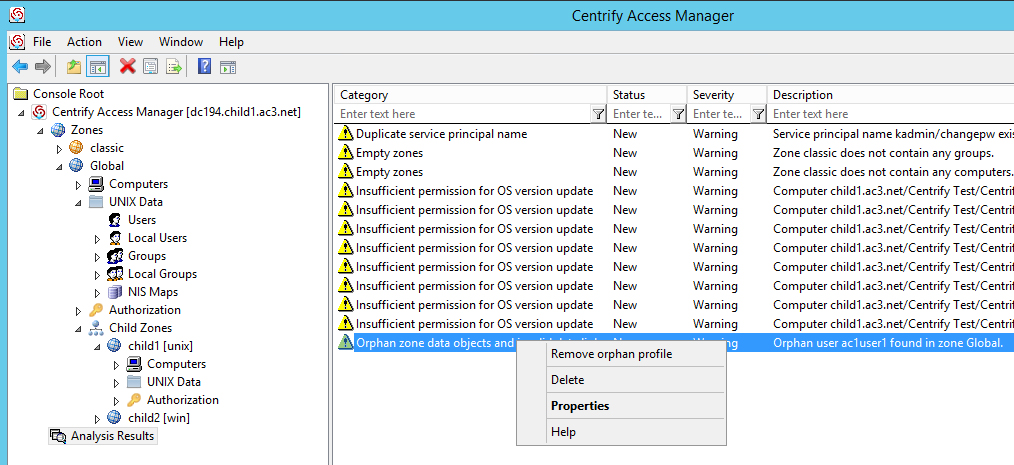
You should be able to add the user.
Formatting NVME Partition on CentOS 7
Step 1: Create a partition:
# sudo fdisk /dev/nvme0n1
Choose “n” to create a new partition
Then "p" and "1" for new partition
Using default paratmeter, "w" to write data to disk
Step 2: Create a file system on it:
# sudo mkfs -t ext4 /dev/nvme0n1p1
Step 3: Create a mount point somewhere convenient:
# sudo mkdir /media/nvme
Step 4: Mount the new partition on that mount point:
# sudo mount /dev/nvme0n1p1 /media/nvme
Step 5: Permanently Mount the Device
Step 5a. To find the UUID first
# sudo blkid
Step 5b: To get it to mount every time, add a line to /etc/fstab:
UUID=nvme_UUID /media/nvme ext4 defaults 0 0
(where nvme_UUID is the value taken from “sudo blkid”)
Step 6 (Optional): At this point, the whole thing belongs to ‘root’
To change the ownership to a specific user (with the partition mounted):
# sudo chown -R user:usergroup /media/nvme
Nvidia Tesla versus Nvidia GTX Cards
References
- Performance Comparison between NVIDIA’s GeForce GTX 1080 and Tesla P100 for Deep Learning
- Comparison of NVIDIA Tesla/Quadro and NVIDIA GeForce GPUs
Nvidia EULA
Key clauses are: 2.1.3 that states no DC deployment, commercial hosting and broadcast services
http://www.nvidia.com/content/DriverDownload-March2009/licence.php?lang=us&type=GeForce
FP64 64-bits (Double Precision) Floating Point Calculation
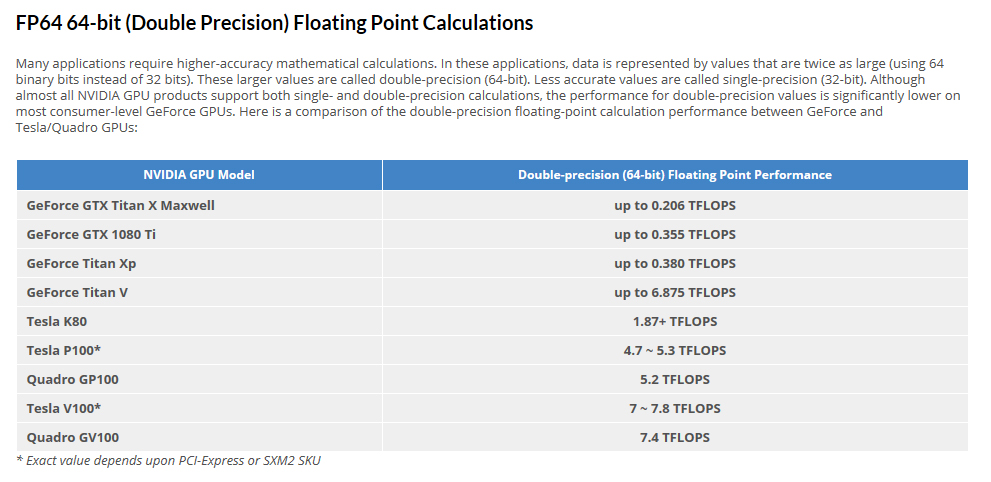
Pix taken from Comparison of NVIDIA Tesla/Quadro and NVIDIA GeForce GPUs
FP16-16bits (Half Precision) Floating Point Calculation
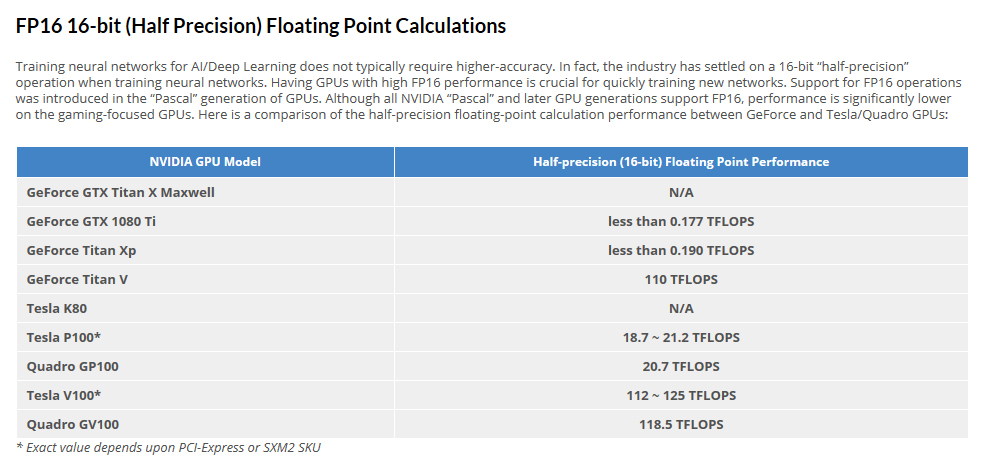
Pix taken from Comparison of NVIDIA Tesla/Quadro and NVIDIA GeForce GPUs
Compiling OpenFOAM-5.0 with Intel-MPI
Minimum Requirements version
- gcc: 4.8.5
- cmake: 3.3 (required for ParaView and CGAL build)
- boost: 1.48 (required for CGAL build)
- fftw: 3.3.7 (optional – required for FFT-related functionality)
- Qt: 4.8 (optional – required for ParaView build)
I’m using Intel-16.0.4 and Intel-MPI-5.1.3.258
Step 1a: Download and Unpacking Sources
# wget -O - http://dl.openfoam.org/source/5-0 | tar xvz
# wget -O - http://dl.openfoam.org/third-party/5-0 | tar xvz
Step 1b: Rename the Directory
# mv OpenFOAM-5.x-version-5.0 OpenFOAM-5.0
# mv ThirdParty-5.x-version-5.0 ThirdParty-5.0
Step 2: Initiate Intel and Intel-MPI Environment and source OpenFOAM-5.0 bashrc
source /usr/local/intel/bin/compilervars.sh intel64
source /usr/local/intel/parallel_studio_xe_2016.4.072/bin/psxevars.sh intel64
source /usr/local/intel/impi/5.1.3.258/bin64/mpivars.sh intel64
source /usr/local/intel/mkl/bin/mklvars.sh intel64
source /usr/local/OpenFOAM/OpenFOAM-5.0/etc/bashrc
export MPI_ROOT=/usr/local/intel/impi/5.1.3.258/intel64
Step 3: Make sure your CentOS-7 Environment have the following base packages
# yum install gcc-c++ gcc-gfortran gmp flex flex-devel boost zlib zlib-devel qt4 qt4-devel
Step 4: Edit the OpenFOAM internal bashrc
# vim /usr/local/OpenFOAM/OpenFOAM-5.0/etc/bashrc
Line 35,36
export WM_PROJECT=OpenFOAM
export WM_PROJECT_VERSION=5.0
Line 45
FOAM_INST_DIR=/usr/local/$WM_PROJECT
Line 60
export WM_COMPILER_TYPE=system
Line 65
export WM_COMPILER=Icc
Line 88
export WM_MPLIB=INTELMPI
Step 5: Compile OpenFOAM
# ./Allwmake -update -j
