
A Massively Spiffy Yet Delicately Unobtrusive Compression Library
Prerequisites
GNU 6.5
Compiling
wget http://www.zlib.net/zlib-1.2.11.tar.gz
tar -xvzf zlib-1.2.11.tar.gz
cd zlib-1.2.11
./configure --prefix=/usr/local/zlib-1.2.11-gcc6
make check

A Massively Spiffy Yet Delicately Unobtrusive Compression Library
GNU 6.5
wget http://www.zlib.net/zlib-1.2.11.tar.gz tar -xvzf zlib-1.2.11.tar.gz cd zlib-1.2.11 ./configure --prefix=/usr/local/zlib-1.2.11-gcc6 make check
If you are doing a setup.py with specific directories
python setup.py install --prefix=/home/user1
If you are getting a PythonPath Error something like this.
TEST FAILED: /home/user1/lib/python3.7/site-packages/ does NOT support .pth files error: bad install directory or PYTHONPATH

You are attempting to install a package to a directory that is not on PYTHONPATH and which Python does not read ".pth" files from.
The installation directory you specified (via --install-dir, --prefix, or the distutils default setting) was: /home/user1/lib/python3.7/site-packages/

and your PYTHONPATH environment variable currently contains:
You can solve like by putting in your .bashrc.
export PYTHONPATH="${PYTHONPATH}:/home/user1/lib/python3.7/site-packages/"
source ~/.bashrc
SCons is an Open Source software construction tool—that is, a next-generation build tool. Think of SCons as an improved, cross-platform substitute for the classic Make utility with integrated functionality similar to autoconf/automake and compiler caches such as ccache. In short, SCons is an easier, more reliable and faster way to build software.
For more information, see https://scons.org/
Python 3 Distribution. For this I used the Intel Python Distribution
git clone https://github.com/SCons/scons.git
cd $HOME/scons
/usr/local/intel/2020/intelpython3/bin/python setup.py install
Do note that the scons will write a site package at /usr/local/intel/2020/intelpython3/lib/python3.7/site-packages/SCons-3.9.9a993-py3.7.egg . You need to allow the necessary permission
cd /usr/local/scons
python runtest.py SCons/BuilderTests.py
1/1 (100.00%) /usr/local/intel/2020/intelpython3//bin/python SCons/BuilderTests.py
......................................
----------------------------------------------------------------------
Ran 38 tests in 0.096s
OK
In this blog, I will write on how to turn off KSM and ksmtuned since I do not need these services and save some unnecessary swapping activities on the disk.
According to RedHat Site (8.4. KERNEL SAME-PAGE MERGING (KSM)),
Kernel same-page Merging (KSM), used by the KVM hypervisor, allows KVM guests to share identical memory pages. These shared pages are usually common libraries or other identical, high-use data. KSM allows for greater guest density of identical or similar guest operating systems by avoiding memory duplication……
KSM is a Linux feature which uses this concept in reverse. KSM enables the kernel to examine two or more already running programs and compare their memory. If any memory regions or pages are identical, KSM reduces multiple identical memory pages to a single page……
8.4.4 Kernel same-page merging (KSM) has a performance overhead which may be too large for certain environments or host systems. KSM may also introduce side channels that could be potentially used to leak information across guests. If this is a concern, KSM can be disabled on per-guest basis.
# systemctl stop ksmtuned
Stopping ksmtuned:                                         [  OK  ]
# systemctl stop ksm
Stopping ksm:                                              [  OK  ]
To permanently deactivate KSM with the systemctl commands
# systemctl disable ksm
# systemctl disable ksmtuned
When KSM is disabled, any memory pages that were shared prior to deactivating KSM are still shared. To delete all of the PageKSM in the system, use the following command:
# echo 2 >/sys/kernel/mm/ksm/runAfter this is performed, the khugepaged daemon can rebuild transparent hugepages on the KVM guest physical memory. Using # echo 0 >/sys/kernel/mm/ksm/run stops KSM, but does not unshare all the previously created KSM pages (this is the same as the # systemctl stop ksmtuned command).
If you wish to look at a specific application limits during run, you can do the following
pgrep fortcom
12345
* I used for fortcom, but it could be any application you wish to take a look.
cat /proc/12345/limitsLimit Soft Limit Hard Limit Units
Max cpu time unlimited unlimited seconds
Max file size unlimited unlimited bytes
Max data size unlimited unlimited bytes
Max stack size 8388608 unlimited bytes
Max core file size 0 unlimited bytes
Max resident set unlimited unlimited bytes
Max processes 4096 2190327 processes
Max open files 1024 4096 files
Max locked memory unlimited unlimited bytes
Max address space unlimited unlimited bytes
Max file locks unlimited unlimited locks
Max pending signals 2190327 2190327 signals
Max msgqueue size 819200 819200 bytes
Max nice priority 0 0
Max realtime priority 0 0
Max realtime timeout unlimited unlimited us* You can take a look that there is no limits to Max locked Memory and Max file locks are unlimited.
GCC-6.5 Compilers and associates libraries
m4-1.4.18
mpfr-3.1.4
cmake-3.15.1
gmp-6.1.0
mpc-1.0.3
% source /usr/local/intel/2018u3/bin/compilervars.sh intel64
% source /usr/local/intel/2018u3/impi/2018.3.222/bin64/mpivars.sh intel64
% source /usr/local/intel/2018u3/mkl/bin/mklvars.sh intel64
% source /usr/local/intel/2018u3/parallel_studio_xe_2018/bin/psxevars.sh intel64
% MKLROOT=/usr/local/intel/2018u3/mkl
Create a setup file
% touch gromacs_gpgpu.shPut the following into the gromacs_cpu.sh
CC=mpicc CXX=mpicxx cmake .. -DCMAKE_C_COMPILER=mpicc -DCMAKE_CXX_COMPILER=mpicxx -DGMX_MPI=on -DGMX_FFT_LIBRARY=mkl
-DCMAKE_INSTALL_PREFIX=/usr/local/gromacs-2019.3_intel18_mkl_cuda10.1 -DREGRESSIONTEST_DOWNLOAD=ON
-DCMAKE_C_FLAGS:STRING="-cc=icc -O3 -xHost -ip"
-DCMAKE_CXX_FLAGS:STRING="-cxx=icpc -O3 -xHost -ip -I/usr/local/intel/2018u3/compilers_and_libraries_2018.3.222/linux/mpi/intel64/include/"
-DGMX_GPU=on
-DCUDA_TOOLKIT_ROOT_DIR=/usr/local/cuda-10.1
-DCMAKE_BUILD_TYPE=Release
-DCUDA_HOST_COMPILER:FILEPATH=/usr/local/intel/2018u3/compilers_and_libraries_2018.3.222/linux/bin/intel64/icpc
% ./gromacs_gpgpu.sh% make% make install$ source /your/installation/prefix/here/bin/GMXRC
./gmxtest.pl all -np 2
SPEAKER: Stephen Wolfram, Founder & CEO, Wolfram Research
TITLE: Emerging Surprises in Applying the Computational Paradigm (and the Deep Relations between Physics, Distributed Computing and AI)
DATE&TIME: Thursday, June 18, 2020 at 7:00 PM CEST FREE REGISTRATION: https://supercomputingfrontiers.eu/2020/seminars/
GCC-6.5 Compilers and associates libraries
m4-1.4.18
mpfr-3.1.4
cmake-3.15.1
gmp-6.1.0
mpc-1.0.3
source /usr/local/intel/2018u3/bin/compilervars.sh intel64 source /usr/local/intel/2018u3/impi/2018.3.222/bin64/mpivars.sh intel64 source /usr/local/intel/2018u3/mkl/bin/mklvars.sh intel64 source /usr/local/intel/2018u3/parallel_studio_xe_2018/bin/psxevars.sh intel64 MKLROOT=/usr/local/intel/2018u3/mkl
Create a setup file
touch gromacs_cpu.sh
Put the following into the gromacs_cpu.sh
CC=mpicc CXX=mpicxx cmake .. -DCMAKE_C_COMPILER=mpicc -DCMAKE_CXX_COMPILER=mpicxx -DGMX_MPI=on -DGMX_FFT_LIBRARY=mkl -DCMAKE_INSTALL_PREFIX=/usr/local/gromacs-2019.3_intel18_mkl -DREGRESSIONTEST_DOWNLOAD=ON -DCMAKE_C_FLAGS:STRING="-cc=icc -O3 -xHost -ip" -DCMAKE_CXX_FLAGS:STRING="-cxx=icpc -O3 -xHost -ip" -DGMX_GPU=off -DCMAKE_BUILD_TYPE=Release
./gromacs_cpu.sh
make
make install
$ source /your/installation/prefix/here/bin/GMXRC
./gmxtest.pl all -np 2
We assumed that you have installed GNU 6.5 and isl-0.15
Download the latest OpenMPI 3.1.6 package from OpenMPI site
% ./configure --prefix=/usr/local/gnu/openmpi-3.1.6 --enable-orterun-prefix-by-default --enable-mpi-cxx --enable-openib-rdmacm-ibaddr --enable-mca-no-build=btl-uct–enable-orterun-prefix-by-default (Configure OMPI –enable-orterun-prefix-by-default and so that you do not need to add the prefix option)
–enable-openib-rdmacm-ibaddr (To enable routing over IB)
–enable-mpi-cxx (C++ bindings are no more built by default)
–enable-mca-no-build=btl-uct (ecent OpenMPI versions contain a BTL component called ‘uct’, which can cause data corruption when enabled, due to conflict on malloc hooks between OPAL and UCM.)
% make all install | tee install.logReferences:
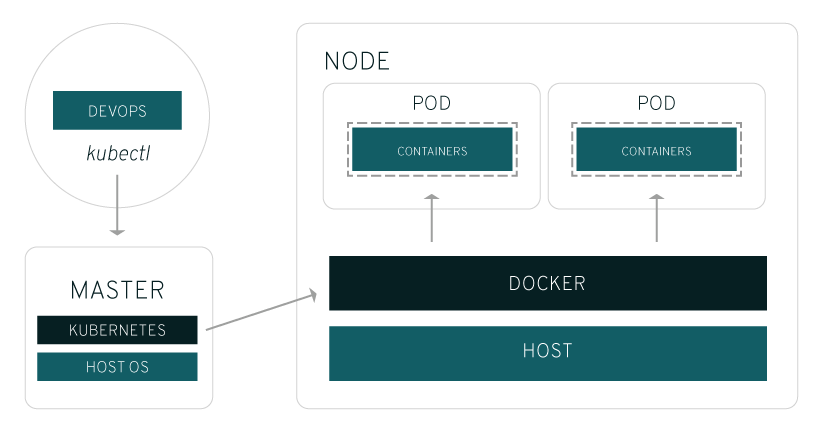
A very good basic article on What is Kubernetes from Red-Hat?
