You may want to module use which come in the hpcx installation
export HPCX_HOME=/usr/local/hpcx-v2.15-gcc-MLNX_OFED_LINUX-5-redhat8-cuda12-gdrcopy2-nccl2.17-x86_64
module use $HPCX_HOME/modulefiles
Next, I used the following parameters that suit my HPC Environment. The default installation is already double-precision. I needed MPI, OPenMPI and needs AVX512…..
# ./configure --prefix=/usr/local/fftw-3.3.10 --enable-threads --enable-openmp --enable-mpi --enable-avx512
# make && make install
ORCA is a general-purpose quantum chemistry package that is free of charge for academic users. The Project and Download Website can be found at ORCA Forum. The current version is 5.0.4.
The current prerequisites that I have used were OpenMPI-4.1.1 and System GNU which is 8.5.
Unless I have missed something, the packages of ORCA-5.0.4 has been split into 3 different packages which you have to untar and combine together
orca_5_0_4_linux_x86-64_openmpi411_part1
orca_5_0_4_linux_x86-64_openmpi411_part2
orca_5_0_4_linux_x86-64_openmpi411_part3
How do I untar the packages?
The first thing is to untar all the packages separately first. Assuming you are untarring at the /usr/local/
$ tar -xf orca_5_0_4_linux_x86-64_openmpi411_part1.tar.xz
$ tar -xf orca_5_0_4_linux_x86-64_openmpi411_part2.tar.xz
$ tar -xf orca_5_0_4_linux_x86-64_openmpi411_part3.tar.xz
How do I do with all the untarred packages?
Copy all the untar files into /usr/local/orca-5.0.4.
If you are not using the Module Environment, you can consider installing. For more information do take a look at Installing Environment Modules on Rocky Linux 8.5. All you need to do is then is to load the additional module such as OpenMPI as a prerequisites. Alternatively, you can set the PATH, LD_LIBRARY_PATH of OpenMPI something like this.
If you encounter slow nvidia-smi before the information is shown. For my 8 x A40 Cards, it took about 26 seconds to initialise.
The reason for slow initialization might be due to the driver persistence issue. For more background on the issue, do take a look at Nvidia Driver Persistence. According to the article,
The NVIDIA GPU driver has historically followed Unix design philosophies by only initializing software and hardware state when the user has configured the system to do so. Traditionally, this configuration was done via the X Server and the GPUs were only initialized when the X Server (on behalf of the user) requested that they be enabled. This is very important for the ability to reconfigure the GPUs without a reboot (for example, changing SLI mode or bus settings, especially in the AGP days).
More recently, this has proven to be a problem within compute-only environments, where X is not used and the GPUs are accessed via transient instantiations of the Cuda library. This results in the GPU state being initialized and deinitialized more often than the user truly wants and leads to long load times for each Cuda job, on the order of seconds.
NVIDIA previously provided Persistence Mode to solve this issue. This is a kernel-level solution that can be configured using nvidia-smi. This approach would prevent the kernel module from fully unloading software and hardware state when no user software was using the GPU. However, this approach creates subtle interaction problems with the rest of the system that have made maintenance difficult.
The purpose of the NVIDIA Persistence Daemon is to replace this kernel-level solution with a more robust user-space solution. This enables compute-only environments to more closely resemble the historically typical graphics environments that the NVIDIA GPU driver was designed around.
.....
Installing from scratch into /usr/local/software/cp2k/tools/toolchain/install/sirius-7.5.2

         for (auto it : unit_cell_.spl_num_paw_atoms()) {

             ^

/usr/local/software/cp2k/tools/toolchain/build/SIRIUS-7.5.2/src/potential/potential.hpp:710:9: error: expected iteration declaration or initialization

         for (auto it : unit_cell_.spl_num_paw_atoms()) {

         ^~~

/usr/local/software/cp2k/tools/toolchain/build/SIRIUS-7.5.2/src/potential/potential.hpp:717:5: warning: no return statement in function returning non-void [-Wreturn-type]

     }
.....
The reason is that the sirius package is installed by default. The issue can be issued if you put the parameters “–with-sirius=no”
% cd cp2k
% cd /usr/local/software/cp2k/tools/toolchain
% ./install_cp2k_toolchain.sh --no-check-certificate --with-openmpi --with-sirius=no
As mentioned, in the blog entry, Terrapin Attack (CVE-2023-48795): SSH Protocol Impacted, the attack is possible only if you use vulnerable ciphers and encryption modes: ChaCha20-Poly1305, CTR-EtM, CBC-EtM. Note that the cyphers and the encryption modes themselves are not vulnerable, but their input (sequence number) can be manipulated by the attacker.
Unable to negotiate with 172.21.33.11 port 22: no matching cipher found. Their offer: aes256-gcm@openssh.com,aes128-gcm@openssh.com,aes256-ctr,aes192-ctr,aes128-ctr
To verify that the Terrapin Attack Vulnerability is mitigated, take a look at Vulnerability Scanner. Pre-built binaries for all major platforms and the source code are available on GitHub.
Researchers from Ruhr University announced the discovery of new vulnerabilities impacting the SSH Protocol. Detailed Information of the Terrapin Attack can be found at Terrapin Attack.
Terrapin is a man-in-the-middle attack; the flaw allows an attacker to corrupt data being transmitted. This can result in a loss of information or bypass critical security controls such as keystroke timing protections or SHA-2 cryptographic hash requirements, allowing the threat actor to downgrade to SHA-1. Doing so opens up the possibility of other attacks on downstream applications, components, or environments that use SSH. These associated vulnerabilities have been assigned CVE-2023-46445 (Rogue Extension Negotiation Attack in AsyncSSH) and CVE-2023-46446 (Rogue Session Attack in AsyncSSH).
The attack is possible only if you use vulnerable ciphers and encryption modes: ChaCha20-Poly1305, CTR-EtM, CBC-EtM. Note that the cyphers and the encryption modes themselves are not vulnerable, but their input (sequence number) can be manipulated by the attacker.
How do I mitigate the attack?
To mitigate the attack, either you upgrade OpenSSH to their latest version 9.6 or disable the affected ciphers and encryption modes.
Limited Impacts: Terrapin can delete consecutive portions of encrypted messages, which in isolation will typically result in a stuck connection. Some of the most serious impacts identified are in downstream applications implementing SSH, such as AsyncSSH. An attacker may be able to disable certain keylogging obfuscation features, enabling them to conduct a keylogging attack; or, worst case, a threat actor can sign a victim’s client into another account without the victim noticing, enabling phishing attacks.
Difficult to Expliot: An active man-in-the-middle attacker and specific encryption modes are prerequisites for the exploit. Intercepting SSH traffic requires a detailed understanding of a target’s environment, limiting real-world applicability.
How do I check?
You may want to explore the vulnerablilty tool published by the Ruhr University Researchers:
For more information, do take look at Vulnerability Scanner. Pre-built binaries for all major platforms and the source code are available on GitHub.
Usage is very simple, after downloading the relevant binary, just use the command
qsub: Budget Manager: License is unverified. AM is not handling requests
To resolve the issue, I took the following Steps. On the PBS-Control Server,
Step 1: Export the Path of the AM Database.
export PATH=/opt/am/postgres/bin:$PATH
Step 2: Check that the Docker Container Services are started in the System. You may want to start the dockers to capture any errors. If the docker is not able to start up, it is likely due to the firewall settings.
# systemctl status firewalld.service.
Step 3: I restarted the PBS Altair Service
# systemctl restart altaircontrol.service
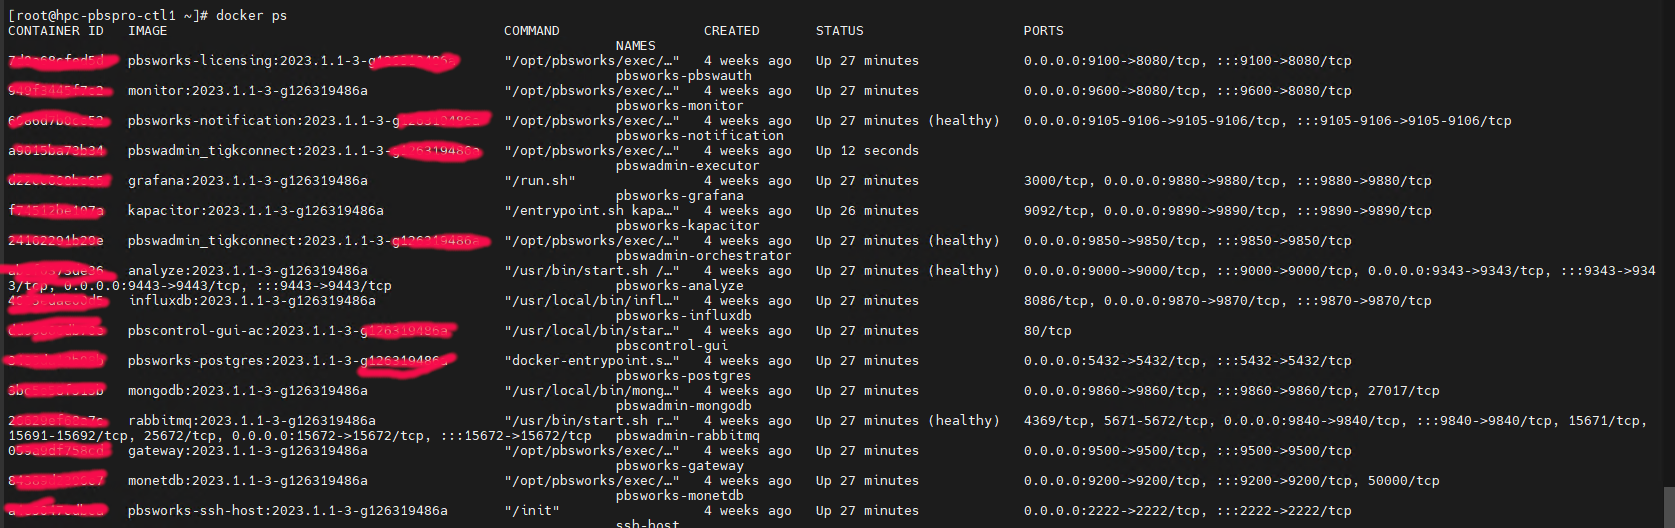
Step 4: I use the Docker Command to return an overview of all running containers
# docker ps
At the PBS-Server, Restart the AM Control Register is working
# /opt/am/libexec/am_control_register
To Test, Submit an Interactive Job with the correct Project Code, it should work.
According to the Article, the goal of the Configuration is to
The firewall rules should count for whole host system – so including Docker containers with port mappings
A Docker container should be accessible from the internet if and only if the host port used in Docker container port mapping is allowed in the firewall
The approach should not break container networking
If you have read the blog entry Using Ansible to automate Security Patch on Rocky Linux 8, you may want to consider capturing the logs and send notification to MS-Team if you are using that as a Communication Channel. This is a follow-up to that blog.
Notification (Option 1: Ansible Command used if just checking)
You can write to MS Team to provide a short notification to let the Engineers knows that the logs has been written to /var/log/ansible_logs
- name: Send a notification to MS-Teams that Test Run (No Patching) is completed
  run_once: true
  uri:
    url: "https://xxxxxxx.webhook.office.com/webhookb2/xxxxxxxxxxxxxxxxxxxxxxxxx"
    method: POST
    body_format: json
    body:
      title: "Test Patch Run on {{ansible_date_time.date}}"
      text: "Test Run only. System has not been Patched Yet. Logs saved at: /var/log/ansible_logs/patch-list_{{ansible_date_time.date}}.log"
  when:
    - register_update_success is defined
    - ext_permit_flag == "no"
Writing to MS-Team to capture the success Or failure of the Update (Option 2: Ansible Command used when ready for Patching)
- name: Send a notification to MS-Teams Channel if Upgrade failed
  run_once: true
  uri:
    url: "https://xxxxx.webhook.office.com/webhookb2/xxxxxx"
    method: POST
    body_format: json
    body:
      title: "Patch Run on {{ansible_date_time.date}}"
      text: "Patch Update has Failed"
  when:
    - register_update_success is not defined
    - ext_permit_flag == "yes"


- name: Send a notification to MS-Teams Channel if Upgrade failed
  run_once: true
  uri:
    url: "https://entuedu.webhook.office.com/webhookb2/xxxxxx"
    method: POST
    body_format: json
    body:
      title: "Patch Run on {{ansible_date_time.date}}"
      text: "Patch Update is Successful. Logs saved at: /var/log/ansible_logs/patch-list_{{ansible_date_time.date}}.log"
  when:
    - register_update_success is defined
    - ext_permit_flag == "yes"