Basic GNU Screen Usage on CentOS

Introduction

Screen is a full-screen window manager that multiplexes a physical terminal between several processes, typically interactive shells. In other words, you can start any number of virtual terminals inside the session. The good thing is that processes running inside screen will continue to run even though the SSH session get disconnected.

GNU Screen Site

GNU Screen can be found on http://ftp.gnu.org/gnu/screen/

Source Code

You can get the source code from here

Using Screen

Screen can be easily installed on CentOS with just

# yum install screen

Naming a Named Session

You may be running many sessions and it is a good idea to name the session that you are starting.

screen -S your_preferred_screen_name

Listing running Screen Session

[user1@node1 ~]$ screen -ls
There is a screen on:
2109.myScreenA (Detached)
1 Socket in /var/run/screen/S-user1

Reattach to a Screen Session

To connect back to the screen, just type the numeric id of the screen

screen -r 2109

Detaching from a Screen Session

Inside the Virtual Session, you can detach the screen with the command

Ctrl-a + d

[Press ctrl with “a” and “d” together]
If you are already outside the virtual session, you can detach an active session by

screen -d 2109

Customised Screen

If you a looking at how to split Screen using screen. Here is a good visual guide.

To Terminate the Screen Session,

Enter into the Session screen

screen -r 2109
exit


User Guide

https://www.gnu.org/software/screen/manual/screen.html#Startup-Files

Links:

How To Use Linux Screen

Unable to open /dev/sdb with fdisk

Taken from my old blog Unable to open /dev/sdb with fdisk

Fdisk is a menu driven program for creation and manipulation of partition tables. The device is usually something like /dev/sda, /dev/sdb. A device name refers to the entire disks. /dev/sd? is the partition of the device. For example, /dev/sda1 refers to the first partition of the first device.

If you issued a command and you receive a corresponding message “unable to open /dev/sdb”

# fdisk /dev/sdb


Unable to open /dev/sdb

Linux is unable to locate or find the partition. One method to verify that it is so, do a listing of the

devices fdisk can see. In this example below, the partition has been created already.

# fdisk -l


Disk /dev/sdb: 2997.4 GB, 2997426536960 bytes
255 heads, 63 sectors/track, 364416 cylinders
Units = cylinders of 16065 * 512 = 8225280 bytes

   Device Boot      Start         End      Blocks   Id  System
/dev/sdb1               1      267349  2147480811   83  Linux

WARNING: The size of this disk is 3.0 TB (2997400633344 bytes).
DOS partition table format can not be used on drives for volumes
larger than 2.2 TB (2199023255040 bytes). Use parted(1) and GUID
partition table format (GPT).

Once you have verified the presence of the device, do a fdisk /dev/sdb again


xrdp_mm_process_login_response: login failed on CentOS 6

This post is taken from my old blog xrdp_mm_process_login_response: login failed

If you encountered this error xrdp_mm_process_login_response: login failed when you use the remote desktop connection to connection to a vnc session.

Even if you restart xrdp, the error still remain, the issue could be due to locked  X11 session that was created by xrdp.

To solve the issue, go to the/tmp/.X11-unix/ and find your X session and delete the session.

# cd /tmp/.X11-unix

Do a listing

# ls -l

Look at the session owned by you which you wished to delete

.....
.....
srwxrwxrwx 1 root      root  0 Jul  9  2012 X0
srwxrwxrwx 1 user1  users 0 Jan 25 09:13 X1
srwxrwxrwx 1 user2      users 0 Jul 10  2012 X10
srwxrwxrwx 1 user3     users 0 Feb 19 13:31 X11
srwxrwxrwx 1 user4  users 0 Nov 20 15:10 X12
srwxrwxrwx 1 user5     users 0 Jul 10  2012 X13
.....
.....

Delete the session……

If xrdp still fails, it seems that it is due to orphaned X–. Once xrdp hits an orphaned X– which may or may not be from other users, the error will still remain.

To see the orphaned X11 session, you can do a vncserver, which you will see something like that

# vncserver


Warning: Head-Node:1 is taken because of /tmp/.X11-unix/X1
Remove this file if there is no X server Head-Node:1

Delete all the orphaned X–
Restart the xrdp service and try the remote connection.

# service xrdp restart

If you are still having the issue, do look at alternative solution

  1. X Server — no display in range is available. xrdp_mm_process_login_response: login failed


Fixing Authentication is required to set the network proxy used for download packages on CentOS 6

This was an old post from my dated blogger Fixing Authentication is requried to set the network proxy used for download packages for CentOS 6

I encountered this pop-up error today when I was xrdp into my CentOS 6. The error was something like this

authentication is required to set the network proxy used for downloading packages.  
An application is attempting to perform an action that requires privileges.  
Authentication as the super user is required to perform this action" and asking  
for the root password


Non-root users

Step 1: Launch a Terminal Console and type

# gnome-session-properties

Step 2: Uncheck PackageKit Update Applet .

See pix below.

Root User

Step 1: Disabled /etc/yum/pluginconf.d

# vim /etc/yum/pluginconf.d/refresh-packagekit.conf
[main]
enabled=0


Making HTTP Server less vulnerable DOS Attack

**These steps were done on CentOS 6 Server

Step 1: Upgrade Apache HTTP to the latest version

# yum update httpd

Step 2: Edit the httpd.conf.

# vim /etc/httpd/conf/httpd.conf

Inside httpd.conf. Scroll all the way to LoadModule………. section and add the line

LoadModule reqtimeout_module modules/mod_reqtimeout.so

Step 3: Create a /etc/httpd/conf.d/reqtimeout.conf and put in the informationbelow

<ifmodule reqtimeout_module>
RequestReadTimeout header=10-20,minrate=500
RequestReadTimeout body=10,minrate=500
</ifmodule>

Step 4: To check whether the apache module is loaded, do

# apachectl -M

Or

apache2ctl -M

References:

  1. Mitigating WAS QID 150085 Slow HTTP POST Vulnerability on Apache


xRDP Connection Errors on CentOS 6

After yum install xrdp and starting the service, I encountered the error during remote desktop to the Linux Box.

connecting to sesman ip 127.0.0.1 port 3350
sesman connect ok
sending login info to session manager, please wait...
xrdp_mm_process_login_reponse: login successful for display
started connecting
connecting to 127.0.0.1 5910
error - problem connecting

At the /var/log/xrdp-sesman.log

......
[20141118-23:53:40] [ERROR] X server for display 10 startup timeout
[20141118-23:53:40] [INFO ] starting xrdp-sessvc - xpid=2998 - wmpid=2997
[20141118-23:53:40] [ERROR] X server for display 10 startup timeout
[20141118-23:53:40] [ERROR] another Xserver is already active on display 10
[20141118-23:53:40] [DEBUG] aborting connection...
[20141118-23:53:40] [INFO ] ++ terminated session:  username root, display :10.0
.....

I have installed the necessary GNOME Desktop packages. Installing GNOME Desktop on CentOS 6 on a console before installing xrdp.

But the solution is quite simple. You need to install the tigervnc-server package and just the tigervnc only.

# yum install tigervnc-server

Restart the xrdp again.

# service xrdp restart


How is the nproc hard limit calculated and how do we change the value on CentOS 7

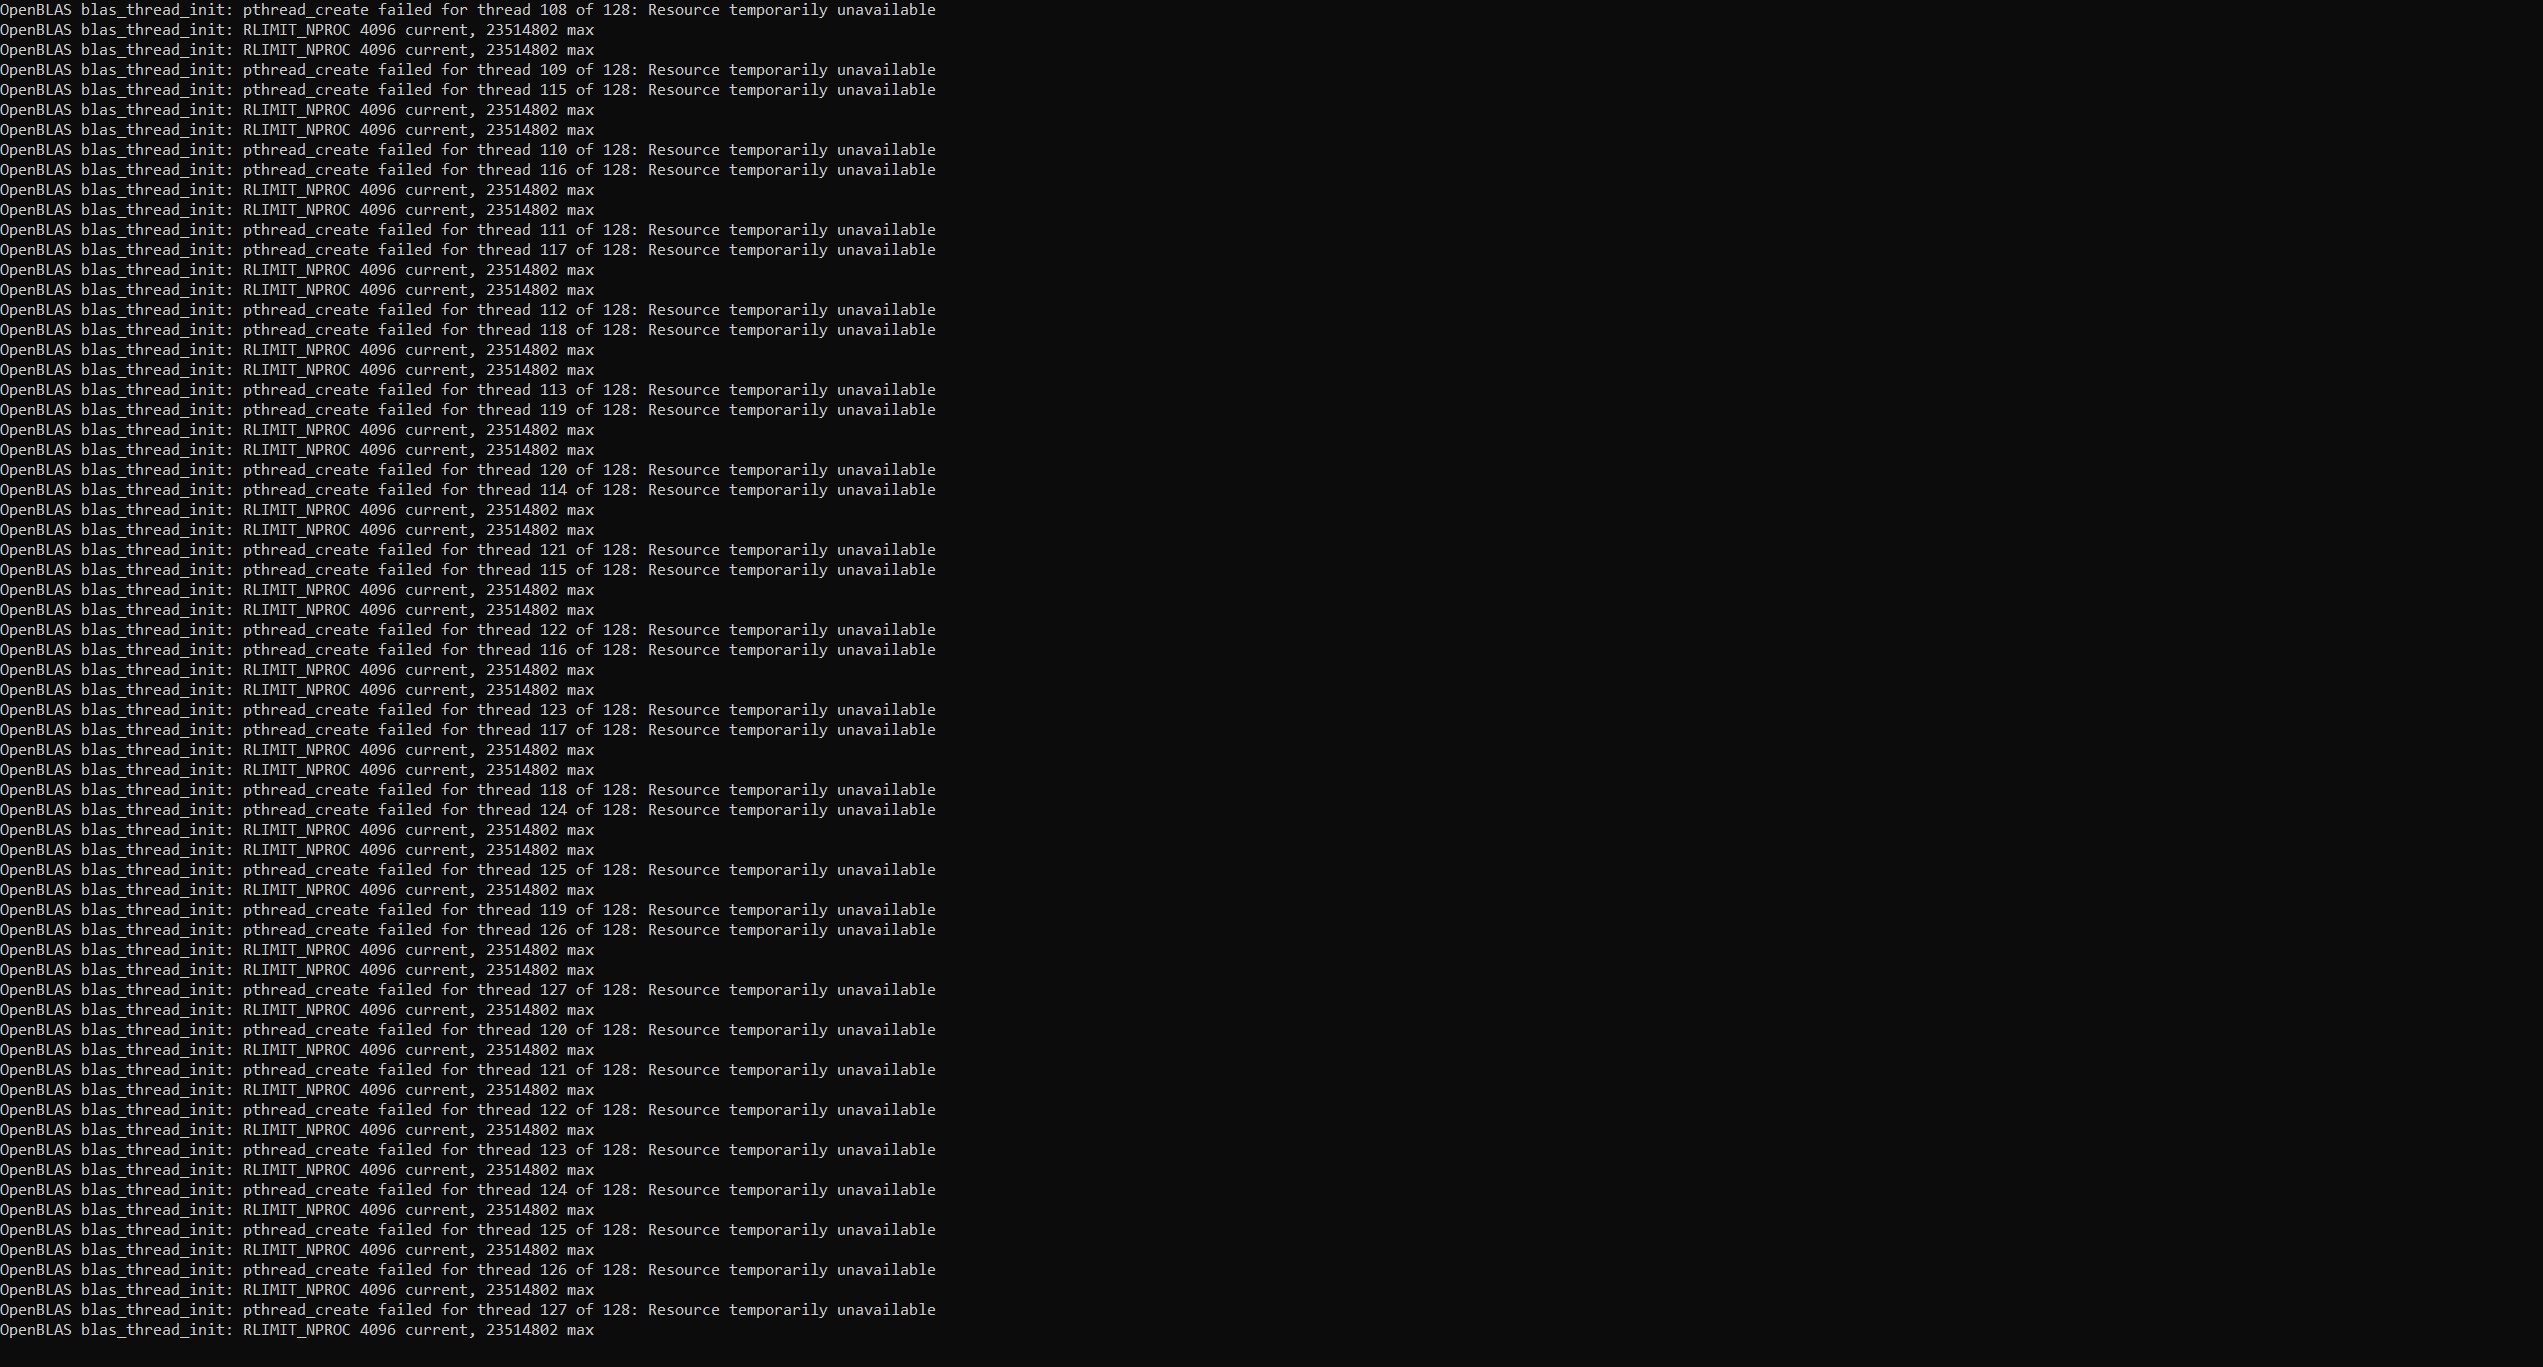
Sometimes, you may encountered errors like this during an intensive run.

How do you know the value of the hard limit set? There is a good article by RedHat that explained “How is the nproc hard limit is calculated

According to the article,

The limit depends on the total memory available on the server, which is calculated at boot time by the kernel as explained below:

/*
* Resource limit IDs
*
* ( Compatibility detail: there are architectures that have
* a different rlimit ID order in the 5-9 range and want
* to keep that order for binary compatibility. The reasons
* are historic and all new rlimits are identical across all
* arches. If an arch has such special order for some rlimits
* then it defines them prior including asm-generic/resource.h. )
*/

#define RLIMIT_CPU 0 /* CPU time in sec */
#define RLIMIT_FSIZE 1 /* Maximum filesize */
#define RLIMIT_DATA 2 /* max data size */
#define RLIMIT_STACK 3 /* max stack size */
#define RLIMIT_CORE 4 /* max core file size */

#ifndef RLIMIT_RSS
# define RLIMIT_RSS 5 /* max resident set size */
#endif

#ifndef RLIMIT_NPROC
# define RLIMIT_NPROC 6 /* max number of processes */
#endif

#ifndef RLIMIT_NOFILE
# define RLIMIT_NOFILE 7 /* max number of open files */
#endif

#ifndef RLIMIT_MEMLOCK
# define RLIMIT_MEMLOCK 8 /* max locked-in-memory address space */
#endif

#ifndef RLIMIT_AS
# define RLIMIT_AS 9 /* address space limit */
#endif

#define RLIMIT_LOCKS 10 /* maximum file locks held */
#define RLIMIT_SIGPENDING 11 /* max number of pending signals */
#define RLIMIT_MSGQUEUE 12 /* maximum bytes in POSIX mqueues */
#define RLIMIT_NICE 13 /* max nice prio allowed to raise to
0-39 for nice level 19 .. -20 */
#define RLIMIT_RTPRIO 14 /* maximum realtime priority */
#define RLIMIT_RTTIME 15 /* timeout for RT tasks in us */
#define RLIM_NLIMITS 16
8<---------- 8< ---------------- 8< ---------------- 8< --------

According to the article, For nproc, the limit is calculated in the kernel before the first process is forked in kernel/fork.c called by start_kernel:

>> init_task.signal->rlim[RLIMIT_NPROC].rlim_cur = max_threads/2;
>> init_task.signal->rlim[RLIMIT_NPROC].rlim_max = max_threads/2;

Below is the path to the function :

>> start_kernel
> fork_init(totalram_pages)
> if (max_threads < 20) max_threads = 20;
> init_task.signal->rlim[RLIMIT_NPROC].rlim_cur = max_threads/2;
> init_task.signal->rlim[RLIMIT_NPROC].rlim_max = max_threads/2;

>>>> RLIMIT_NPROC = max_threads/2

- The value of these variables are:

-> max_threads = mempages / (8 * THREAD_SIZE / PAGE_SIZE);
mempages comes from the function argument : fork_init(totalram_pages);
-> #define THREAD_ORDER 2
-> #define THREAD_SIZE (PAGE_SIZE << THREAD_ORDER)
-> PAGE_SIZE = 4096 (but useless)

- mempages is assigned in dmesg during the boot process, for example:

>> Memory: 36 989 916k/38797312k available (5516k kernel code, 1049156k absent, 758240k reserved, 6912k data, 1332k init)
mempages = 36989916k / PAGE_SIZE = 36989916k / 4096 = 9 247 479

- As an example:

RLIMIT_NPROC = (mempages / (8 * THREAD_SIZE / PAGE_SIZE)) / 2
= (mempages / (8 * (PAGE_SIZE << THREAD_ORDER) / PAGE_SIZE )) /2
= ( 9247479 / (8 * (4096 * 4) / 4096 )) / 2
= ( 9247479 / (8 * 4 )) /2
RLIMIT_NPROC = 14 4491.859375

To look at the values of the hard limits using BASH, you can use the command

ulimit -hn
4096

To modify the limits, do proceed to /etc/security/limits.d/20-nproc.conf to change the number

# Default limit for number of user's processes to prevent
# accidental fork bombs.
# See rhbz #432903 for reasoning.

* soft nproc 4096
root soft nproc unlimited


References:

  1. How is the nproc hard limit calculated?
  2. How to set nproc (Hard and Soft) Values in CentOS / RHEL 5,6,7

Fixing Dependencies Resolution on CentOS 7

Taken from RedHat Solutions- “Yum update or yum install fails with package conflict between 64 bit and 32 bit package architectures ?”

You can configure the yum client to update only a package of the exact architecture installed on the system.

[root@node1 R-3.6.2]# yum install libcurl-devel
Loaded plugins: fastestmirror, langpacks
Loading mirror speeds from cached hostfile
* centos-sclo-rh: mirror.0x.sg
Resolving Dependencies
--> Running transaction check
---> Package libcurl-devel.x86_64 0:7.29.0-42.el7 will be installed
--> Processing Dependency: libcurl = 7.29.0-42.el7 for package: libcurl-devel-7.29.0-42.el7.x86_64
--> Finished Dependency Resolution
Error: Package: libcurl-devel-7.29.0-42.el7.x86_64 (centos74-dvd)
Requires: libcurl = 7.29.0-42.el7
Installed: libcurl-7.29.0-46.el7.x86_64 (installed)
libcurl = 7.29.0-46.el7
Available: libcurl-7.29.0-42.el7.x86_64 (centos74-dvd)
libcurl = 7.29.0-42.el7
You could try using --skip-broken to work around the problem
** Found 139 pre-existing rpmdb problem(s), 'yum check' output follows:


You can configure the yum client to update only a package of the exact architecture installed on the system.

1. Install the yum-utils package

yum install yum-utils

2. The package-cleanup –dupes lists all duplicate packages:

# package-cleanup --dupes

3. The package-cleanup –cleandupes removes the duplicates

# package-cleanup --cleandupes

4. Edit /etc/yum.conf, set the following line for CentOS 7:

exactarchlist=*

Run yum command:

# yum clean all
# yum update

References:

  1. “Yum update or yum install fails with package conflict between 64 bit and 32 bit package architectures ?”

Checking Disk Usage Examples

Point 1: To check and list disk usage of /var/log directory is given below

# du -hx /var/log --max-depth=1
0 /var/log/ntpstats
57M /var/log/sa
288K /var/log/tuned
39M /var/log/audit
0 /var/log/chrony
112K /var/log/xcat
3.2M /var/log/anaconda
0 /var/log/rhsm
12K /var/log/Lenovo_Support

Point 2: Sort out and list disk usage in /var/log is given below

# du -hx /var/log --max-depth=1 |sort -h
0 /var/log/chrony
0 /var/log/ntpstats
0 /var/log/rhsm
12K /var/log/Lenovo_Support
112K /var/log/xcat
288K /var/log/tuned
3.2M /var/log/anaconda
39M /var/log/audit
57M /var/log/sa
108M /var/log

Point 3: Show last modification time and sort it by usage

# du -hx /var/log -d 1 --time -a --max-depth=1 |sort -h
0 2017-04-13 05:24 /var/log/ntpstats
0 2017-08-04 05:27 /var/log/chrony
0 2018-03-30 03:21 /var/log/tallylog
0 2018-03-30 03:27 /var/log/rhsm
0 2018-03-30 06:21 /var/log/opensm-activity.dump
0 2019-05-07 18:39 /var/log/opensm.log
0 2019-09-30 03:36 /var/log/spooler-20191006
0 2019-10-01 03:17 /var/log/btmp-20191101
0 2019-10-06 03:41 /var/log/spooler-20191013
0 2019-10-13 03:43 /var/log/maillog-20191021
0 2019-10-13 03:43 /var/log/spooler-20191021
0 2019-10-21 03:28 /var/log/maillog-20191027
0 2019-10-21 03:28 /var/log/spooler-20191027
0 2019-10-24 03:30 /var/log/boot.log-20191024
0 2019-10-25 03:30 /var/log/boot.log-20191025
0 2019-10-26 03:11 /var/log/boot.log-20191026
0 2019-10-27 03:07 /var/log/boot.log-20191027
0 2019-10-27 03:07 /var/log/spooler
0 2019-10-28 03:48 /var/log/boot.log-20191028
0 2019-10-29 03:28 /var/log/boot.log-20191029
0 2019-11-01 10:29 /var/log/boot.log
0 2019-11-01 10:29 /var/log/boot.log-20191101
0 2019-11-01 10:29 /var/log/btmp
4.0K 2018-03-30 03:21 /var/log/grubby_prune_debug
4.0K 2018-03-30 05:08 /var/log/grubby
4.0K 2019-02-25 03:06 /var/log/opensm.log-20190225.gz
4.0K 2019-02-25 19:31 /var/log/opensm.log-20190303.gz
4.0K 2019-04-07 23:25 /var/log/opensm.log-20190408.gz
4.0K 2019-05-07 17:10 /var/log/opensm.log-20190507.gz
4.0K 2019-10-14 17:30 /var/log/secure-20191021
4.0K 2019-10-24 20:06 /var/log/yum.log
4.0K 2019-11-01 15:41 /var/log/secure
8.0K 2018-09-10 15:01 /var/log/centrifydc-install.log
8.0K 2019-10-02 12:02 /var/log/secure-20191006
8.0K 2019-10-24 22:24 /var/log/secure-20191027
8.0K 2019-11-01 15:30 /var/log/maillog
12K 2018-03-30 13:41 /var/log/Lenovo_Support
.....
.....
.....
39M 2019-10-29 06:00 /var/log/audit
57M 2019-11-01 16:20 /var/log/sa
108M 2019-11-01 16:20 /var/log

Redirecting to another site in User Directory in APACHE

Sometimes your users may require you to redirect to their new site and even capture errors like 404, 401 in their old site and redirect to their new site. You can do it by doing the following.

Step 1: After clearing out all the old site, you may want to put in a redirection page. Can be a simple one line on a index.html

Step 2: To trap “missing or ghost directory and files” in the website of the user directory. For example the old site could be http://www.myoldsite.com/~me/

You may want to create a .conf file such as myoldsite.conf and placed it at /etc/httpd/conf.d and put in the following configuration.

Step 3: Update the httpd service.

For CentOS 7, it could be

# systemctl start httpd.service