AMD’s EPYC™ 7002 HPC Benchmarks over Mellanox solutions

Below are the links to the current HPC Performance Briefs on EPYC 7002 showcasing performance with some of the most main stream applications used in HPC including Gromacs, Weather modeling with WRF and more, including CFD and FEA applications.

  1. GROMACS
  2. WRF
  3. ESI Virtual Performance Solution
  4. LS-DYN
  5. Altair Radioss
  6. ANSYS FLUENT


Mellanox Spectrum Switch & ConnectX-4 25/100GbE

  1. AMD EPYC™ 7002 SERIES PROCESSORS ACHIEVE NEW WORLD RECORD ON INDUSTRY-STANDARD DECISION SUPPORT SYSTEM BENCHMARK – Benchmark: TPC-DS
  2. AMD EPYC™ 7002 Series Processors Best Four Node Benchmark Result VMmark® 3 Using Vmware vSAN® – Benchmark: VMmark over VMware’s ESXi 6.7U3 vSAN
  3. AMD EPYC™ 7002 Series Processors Set New World Record on VMmark® 3 Virtualization Platform Benchmark – Benchmark: Virtualization running Vmmark
  4. AMD EPYC™ 7002 Series Processors Achieve Best-in-Class Results on Internet-of-Things Benchmark with Four Nodes – Benchmarks: TPC Express Benchmark™ IoT (TPCx-IoT™)


Mellanox NIC only

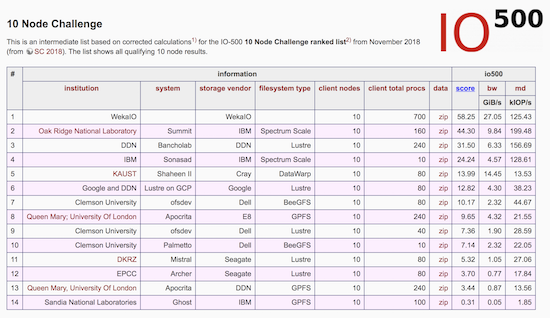
  1. TPCx-HS @ 30 TB (Hortonworks on HP DL325) – Benchmarks: TPC over Big Data using Apache Hadoop
  2. AMD EPYC™ Processor Extends Leadership with Best-in-Class Results on Industry-Standard Big Data Benchmark -TPCx-HS 10TB scale factor (Cloudera on Dell):Cloudera on 17-node Dell R6415 cluster. – Benchmarks: TPC Express HS (TPCx-HS) over Big Data using Apache Hadoop
  3. AMD EPYC™ Processor Achieves Best-in-Class Results on Industry-Standard Internet of Things Benchmark -TPCx-IoT (HBASE): Cloudera HBASE on 4-node Dell R6415 cluster. – Benchmarks: TPC Express HS (TPCx-HS) over Big Data using Apache Hadoop
  4. AMD EPYC Processor Achieves Best-in-Class Results on Industry-Standard Big Data Benchmark on Big Data benchmark, TPCx-HS @ 1 TB scale factor- Cloudera on 17-node Dell R6415 cluster – Benchmarks: TPC Express HS (TPCx-HS) over Big Data using Apache Hadoop

WekaIO Beats Big Systems on the IO-500 10 Node Challenge

What is IO-500 Node Challenge?

The IO-500 10 Node Challenge is a ranked list comparing storage systems that work in tandem with the world’s largest supercomputers. By limiting the benchmark to 10 nodes, the test challenges single client performance from the storage system. Each system is evaluated using the IO-500 benchmark that measures the storage performance using read/write bandwidth for large files and read/write/listing performance for small files…. from InsideHPC

For more information, do look at WekaIO Beats Big Systems on the IO-500 10 Node Challenge

Using firewall-cmd rich rules to whitelist IP Address Range

For basic firewall-cmd Using firewall-cmd in CentOS 7

For starting and stopping firewalld service Disable FirewallD Services on CentOS 7

Firewall Rich Rules are an additional feature of firewalld that allows you to create the most sophisticated firewall rules.

Option 1a: To add a rich rule to allow a subnet to be whitelisted. The rest should be rejected. For example, you only want 192.168.1.0/24 to be admitted; the rest of the source IP addresses should be rejected.

# firewall-cmd --permanent --zone=public --add-rich-rule='rule family="ipv4" source address="192.168.1.0/24" invert="true" port port="22" protocol="tcp" accept'
# firewall-cmd --reload
public (active)
  target: ACCEPT
  icmp-block-inversion: no
  interfaces: ens33
  sources: 192.168.1.0/24
  services: 
  ports: 
  protocols: 
  forward: no
  masquerade: no
  forward-ports: 
  source-ports: 
  icmp-blocks: 
  rich rules: 
	rule family="ipv4" source NOT address="192.168.1.0/24" port="22" reject

Option 1b: To add a rule to allow a service to be whitelisted. The rest should be rejected. For example, you only want 192.168.1.0/24 to be admitted; the rest of the source IP addresses should be rejected.

# firewall-cmd --permanent --zone=public --add-rich-rule='rule family="ipv4" source address="192.168.1.0/24" invert="true" service name="ssh" accept'
# firewall-cmd --reload
public (active)
  target: ACCEPT
  icmp-block-inversion: no
  interfaces: ens33
  sources: 192.168.1.0/24
  services: 
  ports: 
  protocols: 
  forward: no
  masquerade: no
  forward-ports: 
  source-ports: 
  icmp-blocks: 
  rich rules: 
	rule family="ipv4" source NOT address="192.168.1.0/24" service name="ssh" reject

Option 1c: To remove a rich rule to allow a subnet to be whitelisted

# firewall-cmd --permanent --zone=public --remove-rich-rule='rule family="ipv4" source address="192.168.1.0/24" invert="true" port port="22" protocol="tcp" accept'
# firewall-cmd --reload

Option 2a: To add log entry

# firewall-cmd --permanent --zone=public --add-rich-rule='rule family="ipv4" source address="192.168.1.0/24 invert="true" port port="22" protocol="tcp" log prefix="Firewall Rich Rule Log" level="notice" accept'

Spectrum Scale Solutions

  1. NVMe storage via RDMA storage via E8, Excelero
    Lowest-Latency Distributed Block Storage for IBM Spectrum Scale
    Excelero NVMesh, Lowest-Latency Distributed Block Storage for IBM Spectrum Scale
  2. Community server + Spectrum Scale Erasure coding
    IBM Spectrum LSF and IBM Spectrum Scale User Group Erasure Code Edition
  3. IBM ESS NVMe edition (going to be released in this Q4)
    https://www.ibm.com/downloads/cas/MNEQGQVP
    https://www.spectrumscaleug.org/wp-content/uploads/2019/05/SSSD19DE-Day-1-03-IBM-Spectrum-Storage-for-AI-with-Nvidia-DGX.pdf
  4. Existing IBM ESS
    Accelerate with IBM Storage: Building and Deploying Elastic Storage Server (ESS)

Compile LATTE package for LAMMPS using Intel Compilers

Step 1: Download LATTE Source Code from Project

Download or clone the LATTE source code from https://github.com/lanl/LATTE. If you download a zipfile or tarball, unpack the tarball either in this /lib/latte directory or somewhere else on your system.

Step 2: Modify makefile.CHOICES

Modify the makefile.CHOICES according to your system architecture and compilers. Check that the MAKELIB flag is ON in makefile.CHOICES and finally, build the code via the make command

#
# Compilation and link flags for LATTE
#

# Precision - double or single
PRECISION = DOUBLE
#PRECISION = SINGLE

# Make the latte library
# AR and RUNLIB executable default path to compile
# latte as a library (change accordingly)
MAKELIB = ON
AR = /usr/bin/ar cq
RANLIB = /usr/bin/ranlib

# Use PROGRESS and BML libraries
PROGRESS = OFF
PROGRESS_PATH= $(HOME)/qmd-progress/install/lib
BML_PATH= $(HOME)/bml/install/lib

# Use METIS library for graph partitioning
METIS = OFF
METIS_PATH= $(HOME)/metis/metis-5.1.0/install

# GPU available - OFF or ON
GPUOPT = OFF

# Using DBCSR library from cp2k? OFF or ON
DBCSR_OPT = OFF

# Parallelizing over k-points?
MPIOPT = OFF

#
# CPU Fortran options
#

#For GNU compiler:
#FC = mpif90
FC = gfortran
FCL = $(FC)
FFLAGS = -O3 -fopenmp -cpp
#FFLAGS =  -fast -Mpreprocess -mp
LINKFLAG = -fopenmp

#For intel compiler:
FC = ifort
FCL = $(FC)
FFLAGS =  -O3 -fpp -qopenmp
LINKFLAG = -qopenmp
LIB = -mkl=parallel

#GNU BLAS/LAPACK libraries:
#LIB = -L/usr/local/lapack-3.8.0 -llapack -L/usr/local/blas-3.8.0/lib -lblas

#Intel MKL BLAS/LAPACK libraries:
LIB = -Wl,--no-as-needed -L${MKLROOT}/lib/intel64 \
 -lmkl_lapack95_lp64 -lmkl_gf_lp64 -lmkl_gnu_thread -lmkl_core \
 -lmkl_gnu_thread -lmkl_core -ldl -lpthread -lm

#Alternative flags for MKL:
#LIB += -mkl=parallel

#Other BLAS/LAPACK vendors:
#LIB = -framework Accelerate
#LIB = -L/usr/projects/hpcsoft/toss2/common/acml/5.3.1/gfortran64/lib -lacml

# Uncomment for coverage
#CVR = OFF
ifeq ($(CVR), ON)
        FFLAGS += -fprofile-arcs -ftest-coverage
        LINKFLAG += -fprofile-arcs -ftest-coverage
endif

ifeq ($(PROGRESS), ON)
        LIB += -L$(PROGRESS_PATH) -lprogress -L$(BML_PATH) -lbml_fortran -lbml
        FFLAGS += -I$(BML_PATH)/../include -I$(PROGRESS_PATH)/../include
endif

ifeq ($(GRAPH), ON)
        LIB += -L$(METIS_PATH)/lib -lmetis
        FFLAGS += -I$(METIS_PATH)/include
endif

#DBCSR_LIB = -L/home/cawkwell/cp2k/lib/cawkwell/popt -lcp2k_dbcsr_lib
#DBCSR_MOD = -I/home/cawkwell/cp2k/obj/cawkwell/popt

#
# GPU options
#

GPU_CUDA_LIB = -L/usr/local/cuda-9.1/lib64 -lcublas -lcudart
GPU_ARCH = sm_20
# make

You should see liblatte.a file.


Redirecting to another site in User Directory in APACHE

Sometimes your users may require you to redirect to their new site and even capture errors like 404, 401 in their old site and redirect to their new site. You can do it by doing the following.

Step 1: After clearing out all the old site, you may want to put in a redirection page. Can be a simple one line on a index.html

Step 2: To trap “missing or ghost directory and files” in the website of the user directory. For example the old site could be http://www.myoldsite.com/~me/

You may want to create a .conf file such as myoldsite.conf and placed it at /etc/httpd/conf.d and put in the following configuration.

Step 3: Update the httpd service.

For CentOS 7, it could be

# systemctl start httpd.service

Unable to open a connection to your SSH authentication agent

If you are unable to have open a connection to your SSH public key could not be exchanged successfully, you may want to do the following

Remember to do the following SSH Login without Password

Evaluate that the agent is up

# eval `ssh-agent -s`
Agent pid 265652

Add your SSH private key to the ssh-agent.

# ssh-add ~/.ssh/id_rsa.pub

*If you are still using “Could not open a connection to your authentication agent.”

# exec ssh-agent bash

*If You are having the issue. The default is

@@@@@@@@@@@@@@@@@@@@@@@@@@@@@@@@@@@@@@@@@@@@@@@@@@@@@@@@@@@
@ WARNING: UNPROTECTED PRIVATE KEY FILE! @
@@@@@@@@@@@@@@@@@@@@@@@@@@@@@@@@@@@@@@@@@@@@@@@@@@@@@@@@@@@
Permissions 0644 for 'id_rsa.pub' are too open.
It is required that your private key files are NOT accessible by others.
This private key will be ignored.
# chmod 600 id_rsa.pub


Remove virbr0 Interfaces from CentOS 7

Step 1: Stop the libvirtd Service

# systemctl stop libvirtd.service

You should see something like this

● libvirtd.service - Virtualization daemon
Loaded: loaded (/usr/lib/systemd/system/libvirtd.service; enabled; vendor preset: enabled)
Active: inactive (dead) since Mon 2019-06-03 13:33:26 +08; 43s ago
Docs: man:libvirtd(8)
https://libvirt.org
Process: 28069 ExecStart=/usr/sbin/libvirtd $LIBVIRTD_ARGS (code=exited, status=0/SUCCESS)
Main PID: 28069 (code=exited, status=0/SUCCESS)
Tasks: 2 (limit: 32768)
Memory: 6.7M
CGroup: /system.slice/libvirtd.service
├─28896 /usr/sbin/dnsmasq --conf-file=/var/lib/libvirt/dnsmasq/default.conf --leasefile-ro --dhcp-script=/usr/libexec/libvirt_leaseshelper
└─28897 /usr/sbin/dnsmasq --conf-file=/var/lib/libvirt/dnsmasq/default.conf --leasefile-ro --dhcp-script=/usr/libexec/libvirt_leaseshelper

Step 2. Disable the service

# systemctl disable libvirtd.service

Step 3: Removing the virbr0 interfaces on machine

# brctl show
bridge name     bridge id               STP enabled     interfaces
docker0         8000.0242f3432864       no
virbr0          8000.525400d6fcaa       yes             virbr0-nic

Step 4: Down the Bridge Link

# ip link set virbr0 down

Step 5: Remove the Bridge

# brctl delbr virbr0

Step 6: Verify that the bridge has been removed.

# brtcl show
bridge name bridge id STP enabled interfaces
docker0 8000.0242f3432864 no

Displaying node level source summary

P1: To view Node Level Source Summary like bhosts in Platform LSF

# pbsnodes -aSn
n003 job-busy 1 1 0 377gb/377gb 0/32 0/0 0/0 14654
n004 job-busy 1 1 0 377gb/377gb 0/32 0/0 0/0 14661
n005 free 9 9 0 346gb/346gb 21/32 0/0 0/0 14570,14571,14678,14443,14608,14609,14444,14678,14679
n006 job-busy 1 1 0 77gb/377gb 0/32 0/0 0/0 14681
n008 job-busy 1 1 0 77gb/377gb 0/32 0/0 0/0 14681
n009 job-busy 1 1 0 77gb/377gb 0/32 0/0 0/0 14681
n010 job-busy 1 1 0 377gb/377gb 0/32 0/0 0/0 14665
n012 job-busy 1 1 0 77gb/377gb 0/32 0/0 0/0 14681
n013 job-busy 1 1 0 77gb/377gb 0/32 0/0 0/0 14681
n014 job-busy 1 1 0 77gb/377gb 0/32 0/0 0/0 14681
n015 job-busy 1 1 0 77gb/377gb 0/32 0/0 0/0 14681
n007 free 0 0 0 377gb/377gb 32/32 0/0 0/0 --
n016 job-busy 1 1 0 77gb/377gb 0/32 0/0 0/0 14681
n017 job-busy 1 1 0 377gb/377gb 0/32 0/0 0/0 14676
n018 job-busy 1 1 0 377gb/377gb 0/32 0/0 0/0 14677

P2: To View Node Level Summary with explanation via qstat

# qstat -ans | less
Req'd Req'd Elap
Job ID Username Queue Jobname SessID NDS TSK Memory Time S Time
--------------- -------- -------- ---------- ------ --- --- ------ ----- - -----
40043.hpc-mn1 chunfei0 iworkq Ansys 144867 1 1 256mb 720:0 R 669:1
r001/11
Job run at Mon Oct 21 at 15:30 on (r001:ncpus=1:mem=262144kb:ngpus=1)
40092.hpc-mn1 e190013 iworkq Ansys 155351 1 1 256mb 720:0 R 667:0
r001/13
Job run at Mon Oct 21 at 17:41 on (r001:ncpus=1:mem=262144kb:ngpus=1)
42557.mn1 i180004 q32 LAMMPS -- 1 48 -- 72:00 Q --
--
Not Running: Insufficient amount of resource: ncpus (R: 48 A: 14 T: 2272)
42941.mn1 hpcsuppo iworkq Ansys 255754 1 1 256mb 720:0 R 290:2
hpc-r001/4
Job run at Wed Nov 06 at 10:18 on (r001:ncpus=1:mem=262144kb:ngpus=1)
Req'd Req'd Elap
Job ID Username Queue Jobname SessID NDS TSK Memory Time S Time
--------------- -------- -------- ---------- ------ --- --- ------ ----- - -----
40043.mn1 chunfei0 iworkq Ansys 144867 1 1 256mb 720:0 R 669:1
hpc-r001/11
Job run at Mon Oct 21 at 15:30 on (r001:ncpus=1:mem=262144kb:ngpus=1)
40092.hpc-mn1 e190013 iworkq Ansys 155351 1 1 256mb 720:0 R 667:0
hpc-r001/13
Job run at Mon Oct 21 at 17:41 on r001:ncpus=1:mem=262144kb:ngpus=1)
42557.hpc-mn1 i180004 q32 LAMMPS -- 1 48 -- 72:00 Q --
--
Not Running: Insufficient amount of resource: ncpus (R: 48 A: 14 T: 2272)
42941.mn1 hpcsuppo iworkq Ansys 255754 1 1 256mb 720:0 R 290:2
hpc-r001/4
Job run at Wed Nov 06 at 10:18 on (r001:ncpus=1:mem=262144kb:ngpus=1)
....
....
....

Clearing the password cache for Altair Display Manager

If you are using Altair Display Manager and you encounter this Error Message (java.util.concurrent.ExecutionException) below


Resolution Step 1: 

Click the Icon at the top left hand corner of the browser


Resolution Step 2:

Click the Compute Manager Icon


Resolution Step 3:

On the Top-Right Corner of the Browser, click the setting icon and “Edit/Unregister”


Resolution Step 4:

Click the bottom left hand corner and click “Unregister”

Click “Yes”


Resolution Step 5:

Click “Save”

Log out and Login again