Power Systems solutions deliver faster time to insight and offer accelerated performance for demanding HPC workloads.
https://developer.ibm.com/linuxonpower/perfcol/perfcol-technical/

Power Systems solutions deliver faster time to insight and offer accelerated performance for demanding HPC workloads.
https://developer.ibm.com/linuxonpower/perfcol/perfcol-technical/
When I was compiling CMAKE-3.11.4 with GNU-5.4.0, we encountered the error
"The C++ compiler does not support C++11 (e.g. std::unique_ptr)"This was rather complex to solve. I believe if I upgrade my GNU Compilers, it might work. Somehow at GNU 5.4, it does not recognize the C++11 support.
But when I downgraded to Cmake-3.9.6, it works immediately without issues. Do look at https://cmake.org/files/v3.9/
# cd $CMAKE_HOME
#./bootstrap
# gmake
“Crucially, because the BMC has the ability to install the operating system, it can disrupt the process that boots the operating system – and fetch potentially malicious implant code, maybe even over the Internet.”
An Interesting Read “Making sense of the Supermicro motherboard attack” from Light Blue Touchpaper
Here is a write-up of my computing platform and applications:
Step 1: First thing first, source the intel components setting from
# source /usr/local/intel/2018u3/bin/compilervars.sh intel64
# source /usr/local/intel/2018u3/impi/2018.3.222/bin64/mpivars.sh intel64
# source /usr/local/intel/2018u3/mkl/bin/mklvars.sh intel64
# source /usr/local/intel/2018u3/parallel_studio_xe_2018/bin/psxevars.sh intel64
export NWCHEM_TOP=/usr/local/software/nwchem-6.8/nwchem-6.8
export NWCHEM_MODULES=pnnl
export NWCHEM_TARGET=LINUX64
export NWCHEM_LONG_PATHS=y
export PYTHONHOME=/usr
export PYTHONVERSION=2.7
export PYTHONLIBTYPE=so
export USE_PYTHON64=y
export USE_NOFSCHECK=y
export TCGRSH=/usr/bin/ssh
export LARGE_FILES=y
export USE_MPI=y
export USE_MPIF=y
export USE_MPIF4=y
export MPI_LOC="/usr/local/intel/2018u3/impi/2018.3.222/intel64"
export MPI_INCLUDE="/usr/local/intel/2018u3/impi/2018.3.222/intel64/include/gfortran/5.1.0 -I/usr/local/intel/2018u3/impi/2018.3.222/intel64/include"
export MPI_LIB="/usr/local/intel/2018u3/impi/2018.3.222/intel64/lib/release_mt -L/usr/local/intel/2018u3/impi/2018.3.222/intel64/lib"
export LIBMPI="-lmpifort -lmpi -lmpigi -ldl -lrt -lpthread"
export USE_OPENMP=y
export MKLROOT=/usr/local/intel/2018u3/mkl
export MKLLIB="${MKLROOT}/lib/intel64"
export MKLINC="${MKLROOT}/include"
export HAS_BLAS=y
export BLAS_SIZE=8
export BLASOPT="-L${MKLROOT}/lib/intel64 -lmkl_intel_ilp64 -lmkl_intel_thread -lmkl_core -liomp5 -lpthread -lm -ldl"
export LAPACK_SIZE=8
export LAPACK_LIB="$BLASOPT"
export LAPACK_LIBS="$BLASOPT"
export LAPACKOPT="$BLASOPT"
export USE_SCALAPACK=y
export SCALAPACK_SIZE=8
export SCALAPACK="-L${MKLROOT}/lib/intel64 -lmkl_scalapack_ilp64 -lmkl_intel_ilp64 -lmkl_intel_thread -lmkl_core -lmkl_blacs_intelmpi_ilp64 -liomp5 -lpthread -lm -ldl"
export SCALAPACK_LIB="$SCALAPACK"
export SCALAPACK_LIBS="$SCALAPACK"
export CC=icc
export FC=ifort
export USE_64TO32=y
cd $NWCHEM_TOP/src
#make realclean
make nwchem_config
make 64_to_32
make CC=icc FC=ifort FOPTIMIZE=-O3
cd $NWCHEM_TOP/src/tools
make CC=icc FC=ifort FOPTIMIZE=-O3 version
make CC=icc FC=ifort FOPTIMIZE=-O3
cd $NWCHEM_TOP/src
make CC=icc FC=ifort FOPTIMIZE=-O3 link
General Site Installation
Determine the local storage path for the install files. (e.g., /usr/local/NWChem).
Make directories
Determine the local storage path for the install files. (e.g., /usr/local/NWChem).
Make directories
# mkdir /usr/local/nwchem-6.8
# mkdir /usr/local/nwchem-6.8/bin
# mkdir /usr/local/nwchem-6.8/data
Copy binary
# cp $NWCHEM_TOP/bin/ /usr/local/nwchem-6.8/bin
# cd /usr/local/nwchem-6.8/bin
# chmod 755 nwchem
Copy libraries
# cd $NWCHEM_TOP/src/basis
# cp -r libraries /usr/local/nwchem-6.8/data

# cd $NWCHEM_TOP/src/
# cp -r data /usr/local/nwchem-6.8

# cd $NWCHEM_TOP/src/nwpw
# cp -r libraryps /usr/local/nwchem-6.8/data
The Final Lap (From Compiling NWChem)
Each user will need a .nwchemrc file to point to these default data files. A global one could be put in /usr/local/nwchem-6.8/data and a symbolic link made in each users $HOME directory is probably the best plan for new installs. Users would have to issue the following command prior to using NWChem: ln -s /usr/local/nwchem-6.8/data/default.nwchemrc $HOME/.nwchemrc
Contents of the default.nwchemrc file based on the above information should be:
nwchem_basis_library /usr/local/nwchem-6.8/data/libraries/
nwchem_nwpw_library /usr/local/nwchem-6.8/data/libraryps/
ffield amber
amber_1 /usr/local/nwchem-6.8/data/amber_s/
amber_2 /usr/local/nwchem-6.8/data/amber_q/
amber_3 /usr/local/nwchem-6.8/data/amber_x/
amber_4 /usr/local/nwchem-6.8/data/amber_u/
spce    /usr/local/nwchem-6.8/data/solvents/spce.rst
charmm_s /usr/local/nwchem-6.8/data/charmm_s/
charmm_x /usr/local/nwchem-6.8/data/charmm_x/
References:
Step 1: Copy /etc/pbs.conf from any of the existing node to /etc of the new node
# scp -v /etc/pbs.conf root@remotenode:/etcStep 2: Install Pbs execution rpm on the new node
# rpm -Uvh /usr/local/software/admin/altair/PBSPro_14.2.5/pbspro-execution-14.2.5.20180221140231-0.el7.x86_64.rpmStep 3: Copy /var/spool/pbs/mom_priv/config from any existing node to /var/spool/pbs/mom_priv of new node
# scp -v /var/spool/pbs/mom_priv/config root@remotenode:/var/spool/pbs/mom_priv/Step 4. “service pbs restart “ on the new node
# service pbs restartStep 5. Create the node on PBS-Server
# qmgr -c “create node node-name"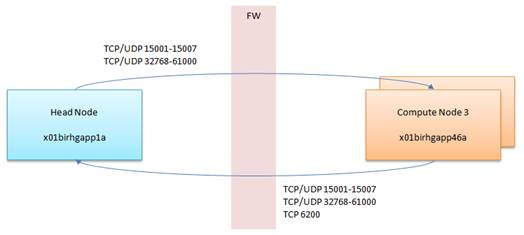
If you are implementing PBS-Pro Display Manager, you have to open ports TCp/UDP 5901-5920
Note: Do note that the default zone is “public”
Section 1: Checking Zones and Prerequisites
Option 1: Check State of Firewalld
# firewall-cmd --state
Running
Option 2: Check Default Zone
# firewall-cmd --get-default-zone
public
Option 3: Check Active Zones
# firewall-cmd --get-active-zones
public: etho eth1
Option 4: Get Zones
# firewall-cmd --get-zones
block dmz drop external home internal public trusted work
Section 2: Selecting Zones for your Interfaces
Option 1: Change Interfaces
# firewall-cmd --permanent --zone=trusted --change-interface=eth0
success
# firewall-cmd --reload
Option 2: Verify the Zone has been changed
firewall-cmd --get-active-zones
trusted
interfaces: eth0
public
interfaces: eth1
Section 3: Editing Firewall-CMD Rules
Option 1: Opening Ports (Single)
# firewall-cmd --permanent --zone=public --add-port=80/tcp
success
# firewall-cmd --reload
Option 2: Opening Ports (Range)
# firewall-cmd --permanent --zone=public --add-port=80-90/tcp
success
# firewall-cmd --reload
Option 3: List Ports
#  firewall-cmd --zone=public --list-all
public (active)
  target: default
  icmp-block-inversion: no
  interfaces: enp6s0f0 eno2 ib1
  sources:
  services: ssh dhcpv6-client
  ports: 22/tcp 5053/tcp 57889/tcp
  protocols:
  masquerade: no
  forward-ports:
  source-ports:
  icmp-blocks:
  rich rules:
Option 4: Remove Port
# firewall-cmd --permanent --zone=public --remove-port=80/tcp
success
# firewall-cmd --reload
Option 5: Adding Service
Checking Services
# firewall-cmd --get-services
Finally, add service – ssh
# firewall-cmd --permanent --zone=public --add-service=ssh
success
# firewall-cmd --reload
Source-Based Filtering with zones and IP Addresses
Add the Source IP Addresses to the Zone (Assume you are limiting IP Addresses on the trusted zone)
firewall-cmd --zone=trusted --add-source=192.168.1.0/24 --permanent
success
firewall-cmd --reloadMake sure the Ethernet is in the trusted zone. To move the ethernet into the trusted zone, see Section2 in the same blog
If you are outside the allowed IP Address, you should see something like (Assume your trusted target server is 192.168.1.1 and your external untrusted client is 192.168.2.0), you might see something like this
ssh user1@192.168.1.1
Password:
Internal errors
References:

Step 1: Check current kernel version
# uname -r
3.10.0-862.14.4.el7.x86_64
Step 2: Check installed kernel version
# yum info kernel
Loaded plugins: fastestmirror, langpacks
Loading mirror speeds from cached hostfile
* base: mirror.0x.sg
* elrepo: elrepo.mirror.angkasa.id
* epel: sg.fedora.ipserverone.com
* extras: mirror.0x.sg
* updates: mirror.0x.sg
Installed Packages
Name : kernel
Arch : x86_64
Version : 3.10.0
Release : 693.el7
Size : 59 M
Repo : installed
From repo : anaconda
Summary : The Linux kernel
URL : http://www.kernel.org/
License : GPLv2
Description : The kernel package contains the Linux kernel (vmlinuz), the core of any
: Linux operating system. The kernel handles the basic functions
: of the operating system: memory allocation, process allocation, device
: input and output, etc.

Name : kernel
Arch : x86_64
Version : 3.10.0
Release : 862.14.4.el7
Size : 62 M
Repo : installed
From repo : updates
Summary : The Linux kernel
URL : http://www.kernel.org/
License : GPLv2
Description : The kernel package contains the Linux kernel (vmlinuz), the core of any
: Linux operating system. The kernel handles the basic functions
: of the operating system: memory allocation, process allocation, device
: input and output, etc.
Step 3: Install Kernel-Devel and Kernel-Headers
# yum install kernel-devel kernel-headers -y
# yum info kernel-devel kernel-headers
Step 4: Check Kernel-Devel. Make sure the version is in-sync
# yum info kernel-devel
Loaded plugins: fastestmirror, langpacks
Loading mirror speeds from cached hostfile
* base: mirror.0x.sg
* elrepo: elrepo.mirror.angkasa.id
* epel: sg.fedora.ipserverone.com
* extras: mirror.0x.sg
* updates: mirror.0x.sg
Installed Packages
Name : kernel-devel
Arch : x86_64
Version : 3.10.0
Release : 862.14.4.el7
Size : 37 M
Repo : installed
From repo : updates
Summary : Development package for building kernel modules to match the kernel
URL : http://www.kernel.org/
License : GPLv2
Description : This package provides kernel headers and makefiles sufficient to build modules
: against the kernel package.
Step 5: Check Kernel-Headers. Make sure the version is in-sync
# yum info kernel-headers
Loaded plugins: fastestmirror, langpacks
Loading mirror speeds from cached hostfile
* base: mirror.0x.sg
* elrepo: elrepo.mirror.angkasa.id
* epel: sg.fedora.ipserverone.com
* extras: mirror.0x.sg
* updates: mirror.0x.sg
Installed Packages
Name : kernel-headers
Arch : x86_64
Version : 3.10.0
Release : 862.14.4.el7
Size : 3.6 M
Repo : installed
From repo : updates
Summary : Header files for the Linux kernel for use by glibc
URL : http://www.kernel.org/
License : GPLv2
Description : Kernel-headers includes the C header files that specify the interface
: between the Linux kernel and userspace libraries and programs. The
: header files define structures and constants that are needed for
: building most standard programs and are also needed for rebuilding the
: glibc package.
Prerequistics:
SERVER ABAQUS_LIC_SVR 000000000 27000
VENDOR ABAQUSLM port=27398
.....
.....
.....
Step 1: Shutting down the License Server
# cd /usr/SIMULIA/License/2017/linux_a64/code/bin/
# lmdown
# lmstat -a
Step 2: Starting the License Server
# lmgrd -c ABAQUS_LIC_SVR.LIC -l 081018.log
