You do not need to burn an ISO file into a CD before you can use it for its intended purposes. A simple command like this can allow you to see and execute the content in the ISO file
# mount -o loop -t iso9660 myISO.iso /media/mount_point

You do not need to burn an ISO file into a CD before you can use it for its intended purposes. A simple command like this can allow you to see and execute the content in the ISO file
# mount -o loop -t iso9660 myISO.iso /media/mount_point
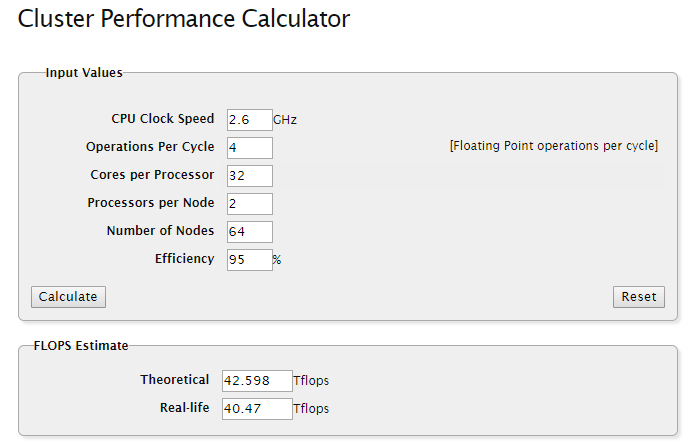
If you need to calculate the Cluster Performance, you may go to http://cads.iiap.res.in/tools/flopsCalc
Taken from RHEL Performance Tuning Student Booklet
The vmstat command, if given no arguments, will print out the averages of various system statistics since boot. The vmstat command accepts two arguments. The first is the delay, and the second is the count. The delay is a value in seconds between output. The count is the number of iterations of statistics to report.
[root@lime ~]# vmstat 4 5
procs -----------memory---------- ---swap-- -----io---- --system-- -----cpu-----
r  b   swpd   free   buff  cache   si   so    bi    bo   in   cs us sy id wa st
0  0   2832 145216 194528 6772048    0    0     0     1    0    1  0  0 100  0  0
0  0   2832 145200 194528 6772048    0    0     0     1   44   45  0  0 100  0  0
0  0   2832 145208 194528 6772048    0    0     0     8   46   45  0  0 100  0  0
1  0   2832 145208 194528 6772048    0    0     0     0   44   46  0  0 100  0  0
0  0   2832 145208 194528 6772048    0    0     0     3   46   55  0  0 100  0  0
| Category | Statistics | Definition |
| Process related | r | The number of processes waiting for runtime |
| Process related | b | The number of processes in uninterruptible sleep |
| memory | swpd | The amount of memory currently used in swap spaces |
| memory | free | The amount of idle (immediately available) memory |
| memory | buff | The amount of memory used as buffers |
| memory | cache | The amount of memory used as cache |
| swap: paging statistics | si | Pages of memory swapped in per second |
| swap: paging statistics | so | Pages of memory swapped out per second |
| io: block I/O statistics | bi | Blocks per second received from block devices |
| io: block I/O statistics | bo | Blocks per second sent to block devices |
| system | in | Interrupts raised per second |
| system | cs | Context switches per second |
| cpu: how CPU time is used | us | Percentage of time spent running user-space code |
| cpu: how CPU time is used | sy | Percentage of time spent running kernel code |
| cpu: how CPU time is used | id | Percentage of time spent idle |
| cpu: how CPU time is used | wa | Percentage of time spent blocked while waiting for I/O to complete |
| cpu: how CPU time is used | st | Percentage of time where the CPU had a process ready to run, but CPU time was stolen by the hypervisor supporting this virtual machine (typically because the CPU is being used by another guest virtual machine) |
I came across this sniffy forgotten tools to help determine the CPU information. I guess we are all familiar with top. But if you type “1” after top, you are able to see details in the individual
A. Using top
# top

top - 10:11:35 up 95 days, 20:02,  2 users,  load average: 0.51, 0.39, 0.20
Tasks: 326 total,   1 running, 325 sleeping,   0 stopped,   0 zombie
Cpu(s):  0.0%us,  0.1%sy,  0.0%ni, 99.9%id,  0.0%wa,  0.0%hi,  0.0%si,  0.0%st
Mem:  65951272k total, 65647784k used,   303488k free,   221504k buffers
Swap: 33046520k total,        0k used, 33046520k free, 63608900k cached

PID USER      PR  NI  VIRT  RES  SHR S %CPU %MEM    TIME+  COMMAND
13469 root      20   0 15172 1436  956 R  2.6  0.0   0:00.72 top
1 root      20   0 19352 1520 1208 S  0.0  0.0   0:01.58 init
2 root      20   0     0    0    0 S  0.0  0.0   0:00.01 kthreadd
..............
..............
1

top - 10:11:58 up 95 days, 20:03,  2 users,  load average: 0.46, 0.38, 0.21
Tasks: 310 total,   1 running, 309 sleeping,   0 stopped,   0 zombie
Cpu0  :  0.0%us,  0.3%sy,  0.0%ni, 99.3%id,  0.3%wa,  0.0%hi,  0.0%si,  0.0%st
Cpu1  :  0.0%us,  0.0%sy,  0.0%ni,100.0%id,  0.0%wa,  0.0%hi,  0.0%si,  0.0%st
Cpu2  :  0.3%us,  0.0%sy,  0.0%ni, 99.7%id,  0.0%wa,  0.0%hi,  0.0%si,  0.0%st
Cpu3  :  0.0%us,  0.0%sy,  0.0%ni,100.0%id,  0.0%wa,  0.0%hi,  0.0%si,  0.0%st
Cpu4  :  0.0%us,  0.0%sy,  0.0%ni,100.0%id,  0.0%wa,  0.0%hi,  0.0%si,  0.0%st
Cpu5  :  0.0%us,  0.0%sy,  0.0%ni,100.0%id,  0.0%wa,  0.0%hi,  0.0%si,  0.0%st
Cpu6  :  0.0%us,  0.0%sy,  0.0%ni,100.0%id,  0.0%wa,  0.0%hi,  0.0%si,  0.0%st
Cpu7  :  0.0%us,  0.0%sy,  0.0%ni,100.0%id,  0.0%wa,  0.0%hi,  0.0%si,  0.0%st
Cpu8  :  0.0%us,  0.0%sy,  0.0%ni,100.0%id,  0.0%wa,  0.0%hi,  0.0%si,  0.0%st
Cpu9  :  0.0%us,  0.0%sy,  0.0%ni,100.0%id,  0.0%wa,  0.0%hi,  0.0%si,  0.0%st
Cpu10 :  0.0%us,  0.0%sy,  0.0%ni,100.0%id,  0.0%wa,  0.0%hi,  0.0%si,  0.0%st
Cpu11 :  0.0%us,  0.0%sy,  0.0%ni,100.0%id,  0.0%wa,  0.0%hi,  0.0%si,  0.0%st
.........
B. Using lspcu to take a look at summary
# lscpu

Architecture:          x86_64
CPU op-mode(s):        32-bit, 64-bit
Byte Order:            Little Endian
CPU(s):                12
On-line CPU(s) list:   0-11
Thread(s) per core:    1
Core(s) per socket:    6
CPU socket(s):         2
NUMA node(s):          2
Vendor ID:             GenuineIntel
CPU family:            6
Model:                 45
Stepping:              7
CPU MHz:               2501.000
BogoMIPS:              4999.27
Virtualization:        VT-x
L1d cache:             32K
L1i cache:             32K
L2 cache:              256K
L3 cache:              15360K
NUMA node0 CPU(s):     0-5
NUMA node1 CPU(s):     6-11
Tuned is a Dynamic Adaptive Tuning System Daemon. According to Manual Page
tuned is a dynamic adaptive system tuning daemon that tunes system settings dynamically depending on usage. For each hardware subsystem a specific monitoring plugin collects data periodically. This information is then used by tuning plugins to change system settings to lower or higher power saving modes in order to adapt to the current usage. Currently monitoring and tuning plugins for CPU, ethernet network and ATA harddisk devices are implemented.
Using Tuned
1. Installing tuned
# yum install tuned
2. To view a list of available tuning profiles
 [root@myCentOS ~]# tuned-adm list
Available profiles:
- laptop-ac-powersave
- server-powersave
- laptop-battery-powersave
- desktop-powersave
- virtual-host
- virtual-guest
- enterprise-storage
- throughput-performance
- latency-performance
- spindown-disk
- default
3. Tuning to a specific profile
# tuned-adm profile latency-performance
Switching to profile 'latency-performance'
Applying deadline elevator: dm-0 dm-1 dm-2 sda             [  OK  ]
Applying ktune sysctl settings:
/etc/ktune.d/tunedadm.conf:                                [  OK  ]
Calling '/etc/ktune.d/tunedadm.sh start':                  [  OK  ]
Applying sysctl settings from /etc/sysctl.conf
Starting tuned:                                            [  OK  ]
4. Checking current tuned profile used and its status
# tuned-adm active
Current active profile: latency-performance
Service tuned: enabled, running
Service ktune: enabled, running
5. Turning off the tuned daemon
# tuned-adm off
References:
If you encounter this error while trying to login or su –login
# su --login user1
"cannot set user id: Resource temporarily unavailable" while trying to login or su as a local user in CentOS.
To resolve the issue, extend the nproc value in /etc/security/limits.conf for the user.
.....
.....
user1       soft    nproc   10240
# End of file
Alternatively, you can edit /etc/security/limits.d/90-nproc.conf which is
# Default limit for number of user's processes to prevent
# accidental fork bombs.
# See rhbz #432903 for reasoning.

*          soft    nproc     1024
user1       soft    nproc    10240
In CentOS 6, this error occurs even if it has not set the limit explicitly because default configuration to all users is set to /etc/security/limits.d/90-nproc.conf. the reason for this error is that the the user’s the number of executing threads has reached the nproc resource limit.
1. What is pdsh?
Pdsh is a high-performance, parallel remote shell utility. It uses a sliding window of threads to execute remote commands, conserving socket resources while allowing some connections to timeout if needed. It was originally written as a replacement for IBM’s DSH on clusters at LLNL. More information can be found at PDSH Web site
2. Setup EPEL yum repository on CentOS 6.
For more information, see Repository of CentOS 6 and Scientific Linux 6
3. Do a yum install
# yum install pdsh
To confirm installation
# which pdsh
4. Configure user environment for PDSH
# vim /etc/profile.d/pdsh.sh
Edit the following:
# setup pdsh for cluster users
export PDSH_RCMD_TYPE='ssh'
export WCOLL='/etc/pdsh/machines'
5. Put the host name of the Compute Nodes
# vim /etc/pdsh/machines/
node1
node2
node3
.......
.......
6. Make sure the nodes have their SSH-Key Exchange. For more information, see Auto SSH Login without Password
7. Do Install Step 1 to Step 3 on ALL the client nodes.
B. USING PDSH
Run the command ( pdsh [options]… command )
1. To target all the nodes found at /etc/pdsh/machinefile. Assuming the files are transferred already. Do note that the parallel copy comes with the pdsh utilities
# pdsh -a "rpm -Uvh /root/htop-1.0.2-1.el6.rf.x86_64.rpm"
2. To target specific nodes, you may want to consider using the -x command
# pdsh -x host1,host2 "rpm -Uvh /root/htop-1.0.2-1.el6.rf.x86_64.rpm"
References
This tutorial is very similar to Installing and Configuring Environment Modules on CentOS 5 and the steps are very similar for CentOS 6 except that the tcl/tk 8.5.x used in CentOS repository does not have tclConfig.sh which is needed when you compile the Modules packages. I used 8.4.x which is similar to the version used in the CentOS 5 repository. You can use more more updated version of tcl
Step 1: Download the modules packages
Download the latest modules packages from Modules Sourceforge Project Site.
Step 2. Download the tcl/tk package from tcl/tk download site
# tar -zxvf tcl8.4.19-src.tar.gz
# cd tcl8.4.19/unix
Step 2a. Compile the tcl package
# ./configure --prefix=/usr/local/tcl --enable-threads
# make && make install
Step 2b. Compile the tk package
# tar -zxvf tk8.4.19-src.tar.gz
# cd tk8.4.19
# ./configure --prefix=/usr/local/tk --with-tcl=/usr/local/tcl/lib
# make && make install
Make sure you put the tcl library in the /etc/ld.so.conf.d
# vim /etc/ld.so.conf.d/tclx-x86_64.conf
/usr/local/tcl/lib
/usr/local/tk/lib
Do a ldconfig to update dynamic linker run-time bindings
# /sbin/ldconfig
Step 3: Unpacked, Configure and Install
# tar -zxvf modules-3.2.9c.tar.gz
Go to the Modules folder ($ModuleHome)
# cd modules-3.2.9
I wanted to keep all my individual modules files at /usr/local/Modules/contents. You can keep module files anywhere you wish to keep.
# ./configure --with-module-path=/usr/local/Modules/contents
Make and install the configuration
# make && make install
Step 4: Amend .modulefiles
Edit . modules to let Modules know where all the customized module files will be kept
# vim /usr/local/Modules/3.2.9/init/.modulespath
Comment out all the lines except the directory where all the customised modules files will be kept.
.....
.....
/usr/local/Modules/contents                             # General module files
.....
.....
Step 5: Update /etc/profile.d of the Servers
Copy the profile.modules from the $ModuleHome Directory
# cp /$ModuleHome/modules-3.2.9/etc/global/profile.modules /etc/profile.d/modules.sh
The content of modules.sh are as followed
#----------------------------------------------------------------------#
# system-wide profile.modules                                          #
# Initialize modules for all sh-derivative shells                      #
#----------------------------------------------------------------------#
trap "" 1 2 3

case "$0" in
-bash|bash|*/bash) . /usr/local/Modules/default/init/bash ;;
-ksh|ksh|*/ksh) . /usr/local/Modules/default/init/ksh ;;
-zsh|zsh|*/zsh) . /usr/local/Modules/default/init/zsh ;;
*) . /usr/local/Modules/default/init/sh ;; # sh and default for scripts
esac

trap 1 2 3
Create a softlink at /usr/local/Modules
# cd /usr/local/Modules
# ln -s 3.2.9 default
Sample Installation of an application using Modules (Intel Compilers)
Step 1: Create a Module File.
Place the Module File for Intel in /usr/local/Modules/contents
a. Create an Intel Folder inside /usr/local/Modules/contents
# mkdir /usr/local/Modules/contents/intel
b. Create a module file for the version of Intel (In my case, “12.0.2″). To save some time, you can copy a “sample” file and you can edit
# cp $ModuleHome/modules-3.2.9/modulefiles/modulefile /usr/local/Modules/contents/intel/12.0.2
# vim /usr/local/Modules/contents/intel/12.0.2
#%Module1.0
proc ModulesHelp { } {
global version prefix

puts stderr "\tIntel XE 12.0.2 (icc, icpc, ifort)"
}

module-whatis   "Intel XE 12.0.2 (icc, icpc, ifort)"

prepend-path    PATH            /opt/intel/composerxe/bin
prepend-path    LIBRARY_PATH    /opt/intel/composerxe/lib/intel64
prepend-path    LD_LIBRARY_PATH /opt/intel/composerxe/lib/intel64:/opt/intel/mkl/10.2.6.038/lib/em64t
prepend-path    MANPATH         /opt/intel/composerxe/man
prepend-path    MKL_HOME        /opt/intel/mkl/10.2.6.038

setenv CC       icc
setenv CXX      icpc
setenv FC       ifort
setenv F77      ifort
setenv F90      ifort
Step 2: Setting the Default versions of Intel.
If you have different version of software you wish to present to the users, do the following
# vim /usr/local/Modules/contents/intel/.version
#%Module1.0
set ModuleVersion "12.0.2"
More Information
This is the 2nd part of “Installing and Configuring Environment Modules on CentOS 5”
1. List the Modules on System
# module avail
--------------------------- /usr/local/Modules/contents ----------------------------
R/R-2.15.1            intel/12.0.2(default) matlab/R2011b
2. Load the Modules on System
# module load intel/12.0.2
Checking the version
# icc -v
Version 12.0.2
3. Unload the Modules on System
# module unload intel/12.0.2
What is User Environment Modules?
Taken from Environment Modules Project
The Environment Modules package provides for the dynamic modification of a user’s environment via modulefiles.
Each modulefile contains the information needed to configure the shell for an application. Once the Modules package is initialized, the environment can be modified on a per-module basis using the module command which interprets modulefiles. Typically modulefiles instruct the module command to alter or set shell environment variables such as PATH, MANPATH, etc. modulefiles may be shared by many users on a system and users may have their own collection to supplement or replace the shared modulefiles.
Step 1: Download the modules packages
Download the latest modules packages from Modules Sourceforge Project Site.
Step 2: Download the dependencies tcl and tcl-devel
# yum install tcl tcl-devel
Step 3: Unpacked, Configure and Install
# tar -zxvf modules-3.2.9c.tar.gz
Go to the Modules folder ($ModuleHome)
# cd modules-3.2.9
I wanted to keep all my individual modules files at /usr/local/Modules/contents. You can keep module files anywhere you wish to keep.
# ./configure --with-module-path=/usr/local/Modules/contents
Make and install the configuration
# make && make install
Step 4: Amend .modulefiles
Edit . modules to let Modules know where all the customized module files will be kept
# vim /usr/local/Modules/3.2.9/init/.modulespath
Comment out all the lines except the directory where all the customised modules files will be kept.
.....
.....
/usr/local/Modules/contents                             # General module files
.....
.....
Step 5: Update /etc/profile.d of the Servers
Copy the profile.modules from the $ModuleHome Directory
# cp /$ModuleHome/modules-3.2.9/etc/global/profile.modules /etc/profile.d/modules.sh
The content of modules.sh are as followed
#----------------------------------------------------------------------#
# system-wide profile.modules                                          #
# Initialize modules for all sh-derivative shells                      #
#----------------------------------------------------------------------#
trap "" 1 2 3

case "$0" in
-bash|bash|*/bash) . /usr/local/Modules/default/init/bash ;;
-ksh|ksh|*/ksh) . /usr/local/Modules/default/init/ksh ;;
-zsh|zsh|*/zsh) . /usr/local/Modules/default/init/zsh ;;
*) . /usr/local/Modules/default/init/sh ;; # sh and default for scripts
esac

trap 1 2 3
Sample Installation of an application using Modules (Intel Compilers)
Step 1: Create a Module File.
Place the Module File for Intel in /usr/local/Modules/contents
a. Create an Intel Folder inside /usr/local/Modules/contents
# mkdir /usr/local/Modules/intel
b. Create a module file for the version of Intel (In my case, “12.0.2”). To save some time, you can copy a “sample” file and you can edit
# cp $ModuleHome/modules-3.2.9/modulefiles/modulefile /usr/local/Modules/contents/intel/12.0.2
# vim /usr/local/Modules/contents/intel/12.0.2
#%Module1.0
proc ModulesHelp { } {
global version prefix

puts stderr "\tIntel XE 12.0.2 (icc, icpc, ifort)"
}

module-whatis   "Intel XE 12.0.2 (icc, icpc, ifort)"

prepend-path    PATH            /opt/intel/composerxe/bin
prepend-path    LIBRARY_PATH    /opt/intel/composerxe/lib/intel64
prepend-path    LD_LIBRARY_PATH /opt/intel/composerxe/lib/intel64:/opt/intel/mkl/10.2.6.038/lib/em64t
prepend-path    MANPATH         /opt/intel/composerxe/man
prepend-path    MKL_HOME        /opt/intel/mkl/10.2.6.038

setenv CC       icc
setenv CXX      icpc
setenv FC       ifort
setenv F77      ifort
setenv F90      ifort
Step 2: Setting the Default versions of Intel.
If you have different version of software you wish to present to the users, do the following
# vim /usr/local/Modules/contents/intel/.version
#%Module1.0
set ModuleVersion "12.0.2"
More Information
